🧢 Beautiful ✨ Detailed πŸ’ Adorable

Look Whos Arrived Heart Pattern

Look Whos Arrived Heart Pattern
4.5β˜… Rating
5-7 Hours Time Needed
3.5K Made This
βœ‚οΈ

Intermediate Level

Ideal for those with basic crochet experience, featuring slightly more advanced stitches and techniques to expand your skills.

⏱️

Weekend Treat

Takes 5-7 hours, making it an enjoyable project to finish over a couple of days.

πŸ€—

Soft Hug

Gentle, plush, and full of warmth, creating a sense of comfort and coziness wherever they find a home.

About This Look Whos Arrived Heart Pattern

This pattern creates a textured baby blanket with a playful "Look who’s arrived" message worked with puff stitches and a clear chart. The background is worked in single crochet rows while puff stitches create raised letters and hearts that pop on the right side. The finished piece is edged with a delicate shell border for a polished finish. It uses light-worsted DK yarn worked on a 4mm hook for a soft drape.

Look Whos Arrived Heart Pattern crochet pattern - detailed view of completed project

Includes a full written row-by-row pattern plus a chart you can follow from the bottom up. Suitable for intermediate crocheters comfortable with puff stitches and reading simple charts.

Why You'll Love This Look Whos Arrived Heart Pattern

I absolutely love this pattern because it combines simple single crochet rows with playful puff stitch texture to create a blanket that feels both modern and handmade. I enjoy how the puff stitches form letters and hearts that really stand out, giving a professional, tactile finish. As the designer, I love that it works up quickly but still has personalityβ€”perfect for baby gifts. The included chart makes placement easy, and I find the shell border gives the blanket a lovely frame that finishes it beautifully.

Look Whos Arrived Heart Pattern step 1 - construction progress Look Whos Arrived Heart Pattern step 2 - assembly progress Look Whos Arrived Heart Pattern step 3 - details and accessories Look Whos Arrived Heart Pattern step 4 - final assembly and finishing

Switch Things Up

I love customizing this blanket by changing the colour palette; try soft pastels for a delicate baby version or bold jewel tones for a modern nursery piece.

I sometimes convert the design into a larger throw by increasing the starting chain in multiples of the chart width and repeating chart sections vertically for a bigger layout.

If youd like a miniature version for a toy or keyring, use finer yarn and a smaller hook to scale the pattern down while keeping the puff stitch texture.

I often switch the puff stitch to bobble or cluster stitches for a different texture effect that still reads well on the background single crochet rows.

Try swapping the shell border for a picot or crab stitch edge to give a different finishing look; the sc foundation row helps any border sit neatly.

I add embroidered initials or a small motif to personalize the blanket for the recipient, placing it in a corner or inside the message area if there is space on your chart.

To make it gender-neutral, choose earthy tones and muted shades like sage, mustard, or denim which work beautifully with the puff texture.

I sometimes add a thin cotton lining on the back for a slightly heavier blanket that holds shape well if the blanket will be used outdoors or as a keepsake.

If you want the puff stitches to be subtler, work them with the same colour but slightly tighter loop sizes so they sit lower and create a gentler texture.

Experiment with alternating two colours in the puff stitches to create a contrast outline effect on the letters and hearts, which makes the design pop even more.

Common Mistakes & How to Fix Them

βœ— Skipping the back bump edge on the starting chain will give a messy border; work the first row into the back bump of the chain to create a neat edge for the border. βœ— Not counting stitches after rows with many puff stitch groupings can cause misalignment; count to 75 stitches at the end of each row to ensure correct placement. βœ— Making puff stitch loops too tight makes them hard to pull through; pull up slightly larger, looser loops so you can yarn over and complete the puff stitch cleanly. βœ— Forgetting to start the first sc into the chain the ch1 came from will change your stitch count; always start the first sc of each row into that first chain to maintain alignment.

Look Whos Arrived Heart Pattern

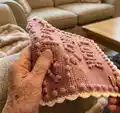
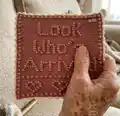
Make a charming, modern baby blanket featuring puff stitch hearts and a cheeky "Look who's arrived" message. This pattern uses a simple single crochet background with puff stitch pop-outs and a chart to guide the design. Ideal for gifting at baby showers or as a keepsake, the blanket is edged with a pretty shell border. Youll adore the textured details and clear charted instructions.

Intermediate 5-7 Hours

Materials Needed for Look Whos Arrived Heart Pattern

β€” Main Fabric

  • 01
    Stylecraft 100% premium acrylic DK (light worsted) - Pale Rose 1080 - approximately 1 & 1/2 x 100g balls for main colour
  • 02
    Stylecraft 100% premium acrylic DK (light worsted) - Cream 1005 - 100g ball for edging and shell border

β€” Tools Required

  • 01
    Crochet hook size 4mm (recommended for the blanket shown)
  • 02
    Crochet hook size 5mm (optional for light worsted yarn if you prefer a looser tension)
  • 03
    Crochet hook size 5.5mm (optional for worsted/aran weight yarn)
  • 04
    Yarn needle for sewing in ends
  • 05
    Scissors

Progress Tracker

0% Complete

β€” Blanket :

Info :

Chain - 76 sts.

Row 1 :

Sc into 2nd loop from the hook. ( the back bump of the Ch to create a nice edge to add your border to). Ch1 and turn.

Info :

All even rows throughout this pattern are Sc into all sts.

Row 3 :

Sc 1 st, ( ps, sc 3 sts ) x 18 times, ps, sc 1 st, ch 1, turn.

Row 5 :

Sc all sts, ch1, turn.

Row 7 :

Sc 1 st, ps, sc 12 sts, ( ps, sc 22 sts ) repeat once more, ps, sc 12 sts, ps, sc 1 st, ch1, turn.

Row 9 :

Sc 12 sts, ps, sc 3 sts, ps, sc 18 sts, ps, sc 3 sts, ps, sc 18 sts, ps, sc 3 sts, ps, sc 12 sts, ch1, turn.

Row 11 :

Sc 1 st, ps, sc 8 sts, ( ps, sc 7 sts, ps, sc 14 sts ) repeat once more, ps, sc 7 sts, ps, sc 8 sts, ps, sc 1 st, ch1, turn.

Row 13 :

Sc 8 sts, ps, sc 11 sts, ( ps, sc 10 sts, ps, sc 11 sts ) repeat once more, ps, sc 8 sts, ch1, turn.

Row 15 :

Sc 1 st, ps, sc 6 sts, *(( ps, sc 5 sts ) x 2, ps, sc 10 sts )) repeat once more, ( ps, sc 5 sts )* x 2, ps, sc 6 sts, ps, sc1 st, ch1, turn.

Info :

* (( ))*means repeat this whole section again.

Row 17 :

Sc 10 sts, ( ps, sc 1 st, ps, sc 3 sts, ps, sc 1 st, ps, sc 14 sts ) repeat once more, ps, sc 1 st, ps, sc 3 sts, ps, sc 1 st, ps, sc 10 sts, ch1, turn.

Row 19 :

Sc 1 st, ps, sc 71 sts, ps, sc 1 st, ch1, turn.

Row 21 :

Sc into all sts, ch1, turn.

Row 23 :

Sc 1 st, ( ps, sc 3 sts ) x 18 times, ps, sc 1 st, ch 1, turn.

Row 25 :

Sc into all sts, ch1, turn.

Row 27 :

Sc 1 st, ps, sc 71 sts, ps, sc 1 st, ch1, turn.

Row 29 :

Sc into all sts, ch1, turn.

Row 31 :

Sc 1 st, ps, sc 3 sts, ps ,sc 11 sts, ps, sc 3 sts, ( ps, sc 7 sts ) x 3, ps, sc 8 sts, ( ps, sc 1st ) x 2, ps, sc 5 sts, ( ps, sc 1st ) x 2, ps, sc 4 sts, ps, sc 1, ch1, turn.

Row 33 :

Sc 6 sts, ps, sc 9 sts, ps, sc 4 sts, ( ps, sc 7 sts ) x 2, ps, sc 6 sts, ps, sc 1 st, ps, sc 6 sts, ch1, turn.

Row 35 :

Sc 1 st, ps, sc 5 sts, ( ps, sc 1 st ) x 4, ps, sc 5 sts, ( ps, sc 7 sts ) x 2, ps, sc 5 sts, ps, sc 3 sts, ps, sc 5 sts, ( ps, sc 1 st ) x 3, ps, sc 3 sts, ( ps, sc 4 sts ) x 2, ps, sc 1 st, ch1, turn.

Row 37 :

Sc 8 sts, ps, sc 5 sts, ps, sc 6 sts, ( ps, sc 7 sts ) x 2, ps, sc 4 sts, ps, sc 5 sts, ps, sc 4 sts, ps, sc 5 sts, ps,sc 3 sts, ps, sc 4 sts, ps, sc 6 sts, ch1, turn.

Row 39 :

Sc 1 st, ps, sc 7 sts, ps, sc 3 sts, ps, sc 7 sts, ( ps, sc 1 st ) x 2, ps, sc 3 sts, ( ps, sc 1 st ) x 2, ps, sc 3 sts, ps, sc 3 sts, ps, sc 7 sts, ps, sc 4 sts, ( ps, sc 1 st ) x 2, ps, sc 5 sts, ( ps, sc 1 st ) x 2, ps, sc 4 sts, ps, sc 1, ch1, turn.

Row 41 :

Sc 10 sts, ps, sc 1 st, ps, sc 55 sts, ps, sc 6 sts, ch1, turn.

Row 43 :

Sc 1 st, ps, sc 9 sts, ps, sc 25 sts, ps, sc 30 sts, ps, sc 4 sts, ps, sc 1 st, ch1, turn.

Row 45 :

Sc into all sts, ch1, turn.

Row 47 :

Sc 1 st, ps, sc 71 sts, ps, sc 1 st, ch1, turn.

Row 49 :

Sc into all sts, ch1, turn.

Row 51 :

Sc 1 st, ps, sc 15 sts, ps, sc 3 sts, ps, sc 5 sts, ( ps, sc 4 sts ) x 2, ( ps, sc 1 st ) x 2, ps, sc 11 sts, ( ps, sc 1 st ) x 2, ps, sc 15 sts, ps, sc 1 st, ch1, turn.

Row 53 :

Sc 15 sts, ( ps, sc 3 sts ) x 3, ps, sc 4 sts, ps, sc 3 sts, ps, sc 5 sts, ps, sc 16 sts, ps, sc 15 sts, ch1, turn.

Row 55 :

Sc 1 st, ps, sc 13 sts, ( ps, sc 3 sts ) x 3, ps, sc 4 sts, ps, sc 3 sts, ps, sc 5 sts, ps, sc 10 sts, ( ps, sc 1 st ) x 2, ps, sc 15 sts, ps, sc 1 st, ch1, turn.

Row 57 :

Sc 15 sts, ps, sc 7 sts, ps, sc 3 sts, ps, sc 4 sts, ps, sc 3 sts, ps, sc 5 sts, ps, sc 8 sts, ps, sc 23 sts, ch1, turn.

Row 59 :

Sc 1 st, ps, sc 13 sts, ps, sc 7 sts, ps, sc 3 sts, ( ps, sc 1 st ) x 2, ps, sc 5 sts, ( ps, sc 1 st ) x 2, ps, sc 11 sts, ( ps, sc 1 st ) x 2, ps, sc 15 sts, ps, sc 1 st, ch1, turn.

Row 61 :

Sc 15 sts, ps, sc 7 sts, ps, sc 3 sts, ps, sc 18 sts, ps, sc 28 sts, ch1, turn.

Row 63 :

Sc 1 st, ps, sc 13 sts, ps, sc 7 sts, ps, sc 3 sts, ps, sc 19 sts, ps, sc 25 sts, ps, sc 1 st, ch1, turn.

Row 65 :

Sc 48 sts, ps, sc 26 sts, ch1, turn.

Row 67 :

Sc 1 st, ps, sc 71 sts, ps, sc 1 st, ch1, turn.

Row 69 :

Sc into all sts, ch1, turn.

Row 71 :

Sc 1 st, ps, sc 18 sts, ( ps, sc 1 st ) x 3, ps, sc 4 sts, ( ps, sc 1 st ) x 2, ps, sc 5 sts, ( ps, sc 1 st ) x 2, ( ps, sc 4 sts ) x 2, ps, sc 17 sts, ps, sc 1 st, ch1, turn.

Row 73 :

Sc 19 sts, ps, sc 10 sts, ps, sc 5 sts, ps, sc 3 sts, ps, sc 5 sts, ( ps, sc 3 sts ) x 2, ps, sc 20 sts, ch1, turn.

Row 75 :

Sc 1 st, ps, sc 17 sts, ps, sc 10 sts, ps, sc 5 sts, ps, sc 3 sts, ps, sc 5 sts, ps, sc 3 sts, ps, sc 1 st, ps, sc 22 sts, ch1, turn.

Row 77 :

Sc 19 sts, ps, sc 10 sts, ps, sc 5 sts, ps, sc 3 sts, ps, sc 5 sts, ps, sc 3 sts, ps, sc 1 st, ps, sc 22 sts, ch1, turn.

Row 79 :

Sc 1 st, ps, sc 17 sts, ps, sc 11 sts, ( ps, sc 1 st ) x 2, ps, sc 5 sts, ( ps, sc 1 st ) x 2, ps, sc 4 sts, ps, sc 2 sts, ps, sc 19 sts, ps, sc 1 st, ch1, turn.

Row 81 :

Sc 19 sts, ps, sc 30 sts, ps, sc 3 sts, ps, sc 20 sts, ch1, turn.

Row 83 :

Sc 1 st, ps, sc 17 sts, ps, sc 30 sts, ps, sc 4 sts, ps, sc 17 sts, ps, sc 1 st, ch1, turn.

Row 85 :

Sc into all sts, ch1, turn.

Row 87 :

Sc 1 st, ps, sc 71 sts, ps, sc 1 st, ch1, turn.

Row 89 :

Sc into all sts, ch1, turn.

Row 91 :

Sc 1 st, ( ps, sc 3 sts ) x 18 times, ps, sc 1 st, ch 1, turn.

Row 93 :

Sc into all st and tie off, sew in both ends.

Info :

Every row ends with 75 stitches with a Ch 1 and turn. Always start the first Sc of each row into the first ch that the ch1 came from. Gauge is not important for this pattern.

Info :

If youre reading the pattern from the chart, it is worked from the bottom of the chart upwards, and left to right. Add a stitch at the end of the chain row and start the 1st row from the 2nd chain from the hook, ch 1 at the end of each row.

Info :

Puff stitches are created on the wrong side of the blanket and will pop out into the front of the blanket. If your puff stitch is not popping forward try a tighter than normal sc into the next stitch ( this sc will be part of the pattern, not an extra stitch added ).

Border :

To prepare for the border I like to do a row of sc along the front left and right edge in the same shade as the main blanket colour, to give a nice edge for the border. For this blanket I did a shell edge border in cream to give it a nice finish, but any border of your choice would look fantastic.

Assembly Instructions

  • Tie off at the end of Row 93 and sew in both ends securely using a yarn needle.
  • Prepare for the border by working a row of single crochet along the front left and right edges in the main colour to create a neat foundation for the shell edge.
  • Work the shell edge border in cream (or chosen contrast colour) evenly around the blanket, spacing shells to sit nicely across the straight edges and into corners.
  • Block or lightly steam the finished blanket to even out stitches and help the puff stitches sit forward for the best appearance.
  • Weave in all ends on the wrong side and trim any excess yarn after securing to finish neatly.

Important Notes

  • πŸ’‘Pattern is written in US terminology; check the abbreviations list before starting to avoid confusion.
  • πŸ’‘Beginning chain is not included in the total stitch count; add a stitch at the end of the chain row so the first row starts correctly.
  • πŸ’‘Puff stitches are made on the wrong side and will pop through to the right side; adjust loop height if youre finding them hard to work.

This delightful heart blanket celebrates new arrivals with charming puff stitch lettering and heart motifs. It works up in a soft DK yarn and is finished with a pretty shell border for a professional look. A perfect baby shower gift that will be treasured by both baby and parents. πŸ§ΆπŸ‘Ά

You ask,

we answer.

FAQs

What size will the finished piece be?

The finished blanket measures approximately 21 x 20 inches when worked with the recommended yarn and a 4mm hook.

Can I use a different yarn weight for this pattern?

Yes, you can use different yarn weights but the final size will change; for worsted/aran yarn try a 5mm-5.5mm hook and adjust expectations for finished dimensions.

Do I need to know how to make a puff stitch?

Yes, this pattern uses puff stitches for the letters and hearts; a step-by-step puff stitch method is included in the pattern to guide you.

How long does this project typically take to complete?

Most crocheters complete this blanket in about 5-7 hours, but time will vary depending on experience and working speed.