About This Little Spark Amigurumi Pattern
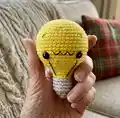
This pattern creates a small, adorable light bulb amigurumi called Little Spark, worked in continuous rounds using cotton yarn. It features a bright yellow bulb, a grey screw-fitting base, and simple embroidered facial details to give it personality. The design is compact and perfect for practicing amigurumi basics while producing a delightful finished toy.
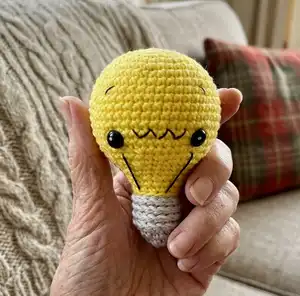
Designed for beginners, it uses basic single crochet increases and decreases with notes on finishing and embroidery. The finished toy measures approximately 8 cm tall using the recommended yarn and hook.
Why You'll Love This Little Spark Amigurumi Pattern
I absolutely love this pattern because it takes a simple shape and gives it tons of character with minimal stitches. The little zig-zag mouth and embroidered details make each bulb feel like a tiny personality. It is quick to make, making it satisfying to finish in one sitting and perfect for gifting. I also enjoy how versatile it is — change colors to create whole sets of Little Sparks for decorations or keychains.
Switch Things Up
I love how easy it is to customize Little Spark with different colorways; try soft pastels for a mellow collection or neon brights for a playful display.
To make a larger bulb, switch to a thicker yarn and larger hook; conversely use finer yarn and a smaller hook to create mini keychain versions.
I often change the screw fitting color to bronze or copper for a vintage look, or use variegated yarn for a fun, speckled bulb effect.
You can replace safety eyes with embroidered eyes for a fully child-safe toy and add blush with a tiny bit of pastel pencil or embroidery thread for extra charm.
Try adding a small loop at the top with a few chains before finishing to turn your bulb into an ornament or keyring attachment.
If you want a posable bulb, insert a short length of bendable wire into the body before stuffing and secure the ends inside the screw base.
I sometimes embroider different expressions — a smile, a surprised O, or sleepy eyes — to give each bulb a unique personality.
For party favors, make a batch in team or party colors and add tiny tags or felt accents to match your event theme.
Experiment with different yarn textures like cotton-linen blends for a rustic finish or soft acrylic for a plush feel depending on the intended use.
I recommend testing one bulb in your chosen yarn and hook to check size and feel before committing to a whole set so you can adjust tension and stuffing to suit your style.
Common Mistakes & How to Fix Them
✗ Skipping the stitch marker or not marking the first stitch will make it hard to track rounds; place a stitch marker at the start of each round to avoid losing your place.
✗ Forgetting to stuff as you go can leave large unfillable gaps later; begin stuffing early and add stuffing gradually to maintain an even shape and avoid lumps.
✗ Using very loose tension can cause visible holes and floppy structure; maintain consistent, slightly firm tension for neat stitches and a solid finished toy.
✗ Placing safety eyes too late may prevent secure positioning; insert safety eyes between rounds 16-17 with 10 stitches visible between them before adding too much stuffing.
✗ Not switching to BLO as instructed for the screw fitting rows will hide the front loop detail; change to silver yarn and work in the front loops as specified to create the screw effect.
✗ Failing to weave the finishing tail through the FLO can leave the opening untidy; weave the yarn tail through the FLO of the final round to close neatly and securely.