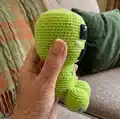
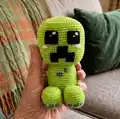
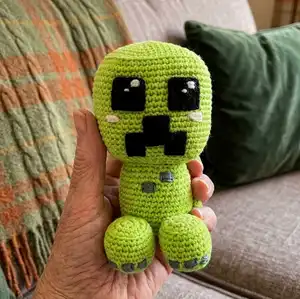
About This Creeper Amigurumi Pattern
This pattern creates a kawaii-style Creeper amigurumi crocheted with fine 2.5 mm cotton yarn, resulting in a toy approximately 15 cm high. The design uses simple amigurumi shaping, worked in continuous rounds, and includes instructions for embroidered details and felt facial pieces. Youll enjoy clear round-by-round instructions and photos showing assembly and finishing touches.
Perfect for intermediate crocheters familiar with basic increases and decreases. Swap yarn weight or colors to change size and personality.
Why You'll Love This Creeper Amigurumi Pattern
I absolutely love this pattern because it transforms simple rounds into a charming, recognizable character that feels full of personality. I enjoy the balance of shaping and small finishing details like felt eyes and embroidered squares that make each Creeper unique. The piece is quick to make but satisfying, and fits easily in the hand when finished. I also love how customizable it is—changing color accents or expressions creates entirely new little companions.
Switch Things Up
I love how easy it is to customize this pattern to create different personalities: try changing the eye shape, adding eyebrows, or using pastel greens for a cuter look.
Want a bigger version? Use a chunkier yarn and a larger hook to scale up the pattern proportionally; the round counts will remain the same but the finished toy will be larger.
To make a keychain or small charm, use thinner yarn and a smaller hook for a tiny version perfect for bags or gifts.
I often add little accessories like a tiny scarf, bow, or miniature weapon to give my amigurumi a story and make each one unique.
Try embroidering different patterns on the body instead of the dark green squares for an original look—dots, stripes, or initials are cute options.
Switching felt for embroidered eyes gives a softer finish and is safer for small children as there are no glued pieces to come off.
I like to experiment with facial placement: moving the eyes slightly up or down changes the expression from surprised to shy, so test positions before gluing.
For extra poseability, you can insert thin wire into the limbs before stuffing to allow slight movement—just be careful with sharp ends.
If you want a plushier feel, stuff with softer filling and press it in more firmly during finishing rounds to create plump shapes.
Don't be afraid to mix colors: try a two-tone head or gradient yarn to create a unique textured look that stands out from the classic Creeper green.
Common Mistakes & How to Fix Them
✗ Skipping stitch markers during rounds can cause you to lose the start of round; use a marker at the first stitch of each round to keep placement accurate.
✗ Waiting until the end to stuff the head or body leads to lumps and uneven shapes; stuff gradually throughout the shaping rounds for smooth results.
✗ Pulling decreases too tight can distort the shape and make sewing difficult; keep decreases snug but not overly tight and stuff incrementally to maintain form.
✗ Forgetting to leave long tails when fastening off makes assembly harder; always leave a long yarn tail when instructed for sewing pieces together securely.