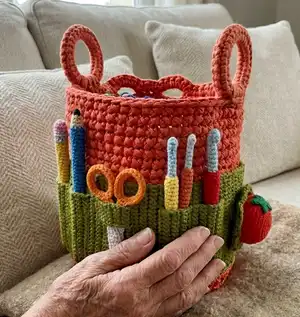
Make a useful, stylish Crochet Caddy to keep your hooks, scissors and notions tidy. This pattern combines t-shirt yarn for structure with a neat outer tidy section and hook pockets for organised storage. Clear step-by-step rounds, pocket construction and a cute hat-shaped pin cushion are included so you can create a professional finished caddy for your craft corner. Perfect for gifting or keeping your supplies in one place.
Progress Tracker
0% Complete
— Introduction :
Info :
The crochet stitches are U.S. style, so for example 1 single crochet in US terms = 1 double crochet in UK terms. The number at the end of each round/row indicates the amount of stitches you should have left to work for the next round/row.
— Explanation of Special Terms :
Info :
Invisible Join: This is used to finish a round. At the end of a round, pull up a loop from the last stitch made and cut loop. Thread the tail onto a yarn needle. Skip the next stitch and sew under the V of the next stitch. Bring the yarn round and sew through the middle of the V in the last stitch worked. Weave in tail. Continuous Rounds: These rounds are worked without slip stitch/chain into your first stitch. Just stitch directly into first stitch for next round. All first stitches in these rounds should be marked with a stitch marker.
— Materials :
Info :
600 g of t-shirt yarn. 1 x 100g (230m) of 100% acrylic 3 ply yarn main colour. Oddments of 100% acrylic yarn the same weight and brand as your main colour, this will be for the hat pin cushion and the starburst pocket front. 9mm hook. 7mm hook. 3.5mm hook. 2.5mm hook. Small amount of fiber fill for pin cushion. 2 x 2.5” Macramé wooden rings for handles (optional). Yarn needle. Scissors. Pins. Stitch markers (I use hairpins/bobby pins).
— Gauge :
Info :
In main colour (100% acrylic yarn) for outer tidy section worked with 3.5mm hook in twisted single crochet (see fig. 1). 25 stitches x 24 row = 4" x 4"
— Base of Basket :
Info :
When working with T-Shirt yarn keep your tension loose. Foundation: With a 9mm hook and the T-shirt yarn Ch5, sl st into first chain to make ring. Work in continuous rounds. NOTE always place a marker on your first stitch. Carry your tail from foundation round and pull tight at the end of Rd1 and weave in tail.
Round 1 :
Work into ring 1 sc x 8 (8)
Round 2 :
*sc-inc* x 8 (16)
Round 3 :
*1sc, sc-inc* x 8 (24)
Round 4 :
*1sc x 2, sc-inc* x 8 (32)
Round 5 :
*1sc x 3, sc-inc* x 8 (40)
Round 6 :
*1sc x 4, sc-inc* x 8 (48)
Round 7 :
*1sc x 5, sc-inc* x 8 (56)
Info :
Your base should measure 8” in diameter. Cut yarn and finish with invisible join and weave in tail.
— Sides :
Info :
With a 7mm hook, make a slip knot and re-join yarn to any FL of last round and twisted single crochet into same stitch (do not chain 1). Work in continuous rounds as follows:
Round 1 :
For this round only work in FL. 1 TSC x 55 56
Info :
Repeat Rd2 until sides measure 7” from base.
Next Rd :
1 TSC x 4, Ch 4, Sk 2, 1TSC x 4, Ch4, Sk2, 1TSC x 4, Ch4, Sk2, 1TSC x 38.
Final Rd :
1 TSC x 4, 1SC x 6 over Ch4 CH-SP, SK 1, 1 TSC x 3, 1SC x 6 over Ch4 stitches CH-SP, SK 1, 1TSC x 3, 1SC x 6 over Ch4 CH-SP, 1 TSC x 8, attach ring over next two stitches, 1 TSC x 26, attach wooden ring over next two stitches, 1TSC. Cut yarn and invisible join. Weave in tail.
Attaching Ring :
Repeat these steps twice for each ring.
Step 1 :
Insert hook into next stitch. Hold ring to the front. Make sure your yarn is at the front.
Step 2 :
Push working yarn through ring and grab yarn with hook.
Step 3 :
Pull yarn through (as though making a single crochet). 2 loops on hook.
Step 4 :
Complete the single crochet. Yarn over pull through the 2 loops. Repeat steps 1-4 again in next stitch to secure ring.
— Hat Shaped Pin Cushion & Starburst Pocket Front :
Terms :
MR Make Magic Ring/circle. CH Chain. CH-SP Chain space. SC Single Crochet. SC-INC 1 single crochet increase (2 single crochet in same stitch). HDC Half Double Crochet. DC Double Crochet. TR Treble Crochet. SL ST Slip stitch. (......) Carry out instructions within brackets in same stitch. * Repeat instruction. FL Work in front loop only. ST Stitch. YO Yarn over hook.
Hat Pin Cushion Foundation :
Using oddments of 100% acrylic yarn and a 2.5mm hook make MR, 1sc x 6 into ring. Close ring. Work in continuous rounds as follows:
Round 1 :
*sc-inc* x 6 (12)
Round 2 :
*1sc, sc-inc* x 6 (18)
Round 3 :
*1sc x 2, sc-inc* x 6 (24)
Round 4 :
*1sc x 3, sc-inc* x 6 (30)
Round 5 :
*1sc x 4, sc-inc* x 6 (36)
Round 6 :
*1sc x 5, sc-inc* x 6 (42)
Info :
Cut yarn and finish with invisible join. With a different colour, make a slip knot and re-join yarn anywhere in FL only of last round.
Round 9 :
In FL of each stitch 1sc x 42 (42)
Round 12 :
*1 hdc, 1dc, 1tr, 1dc, 1hdc, 1sc* to end, sl st into first stitch and cut yarn. Weave in ends.
With a different colour :
re-join yarn anywhere of last round.
Round 13 :
(Ch2, 1sc), Ch2, *(1sc, Ch2)* in each stitch to last stitch 1sc, Ch2, sl st into first stitch. Cut yarn and fasten off. Weave in end.
— Pocket Front: Starburst Square :
Info :
With oddments of acrylic yarn and 2.5mm hook.
Round 1 :
MR, ch3 (counts as 1 dc), 15 dc into ring. Sl st to top of ch3 to close round. Close ring and cut yarn. Sew in tails.
Change colour :
Re-join yarn in top of any dc stitch from previous round and make 16 puff stitches.
Steps for making a puff stitch :
1. Draw up a loop as high as chain 3 stitch (do not chain), yo, insert hook into same stitch, pull up a loop (3 loops on hook). 2. Yo, insert hook into same stitch, pull up a loop (5 loops on hook). 3. Yo, insert hook (into same stitch), pull up a loop (7 loops on hook). 4. Yo, pull through all 7 loops, ch1. This makes a Puff stitch. Repeat to make 16 puff stitches total. Join round with a sl st into first ch stitch.
Change colour :
Make a slip knot and re-join yarn in any Ch 1 space from previous round and make16 Double crochet cluster stitches.
Steps for Cluster stitch :
1st Cluster stitch: Ch3, yo, insert hook into same stitch, yo pull through (3 loops on hook), yo pull through 2 loops only (do not finish off dc stitch), (2 loops on hook). 2. Yo, insert hook into same stitch, yo pull through (4 loops on hook), yo pull through 2 loops only (do not finish dc stitch), (3 loops on hook). 3. Yo, insert hook into same stitch, yo pull through (5 loops on hook), yo pull through 2 loops only (4 loops on hook), at this point you will see 4 double crochets made. 4. To finish stitch, yo (make sure your hook is facing down), pull through all four loops on your hook. Ch2.
Continue :
Now continue with 15 cluster stitches as follows: Yo, go into next ch1 space, yo pull through (3 loops on hook), yo pull through 2 loops, (2 loops on hook), then repeat cluster stitch steps 2, 3 & 4. Repeat steps 1 to 4 until you have 16 Double crochet cluster stitches. Sl st into top of first cluster stitch to close round. Cut yarn. Weave in ends.
Change colour :
Rd4: This is the same as a traditional granny square. 1. (Ch4, 1 tr x 2, ch3, 1 tr x 3) this forms the first corner. 2. In next ch1 space, (1 dc x 3). 3. In next ch1 space, (1 x 3 hdc). 4. In next ch1 space, (1 x 3 dc). 5. In next space (second corner), (1 x 3tr, ch3, 1 x 3tr). Repeat steps 2, 3, 4 and 5 two times. Then repeat steps 2, 3 and 4 one time. Sl st to top of ch3 to join round. Cut yarn and weave in ends.
— Outer Tidy Section of Crochet Caddy :
Info :
If you struggle with this section it is covered in my video tutorial. Check your gauge before making this section. Terms: CH Chain. TSC Twisted single crochet. FL Front loop only. BL Back loop only. R Row. PM Place marker. Finished outer section measures 4 1/4” x 23 3/4”.
Foundation Row :
With a 3.5mm hook and main colour acrylic yarn Ch26. Skip first chain and 1 TSC x 25.
R 1, 2 & 3 :
1 TSC x 25, Ch1 turn (25)
R 4 :
1 TSC x 5, BL only 1TSC x 20, pivot work and work back up FL only 1 TSC x 20. Ch1, turn. 45
R 5 :
1 TSC x 20, across bottom and up 1 TSC x 25. Ch1, turn. 45
Info :
This will form a split in your work to form the first pocket.
R 6 :
1 TSC x 25, across bottom and up 1 TSC x 20 (45)
R 7 :
1 TSC x 20, across bottom and up 1 TSC x 25 (45)
R 8 :
1 TSC x 25, across bottom and up 1 TSC x 20 (45)
R 9 :
1 TSC x 20, across bottom and up 1 TSC x 25 (45)
R 10 :
1 TSC x 5, PM on 5th stitch, 1 TSC x 20, across bottom and up 1 TSC x 20. Ch1, turn.
R 11 :
Join front of pocket to back by crocheting 1 TSC x 20 through both layers of pocket. Ch1, turn. (25)
R 12, 13 & 14 :
1 TSC x 25, Ch1, turn. (25)
Info :
Rows 4 to 14 form the pattern for the crochet hook pockets. Repeat rows 4 to 14 three more times so you have 4 pockets ending with a R14.
Once you have 4 pockets :
R 15 – 36. 1 TSC x 25. (25)
Info :
Now attach the pin cushion on. Using a yarn needle and the same colour yarn as the rim of the hat, back stitch around the inner rim of the hat shape. Before you finish leave a gap and stuff the hat with fibre fill. Finish sewing and cut yarn. Weave in ends.
Continue :
Continue with crochet hook pockets and repeat rows 4-14 two more times.
Make flap for holding scissors :
R. 37 & 38 1 TSC x 25
R. 39 :
1 TSC x 5, in FL only, 1 TSC x 5, Ch1, turn. *1 TSC x 5, Ch1 turn* x 7 more rows on these 5 stitches. Cut yarn and weave in ends.
R. 40 :
With right side facing, make a slip knot and re-join yarn to 11th stitch of R39 (left side of base of flap) and work 1 TSC to end. Ch1, turn.
R. 41 :
1 TSC x 25, working into BL of R18 ch1, turn. (25)
R. 42-45 :
1 TSC x 25. (25)
R. 46 :
1 TSC x 5, join flap to main piece of work, 1 TSC x 5 through both the flap and main piece, 1 TSC x 15 to end. (25)
R. 47, 48, 49 :
1 TSC x 25. (25)
Info :
Next repeat rows 4-14 2 more times. Check the circumference of the main basket and make a note of the size of the circumference.
Continue :
Next continue to work 1 TSC x 25, Ch1, turn, until your work reaches around your basket and meets the beginning of your outer tidy section. Before you finish your outer tidy section pin around the basket and check to make sure it meets the beginning, it should be a snug fit and slightly taught. Cut yarn and leave a tail for sewing together both ends of the piece.
— Finishing :
Info :
Pin Starburst pocket front to last section of outer piece and using a yarn needle backstitch around 3 edges leaving top edge open to form pocket. Stitch just under the V shapes of stitches.
Info :
With wrong sides facing, whip stitch ends of outer piece together to form a circle. Stitch through back loops only. Cut yarn and weave in ends.
Info :
Next slip the circular outer piece over your basket and pin in place making sure it is even. You can check by measuring from the top of the basket to the top of the outer piece. With same colour yarn as your outer piece, back stitch along top edge cut yarn and weave in ends to inside of basket. Then sew bottom edge in same way. Cut yarn and weaving end to inside of basket.
This Crochet Caddy pattern blends function and style to create a beautiful storage solution for your hooks and notions. It includes a sturdy t-shirt yarn basket body, a decorative outer tidy section with pockets, and a sweet hat-shaped pin cushion for tiny treasures. Make one for yourself or gift it to a maker who loves organised craft spaces. 🧶✨