🧢 Beautiful ✨ Detailed πŸ’ Adorable

Little frog Amigurumi Pattern

Little frog Amigurumi Pattern
4.3β˜… Rating
2-3 Hours Time Needed
1.2K Made This
βœ‚οΈ

Intermediate Level

Ideal for those with basic crochet experience, featuring slightly more advanced stitches and techniques to expand your skills.

⏱️

Bite-Sized Project

Finishes in 2-4 hoursβ€”perfect for an afternoon of creative relaxation.

🎁

Tiny Treasure

Small, sweet, and gift-worthy creations that fit perfectly in the palm of your hand with detailed charm.

About This Little frog Amigurumi Pattern

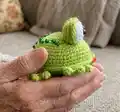
This pattern teaches you how to crochet a tiny frog amigurumi with a white belly, green back, expressive eyes and cute little paws. The instructions are written in rounds and include helpful assembly photos referenced in the text. You will use cotton DK yarn and a small 2.0 mm hook to create a compact, well-shaped toy.

Little frog Amigurumi Pattern crochet pattern - detailed view of completed project

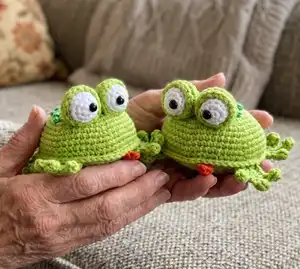
Perfect as a quick gift or keyring-sized friend, the frog measures approximately 7 cm when made with the recommended materials. All pieces are crocheted in spirals and sewn together with clear placement instructions.

Why You'll Love This Little frog Amigurumi Pattern

I absolutely love this pattern because it turns simple stitches into a charming, compact character that you can finish in an afternoon. I enjoy the join-as-you-go feel when attaching the belly and back β€” it makes assembly neat and satisfying. The little details like eyelids, embroidered French knots and the tiny tongue bring so much personality to the frog. I also love that the pattern uses basic amigurumi techniques, so I can riff on the design easily to make variations or gifts.

Little frog Amigurumi Pattern step 1 - construction progress Little frog Amigurumi Pattern step 2 - assembly progress Little frog Amigurumi Pattern step 3 - details and accessories Little frog Amigurumi Pattern step 4 - final assembly and finishing

Switch Things Up

I love how easy it is to customize this frog β€” I often switch yarn colors to make different characters like a blue pond frog or pastel friend.

If you want a larger frog, I recommend using a heavier yarn and increasing hook size; conversely, use a finer yarn for a miniature keychain version.

I sometimes replace safety eyes with embroidered eyes for a fully handmade finish, which is also safer for babies and small children.

For a sparkly look, swap the French knot spots for tiny green seed beads and sew them on carefully for decoration.

I also experiment with the eyelid placement to change expressions β€” closer together for a curious look, slightly angled for a sleepy expression.

Try adding a removable accessory like a tiny crocheted flower or bow to the frog's head to personalize gifts.

I recommend practicing the puff stitch on a scrap first if you haven't used it before β€” it gives the paws lovely texture.

Want a different pose? Add a small wire inside the limbs to make them posable, or sew feet slightly forward for a sitting posture.

I often change the tongue color or make it slightly longer for a playful effect; you can also embroider a tiny smile instead.

Don't be afraid to mix yarn textures β€” a matte cotton body with a slight sheen thread for spots looks fantastic and unique.

Common Mistakes & How to Fix Them

βœ— Crocheting with loose tension can cause stuffing to show through; use tighter stitches or switch to a smaller hook to prevent gaps. βœ— Closing the magic ring too tightly before inserting safety eyes will make it difficult to attach eyes; leave the ring slightly open so the eye base fits easily. βœ— Cutting the work thread too early when joining pieces will make finishing awkward; keep the work thread when instructed to join the belly and back, then finish after stuffing. βœ— Forgetting to stuff as you go can make shaping difficult and lumpy; add small amounts of stuffing gradually while you crochet to keep even shaping.

Little frog Amigurumi Pattern

Make a tiny, lovable frog with this clear step-by-step crochet pattern. You will create a small 7 cm amigurumi using simple rounds, join-as-you-go techniques, and easy decorative details. The pattern includes full instructions for body, eyes, eyelids, paws, tongue and assembly so you can finish a complete frog with confidence.

Intermediate 2-3 Hours

Materials Needed for Little frog Amigurumi Pattern

β€” Main Fabric

  • 01
    100% cotton DK yarn (PaintBox Yarns Cotton DK 125 m / 50 g) - Lime Green (629) approx 50 g
  • 02
    100% cotton DK yarn - Paper White (601) approx 20-30 g
  • 03
    Small amount of Pillar Red (615) for tongue (a few grams)
  • 04
    Small amount of Spearmint Green (626) for decorative spots (a few grams)

β€” Tools Required

  • 01
    A 2.0 mm crochet hook (I used Clover)
  • 02
    Stuffing (hollow fiber)
  • 03
    Safety eyes or black beads 6 mm in diameter (2 pieces)
  • 04
    A needle with a big eye for sewing
  • 05
    Sewing pins for positioning pieces

Progress Tracker

0% Complete

β€” Belly :

1 row :

6 sc in magic ring (6)

2 row :

2 sc in each sc (12)

3 row :

(1 sc, sc inc)* 6 (18)

4 row :

(2 sc, sc inc)* 6 (24)

5 row :

(3 sc, sc inc)* 6 (30)

6 row :

(4 sc, sc inc)* 6 (36)

7 row :

(5 sc, sc inc)* 6 (42)

8 row :

(6 sc, sc inc)* 6 (48)

9 row :

(7 sc, sc inc)* 6 (54)

10 row :

(8 sc, sc inc)* 6, sl.st (60)

Info :

Tie off the thread and cut it (pic. 1).

β€” Back :

1 row :

6 sc in magic ring (6)

2 row :

2 sc in each sc (12)

3 row :

(1 sc, sc inc)* 6 (18)

4 row :

(2 sc, sc inc)* 6 (24)

5 row :

(3 sc, sc inc)* 6 (30)

6 row :

(4 sc, sc inc)* 6 (36)

7 row :

(5 sc, sc inc)* 6 (42)

8 row :

(6 sc, sc inc)* 6 (48)

9 rows :

48 sc (48)

10 row :

(7 sc, sc inc)* 6 (54)

11 rows :

54 sc (54)

12 row :

(8 sc, sc inc)* 6 (60)

13-14 rows :

2 rows - 60 sc (60) (pic. 2)

Info :

Don't cut the work thread.

Info :

Join the belly and the back together: put the wrong sides of the pieces to each other, insert the crochet hook through the loops of the both pieces (pic. 3) and crochet sc. Work sc around the edge (pic. 4).

Info :

Stuff the body as you go round. (pic. 5). Finish with sl.st. Tie off the thread and hide it inside. (pic. 6, 7)

β€” Eyes. 2 pcs :

Info :

With white yarn. Use a hook 2.0 mm. The eyes is crocheted in a spiral.

1 row :

6 sc in magic ring (6)

Info :

Close the magic ring, but not too tight that you can insert the safety eyes easily.

2 row :

2 sc in each sc (12)

3 row :

(3 sc, sc inc)* 3 (15)

4-5 rows :

2 rows - 15 sc (15)

Info :

Insert the safety eyes into the middle of the magic ring (pic. 8, 9)

6 row :

(3 sc, sc dec)* 3 (12)

Info :

Stuff the eye (pic. 10).

7 row :

6 sc dec (6)

Info :

Finish with sl.st. Tie off the thread and leave enough for sewing. (pic. 11)

β€” Eyelids. 2 pcs :

Info :

With green yarn. Use a hook 2.0 mm. The eyelids are crocheted in a spiral.

1 row :

6 sc in magic ring (6)

2 row :

2 sc in each sc (12)

3 row :

(1 sc, sc inc)* 6 (18)

4-6 rows :

3 rows - 18 sc (18)

Info :

Finish with sl.st. Tie off and leave enough thread for sewing (pic. 12, 13).

β€” Paws. 4 pcs :

Info :

With green yarn. Use a hook 2.0 mm.

1 row :

2 ch, 12 dc in magic ring, sl.st. (12) (pic. 14-16)

2 row :

4 sl.st., (6 ch., puff stitch in the 3th loop from the hook and 1 sc in the 4th, 5th and 6th loops from the hook, 1 sl.st. in the next loop of the first row) * repeat this pattern two more times, 4 sl.st. (pic. 17-22)

Info :

Tie off the thread and leave enough for sewing.

β€” Tongue :

Info :

With red yarn. Use a hook 2.0 mm. Crochet 4 ch

1 row :

start in the second loop from the hook (pic. 23) and crochet 2 sc, 3 sc in last ch, don't turn the work and crochet continuously in circle direction,1 sc, 1 sc inc (8) (pic. 24)

Info :

Finish with sl.st. Tie off the thread and leave enough for sewing.

β€” Assembly :

Info :

Place the eyes into the eyelids and sew them. (pic. 25-28) Tie off the white yarn in the bottom of the eye. (pic. 29, 30).

Info :

Sew the eyes onto the head/body between the 4th and 8th rows (pic. 32-38).

Info :

Sew the front paws onto the bottom of the frog symmetrically to the muzzle. (pic. 39-44).

Info :

Sew the back paws onto the bottom of the frog (pic. 47-50). The back paws should be placed as on the pictures 45, 46.

Info :

Sew the tongue onto the muzzle (pic. 51, 52)

Info :

Embroider french knots on the back of the frog using the dark green yarn (pic. 53-55). Note: Also you can use green beads for decorating.

Assembly Instructions

  • Place the eyes into the eyelids and sew them in place, then tie off the white yarn at the bottom of each eye (refer to pics 25-30).
  • Sew the assembled eyes (eye+eyelid) onto the head/body between the 4th and 8th rows so the eyes sit symmetrically (pics 32-38).
  • Join the belly and back by placing wrong sides together, insert the hook through both loops and single crochet around the edge; stuff the body as you go and finish with a slip stitch (pics 3-7).
  • Sew the front paws to the bottom of the frog symmetrically to the muzzle, then sew the back paws to the bottom as shown in the pictures (pics 39-46, 47-50).
  • Sew the tongue onto the muzzle, then embroider French knots on the back using dark green yarn (or sew on green beads) for decorative spots (pics 51-56).

Important Notes

  • πŸ’‘The toy must be crocheted with tight stitches to avoid holes where stuffing can show; if there are tiny holes, use a smaller size hook.
  • πŸ’‘Frog's size is approximately 7 cm (2.7 in) when using the same materials and hook as specified; changing yarn or hook will alter the size.
  • πŸ’‘Do not cut the work thread when joining pieces; keep it for the join-as-you-go step and finish only after the piece is stuffed and joined.

This little frog is tiny, charming and full of personality β€” perfect for gifts, decoration, or a pocket pal. 🐸🧢 Follow the simple rounds and assembly steps to bring it to life, then add French knots or beads for a playful finish. Happy crocheting and enjoy your new handmade friend! ✨

You ask,

we answer.

FAQs

What size will the finished piece be?

The finished amigurumi measures approximately 7 cm tall when using the recommended cotton DK yarn and a 2.0 mm hook.

Can I use different yarn weights for this pattern?

Yes, but the final size will change. Use an appropriate hook for your chosen yarn and be aware that thicker yarn will make a chunkier frog while thinner yarn gives a mini version.

Do I need prior crochet experience for this pattern?

This pattern is rated intermediate and uses magic rings, increases, decreases and puff stitches, so basic amigurumi experience and stitch familiarity are recommended.

How long does this project typically take to complete?

Most crocheters complete this project in 2-3 hours, though time may vary based on experience level and how many decorative details you add.