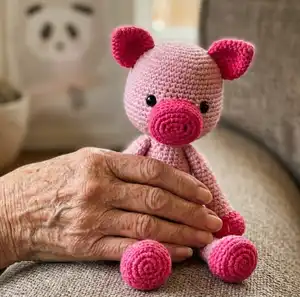
Make an adorable Lily the Piglet amigurumi with this detailed crochet pattern. You will work in spiral rounds, shape the head and body, and assemble the pieces with clear step-by-step instructions and photos. Perfect for making a sweet handmade gift or a cuddly nursery friend — just follow the rounds and assembly notes to bring Lily to life.
Progress Tracker
0% Complete
— Head :
Round 3 :
(sc, inc) x 6 (18)
Round 4 :
(inc, sc 2) x 6 (24)
Round 5 :
(sc 3, inc) x 6 (30)
Round 6 :
sc, inc, (sc 4, inc) x 5, sc 3 (36)
Round 7 :
(sc 5, inc) x 6 (42)
Round 8 :
sc 2, inc, (sc 6, inc) x 5, sc 4 (48)
Round 9 :
(sc 7, inc) x 6 (54)
Round 10-15 :
sc in each st (54)
Info :
On round 16 place a stitch marker between stitches 24 and 25 (around the loops on top of the 25th stitch). This marks the center of the face, use it as a guide when placing the eyes.
Round 16-17 :
sc in each st (54)
Round 18 :
sc 11, inc, (sc 2, inc) x 2, sc 13, inc, (sc 2, inc) x 2, sc 16 (60)
Round 19-21 :
sc in each st (60)
Round 22 :
sc 3, dec, (sc 8, dec) x 5, sc 5 (54)
Round 23 :
(sc 7, dec) x 6 (48)
Round 24 :
sc 2, dec, (sc 6, dec) x 5, sc 4 (42)
Info :
Attach safety eyes to either side of the stitch marker, between rows 16 and 17, leaving 10 stitches (count 9 holes) between them (see page 7).
Round 25 :
(sc 5, dec) x 6 (36)
Round 26 :
sc, dec, (sc 4, dec) x 5, sc 3 (30)
Round 27 :
(sc 3, dec) x 6 (24)
Round 28 :
(dec, sc 2) x 6 (18)
Info :
Sl st in next stitch. Cut the yarn, leaving a long yarn tail for sewing, and fasten off. Stuff the head firmly.
— Muzzle :
Round 1 :
With dark pink yarn: mr, sc 6 (6)
Round 2 :
With dark pink yarn: (inc3 x 2, sc) x 2 (14)
Infos :
Sc in next stitch, count it as the end of the round from now on.
Round 3 :
sc 2, inc x 3, sc 4, inc x 3, sc 2 (20)
Round 4 :
sc 3, inc x 3, sc 7, inc x 3, sc 4 (26)
Round 5 :
bpsc in each st (26)
Round 6-7 :
sc in each st (26)
Info :
Sl st in next stitch. Cut the yarn, leaving a long yarn tail for sewing, and fasten off.
Info :
Stuff the muzzle firmly and sew it to the head. Embroider the nostrils. Use yarn to shape the head (see page 7 - 8).
— Ears (make 2) :
Round 1 :
With dark pink yarn: mr, sc 6 (6)
Round 2 :
sc in each st (6)
Round 3 :
(inc, sc) x 3 (9)
Round 4 :
(sc 2, inc) x 3 (12)
Round 5 :
sc, inc, (sc 3, inc) x 2, sc 2 (15)
Round 6 :
(sc 4, inc) x 3 (18)
Round 7-9 :
sc in each st (18)
Round 10 :
(dec, sc) x 6 (12)
Info :
Sl st in next stitch. Cut yarn, leaving a long yarn tail for sewing, and fasten off. Flatten the ears and sew them to the head (see page 10).
— Arms (make 2) :
Round 1 :
With dark pink yarn: mr, sc 7 (7)
Round 3 :
(sc, inc) x 7 (21)
Note :
Crochet round 4 in back loops only.
Round 4 :
sc in each st (21)
Round 5 :
sc 7, dec, (sc, dec) x 2, sc 6 (18)
Round 6 :
sc 4, dec, sc 7, dec, sc 3 (16)
Round 7 :
sc 8, dec, sc 6 (15)
Info :
Sc in next stitch, count it as the end of the round from now on.
With light pink yarn - Round 8 :
sc in each st (15)
Round 9 :
sc 7, dec, sc 6 (14)
Instructions :
Stuff firmly. Turn the arm so the end of the round is at the back of the arm. Make a long vertical stitch along the front of the hoof with light pink yarn, going from round 7 straight down, draw it very tight and knot the yarn ends together (see page 8). Keep adding a bit of fiberfill after every few rounds, stuffing the arms firmly.
Round 10 :
sc in each st (14)
Round 11 :
sc 7, dec, sc 5 (13)
Round 12 :
sc in each st (13)
Round 13 :
sc 7, dec, sc 4 (12)
Round 14 :
sc in each st (12)
Round 15 :
sc 7, dec, sc 3 (11)
Round 16-23 :
sc in each st (11)
Info :
On the left arm only, sc in next 6 stitches. Count the last sc as the end of the round from now on. Attach the 15 mm joint between rounds 22 and 23, placing it so the stem is facing straight towards the body (see page 9).
Round 24 :
sc 5, dec x 3 (8)
Round 25 :
dec x 2, leave rest of the sts unworked (6)
Info :
Finish stuffing. Cut the yarn, leaving a long yarn tail, and fasten off. Pick up all the remaining stitches and close the opening (see page 9).
— Legs (make 2) :
Round 1 :
With dark pink yarn: mr, sc 6 (6)
Round 3 :
(sc, inc) x 6 (18)
Round 24 :
sc 5, dec x 3 (8)
Round 25 :
dec x 2, leave rest of the sts unworked (6)
Info :
Finish stuffing. Cut the yarn, leaving a long yarn tail, and fasten off. Pick up all the remaining stitches and close the opening (see page 9).
Continue :
On the left leg only, sc in next 7 stitches. Count the last sc as the end of the round from now on. Attach the 20 mm joint between rounds 27 and 28, placing it so the stem is facing straight towards the body (see page 9).
Round 29 :
sc 9, dec, sc 2 (12)
Round 30 :
sc 2, dec x 5 (7)
Round 31 :
sc, dec, leave the rest of the sts unworked (6)
Info :
Finish stuffing. Cut the yarn, leaving a long yarn tail, and fasten off. Pick up all the remaining stitches and close the opening (see page 9).
— Body :
Round 1 :
With light pink yarn: mr, sc 6 (6)
Round 3 :
(sc, inc) x 6 (18)
Round 4 :
(inc, sc 2) x 6 (24)
Round 5 :
(sc 3, inc) x 6 (30)
Round 6 :
sc, inc, (sc 4, inc) x 5, sc 3 (36)
Round 7 :
(sc 5, inc) x 6 (42)
Round 8-14 :
sc in each st (42)
Info :
Turn the body so the last stitch of round 14 is at the center of the back. Attach the legs to either side of the body, between rounds 8 and 9 (see page 9).
Round 15 :
sc 9, dec, sc 5, dec, sc 6, dec, sc 5, dec, sc 9 (38)
Round 16 :
sc 18, dec, sc 18 (37)
Round 17 :
(sc 11, dec) x 2, sc 11 (35)
Round 18 :
sc 4, dec, sc 24, dec, sc 3 (33)
Info :
Start stuffing the body. Keep adding a bit of fiberfill after every few rounds, stuffing the body firmly.
Round 19 :
sc 16, dec, sc 15 (32)
Round 20 :
dec, sc 30 (31)
Round 21 :
sc 7, dec, sc 14, dec, sc 6 (29)
Round 22 :
sc 14, dec, sc 13 (28)
Round 23 :
sc 10, dec, sc 6, dec, sc 8 (26)
Round 24 :
(dec, sc 11) x 2 (24)
Round 25 :
sc 6, dec, sc 9, dec, sc 5 (22)
Round 26 :
sc 9, dec, sc 2, dec, sc 7 (20)
Round 27 :
dec, sc 18 (19)
Round 28 :
sc 9, dec, sc 8 (18)
Round 29 :
sc in each st (18)
Info :
Sl st in next stitch. Cut the yarn and fasten off. Attach the arms to either side of the body between rows 24 and 25 (see page 9). Finish stuffing the body.
Info :
Sew the head to the body (see page 10).
— Tail :
Round 1 :
With light pink yarn: ch 11, starting in 2nd ch from hook, 2 sc in each ch, crocheted into the loops on the back of the chain (20)
Info :
Cut the yarn, leaving a long yarn tail for sewing, and fasten off.
Info :
Sew the tail to the body (see page 10).
This sweet Lily the Piglet pattern is perfect for gifting or decorating a nursery with handmade charm. Follow the step-by-step rounds and photos to create a polished, cuddly companion you will treasure. Enjoy the satisfying process of shaping, sewing and finishing your little piglet! 🧶🐷