๐Ÿงถ Beautiful โœจ Detailed ๐Ÿ’ Adorable

Winter Is Coming Beanie Pattern

Winter Is Coming Beanie Pattern
4.6โ˜… Rating
2-3 Hours Time Needed
1.2K Made This
โœ‚๏ธ

Beginner Friendly Level

Perfect for those just starting their crochet journey, with clear instructions and simple techniques

โฑ๏ธ

Bite-Sized Project

Finishes in 2-4 hoursโ€”perfect for an afternoon of creative relaxation.

๐Ÿงถ

Effortless Style

Simple lines for everyday wear, focusing on quality stitchwork and timeless appeal that never goes out of fashion.

About This Winter Is Coming Beanie Pattern

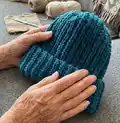
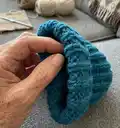
This pattern creates the Winter Is Coming Beanie โ€” a crocheted cap worked flat and finished as a tube, designed to reproduce the fishermanโ€™s rib appearance. You can completely customize the size by adjusting chain length and number of rows to fit any head. The texture is achieved by using half double crochet (hdc) worked through the back loop, creating deep ribs.

Winter Is Coming Beanie Pattern crochet pattern - detailed view of completed project

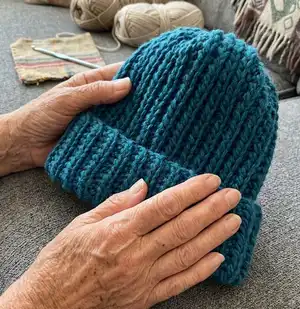
The pattern is beginner friendly and works well with bulky yarn and a large hook for quick progress. The author used an 8 mm hook and approximately 100 g of yarn for a finished circumference of 49 cm.

Why You'll Love This Winter Is Coming Beanie Pattern

I absolutely love this pattern because it gives a knitted fishermanโ€™s rib look using only crochet, which is satisfying and surprisingly simple. I enjoy how quickly a beanie comes together when using bulky yarn and an 8 mm hook, so it feels rewarding in a single sitting. I love that it is fully customizable โ€” you can adjust chain length and rows to fit any head size. I also appreciate that the stitch technique (hdc in the back loop) is easy to teach to beginners but yields a professional, textured finish.

Winter Is Coming Beanie Pattern step 1 - construction progress Winter Is Coming Beanie Pattern step 2 - assembly progress Winter Is Coming Beanie Pattern step 3 - details and accessories Winter Is Coming Beanie Pattern step 4 - final assembly and finishing

Switch Things Up

I love experimenting with color when making this beanie; try stripes every 4 rows for a bold look or alternate two colors for a marled effect.

I sometimes change the chain length to make a slouchy version by adding 510 extra chains and more rows for height.

I switch yarn weights and hook sizes to alter the finished size and texture; using a larger hook increases the rib depth and gives a looser fabric.

I like to add a folded cuff by making the brim longer, then folding and stitching the cuff in place for a classic beanie finish.

I occasionally add a pompom to the top for a playful touch โ€” make a large fluffy pompom in a contrasting color for extra personality.

I have lined beanies with a soft fleece circle sewn inside for extra warmth and to hide the seam neatly.

I sometimes embroider simple initials or a small motif on the cuff for personalization before stitching the seam closed.

I recommend trying different joining techniques; a mattress stitch or invisible seam can give a cleaner finish than visible slip stitches if you prefer.

I like to make matching sets by coordinating yarn for a hat and simple scarf using the same back-loop hdc rib technique.

I often adapt the pattern into earflaps by adding short triangular panels to the sides before closing the top and finishing with braided ties for a fun variation.

Common Mistakes & How to Fix Them

โœ— Choosing the wrong chain length and making the foundation too tight will give you a hat that is too small; measure the head and chain to about 35 cm (author used 40 ch) and keep stitches relaxed. โœ— Not working half double crochet through the back loop will lose the ribbed effect; be sure to insert the hook into the back loop only on each row for consistent ribs. โœ— Joining the seam with inconsistent tension makes an uneven side seam; join the two sides with 40 slip stitches while keeping both edges aligned and consistent tension. โœ— Stopping before checking width causes an ill-fitting hat; measure your work against the head circumference minus about 4 cm and repeat Row 2 and Row 3 until you reach the target width.

Winter Is Coming Beanie Pattern

Make a cozy, customizable beanie worked flat to reproduce the fisherman's rib look using simple half double crochet back-loop technique. This pattern is perfect if you want a quick, adaptable hat you can size to any head. Follow the clear row-by-row instructions to create a warm, textured beanie you will love wearing or giving as a handmade gift.

Beginner Friendly 2-3 Hours

Materials Needed for Winter Is Coming Beanie Pattern

โ€” Main Fabric

  • 01
    Morelfil BigBall yarn - 100 g (used by the author)
  • 02
    Wool (approx. 100 g) - suitable for bulky/large-hook beanies

โ€” Tools Required

  • 01
    Crochet hook size 8 mm

Progress Tracker

0% Complete

โ€” Description :

Info :

Winter is coming Beanie is a crocheted cap, worked in flat, completely customisable to any size, reproducing the fisherman's rib stitch knitted with two needles.

โ€” Gauge :

Info :

No gauge required; you can work adapting the shape to the head dimension. In my case the gauge was 14 lines x 20 stitches for 10x10 cm.

โ€” Final Dimensions :

Info :

My final dimension was: 49 cm for the circumference and 32 cm for the height. You can adapt your dimension to the shape of your head.

โ€” Materials :

Info :

Yarn: I used 100 gr of Morelfil BigBall. Materials: with a hook of 8 mm, I used 100 gr of wool.

โ€” Hook :

Info :

Hook: 8 mm, I used this size, but you can use any size according to the yarn used; bigger is your hook, bigger will appear your ribs.

โ€” Techniques used :

Infos :

Slip stitch. Half double crochet. All rows except for the last one will be made with HDC stitch made through the back loop.

โ€” Level :

Info :

Beginner.

โ€” Abbreviations :

Infos :

Chain: ch. Half Double Crochet: hdc. Slip Stitch: slt.

โ€” Pattern :

Info :

Letโ€™s go! Chain to reach about 35 cm, in my case 40 ch.

Round 1 :

40 hdc (work in rows, back and forth)

Round 2 :

ch, 40 hdc through the back loop

Round 3 :

ch, 40 hdc through the back loop

Round 4 :

Repeat Row 2 and Row 3 until you reach a width of 53 cm; in the author's case work 56 rows. You can adjust your width measuring the head less 4 cm.

Round 5 :

Last row: join the two sides in vertical with 40 slt (slip stitches) to form a tube.

Info :

You will now have a tube. See pictures below for reference.

Round 6 :

Cut the yarn and pull yarn through the remaining stitches, tighten together and fasten. Your beanie is ready!

Assembly Instructions

  • Join the two sides vertically with 40 slip stitches to create a tube; align edges carefully and work evenly so the seam is straight.
  • After joining, check the alignment and tension of the seam to ensure the ribs match across the join and the tube sits flat.
  • Cut the yarn leaving a tail, pull the yarn through the remaining stitches at the crown, tighten together and fasten to close the top.
  • Refer to the pattern photos for visual guidance on how the tube and seam should look after joining, and adjust if necessary.

Important Notes

  • ๐Ÿ’กAll working rows except for the final joining row are made using half double crochet worked through the back loop to create the ribbed texture.
  • ๐Ÿ’กMeasure your head and chain to approximately 35 cm; the author chained 40 ch and recommends adjusting width by measuring the head minus 4 cm.
  • ๐Ÿ’กNo strict gauge is required, but the author reported a gauge of 14 lines x 20 stitches for a 10x10 cm swatch when using the yarn/hook combination.

This Winter Is Coming Beanie is a fast, cozy project that recreates a knitted fishermanโ€™s rib using simple crochet techniques. Perfect for gifting or keeping, you can customize the size and cuff to suit anyones style and comfort. Make one in your favorite bulky yarn and enjoy quick, satisfying results. ๐Ÿงถ๐Ÿงฃ

You ask,

we answer.

FAQs

What size will the finished piece be?

The finished beanie measures approximately 49 cm in circumference and 32 cm in height when using the recommended yarn and an 8 mm hook, as stated by the author.

Can I use different yarn weights for this pattern?

Yes, you can use different yarn weights, but the final size and rib appearance will change; adjust your hook size and chain length accordingly to reach the desired circumference.

Do I need prior crochet experience for this pattern?

This pattern is rated beginner friendly and only uses half double crochet and slip stitch; familiarity with hdc and working through back loops is recommended.

How long does this project typically take to complete?

Most crocheters finish this beanie in about 2-3 hours using bulky yarn and an 8 mm hook, though time may vary with yarn choice and experience.