๐Ÿงถ Beautiful โœจ Detailed ๐Ÿ’ Adorable

Lighthouse stacking toy Amigurumi Pattern

Lighthouse stacking toy Amigurumi Pattern
4.7โ˜… Rating
5-7 Hours Time Needed
3.5K Made This
โœ‚๏ธ

Intermediate Level

Ideal for those with basic crochet experience, featuring slightly more advanced stitches and techniques to expand your skills.

โฑ๏ธ

Weekend Treat

Takes 5-7 hours, making it an enjoyable project to finish over a couple of days.

๐Ÿงธ

Cute Companion

An adorable friend to cherish, handcrafted with love to bring comfort and joy for years to come.

About This Lighthouse stacking toy Amigurumi Pattern

This pattern creates a layered lighthouse stacking toy made from separate rings stacked on a crocheted pole, finished with a rooftop, windows and a door. The design uses Alize Cotton Gold yarn and a 3 mm hook for neat, sturdy stitches ideal for play. Each ring and detail is crocheted in rounds with clear shaping instructions so you can follow along easily. The pattern also includes sewing and finishing tips to assemble the lighthouse securely.

Lighthouse stacking toy Amigurumi Pattern crochet pattern - detailed view of completed project

Perfect for gifting or nursery play, the toy is machine-washable if using suitable yarn and careful finishing. The layers can be made in different colors to personalize your lighthouse.

Why You'll Love This Lighthouse stacking toy Amigurumi Pattern

I absolutely love this pattern because it combines simple round shaping with thoughtful details like windows and a little door that make the lighthouse feel finished and playful. I enjoy the modular nature โ€” you can make each ring separately and see the toy come together as you stack it. The texture from working some rounds in front or back loops adds a delightful edge finish that I find very satisfying. As the designer, I also love how easy it is to customize colors and sizes so each lighthouse becomes a unique handmade keepsake.

Lighthouse stacking toy Amigurumi Pattern step 1 - construction progress Lighthouse stacking toy Amigurumi Pattern step 2 - assembly progress Lighthouse stacking toy Amigurumi Pattern step 3 - details and accessories Lighthouse stacking toy Amigurumi Pattern step 4 - final assembly and finishing

Switch Things Up

I love how easy it is to customize this lighthouse by changing colors for each ring; try pastel shades for a nursery version or bold primary colors for a playroom piece.

If you want a smaller or larger toy, change the yarn weight and use an appropriate hook; chunky yarn and a larger hook gives a chunky, cuddly lighthouse while thinner yarn creates a delicate mini version.

I often add embroidered details or beads for windows instead of crocheted windows to create a different look and add sparkle.

Try adding a loop or handle to the top for hanging mobile-style, or include a felt base for extra stability on surfaces prone to tipping over.

To make the pieces safer for very young children, skip any beads or small attachments and sew all details securely with matching yarn.

I sometimes add a little weighted bag to the bottom base (inside) to make the toy stand steadier โ€” just a small bag of dry beans or poly pellets inside a secured pouch works well.

Experiment with texture by substituting some rounds with a puff or bobble stitch in the rings to create tactile interest for toddlers.

Make a set with multiple poles and ring sizes so kids can match sizes and colors as a learning activity โ€” this pattern adapts well to educational play designs.

I recommend trying a contrasting color for the roof and lantern to make the top pop and draw the eye upward when the set is stacked.

If you like, embroider a simple number on each ring to turn the lighthouse into a counting toy; I often use a contrasting yarn and backstitch embroidery for neat numbers.

Common Mistakes & How to Fix Them

โœ— Skipping stitch markers when working long rounds can lead to losing your start point; place a marker at the first stitch of each round and move it as you go. โœ— Forgetting to stuff gradually causes lumps or uneven shapes; add small amounts of fiberfill as you crochet and shape the piece as you go to keep a smooth profile. โœ— Not working back loop or front loop rounds as instructed will change the ring edges; pay close attention to BLO/FLO notes and complete those rounds exactly for the intended edge finish. โœ— Cutting yarn too short when leaving a tail for sewing makes assembly difficult; leave a generous long tail after finishing rounds that will be sewn together or attached to other parts.

Lighthouse stacking toy Amigurumi Pattern

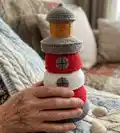
Make a charming lighthouse stacking toy with step-by-step, round-by-round crochet instructions. You will build layered rings, a pole, windows and a roof using Alize Cotton Gold yarn and simple amigurumi techniques. This pattern is perfect for gifting or nursery play and includes clear assembly notes so you can sew everything together with confidence. Enjoy a relaxing, creative project with a beautiful handmade result.

Intermediate 5-7 Hours

Materials Needed for Lighthouse stacking toy Amigurumi Pattern

โ€” Main Fabric

  • 01
    White - Alize Cotton Gold 55 (use as directed for pole and middle ring)
  • 02
    Light grey - Alize Cotton Gold 200 (use for base, roof, windows, door and accents)
  • 03
    Red - Alize Cotton Gold 56 (use for large, small rings)
  • 04
    Yellow - Alize Cotton Gold 216 (use for top lantern part)
  • 05
    Fiberfill stuffing - as needed for pole and rings

โ€” Tools Required

  • 01
    Crochet hook size 3 mm (or in accordance with the yarn you use)
  • 02
    Scissors
  • 03
    Tapestry needle for sewing
  • 04
    Stitch markers
  • 05
    Polyester stuffing / fiberfill
  • 06
    Pins for assembly (optional)

Progress Tracker

0% Complete

โ€” Base :

Round 1 :

6 sc in MR (6)

Round 2 :

6 inc (12)

Round 3 :

(1 sc; inc)*6 (18)

Round 4 :

(2 sc; inc)*6 (24)

Round 5 :

(3 sc; inc)*6 (30)

Round 6 :

FLO (4 sc; inc)*6 (36)

Round 7 :

(5 sc; inc)*6 (42)

Round 8 :

3 sc; inc; (6 sc; inc)*5; 3 sc (48)

Round 9 :

(7 sc; inc)*6 (54)

Round 10 :

4 sc; inc; (8 sc; inc)*5; 4 sc (60)

Round 11 :

FLO (9 sc; inc)*6 (66)

Round 12 :

5 sc; inc; (10 sc; inc)*5; 5 sc (72)

Round 13 :

(11 sc; inc)*6 (78)

Round 14 :

6 sc; inc; (12 sc; inc)*5; 6 sc (84)

Round 15 :

(13 sc; inc)*6 (90)

Round 16-17 :

90 sc (90) cut the yarn, leave a long tail for sewing.

โ€” Pole :

Info :

Crochet with white color, fill with stuffing as you go

Round 1 :

6 sc in MR (6)

Round 2 :

6 inc (12)

Round 3 :

(1 sc; inc)*6 (18)

Round 4 :

(2 sc; inc)*6 (24)

Round 5-49 :

24 sc (24)

Round 50 :

(3 sc; inc)*6 (30)

Info :

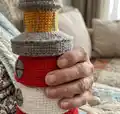
Sew the pole with the part of the base (in round 5) like in the pictures. Then sew two parts of the base together in back loops of rounds 6 and 11. Fill with stuffing as you go. After that sew edges of two parts of base in round 17.

โ€” Large Ring :

Info :

Crochet with red color

Round 1 :

36 ch, sl st in 1st ch (36) continue to work in rounds

Round 2-11 :

1 ch; 36 sc; sl st (36) turn the work inside out and continue in rounds

Round 12 :

BLO (5 sc; inc)*6 (42)

Round 13 :

3 sc; inc; (6 sc; inc)*5; 3 sc (48)

Round 14 :

(7 sc; inc)*6 (54)

Round 15 :

4 sc; inc; (8 sc; inc)*5; 4 sc (60)

Round 16 :

(9 sc; inc)*6 (66)

Round 17 :

5 sc; inc; (10 sc; inc)*5; 5 sc (72)

Round 18 :

(11 sc; inc)*6 (78)

Round 19 :

6 sc; inc; (12 sc; inc)*5; 6 sc (84)

Round 20 :

(13 sc; inc)*6 (90)

Round 21 :

BLO (13 sc; dec)*6 (84)

Round 22-25 :

84 sc (84)

Round 26 :

6 sc; dec; (12 sc; dec)*5; 6 sc (78)

Round 27-30 :

78 sc (78)

Round 31 :

BLO (11 sc; dec)*6 (72)

Round 32 :

5 sc; dec; (10 sc; dec)*5; 5 sc (66)

Round 33 :

(9 sc; dec)*6 (60)

Round 34 :

4 sc; dec; (8 sc; dec)*5; 4 sc (54)

Round 35 :

(7 sc; dec)*6 (48)

Round 36 :

3 sc; dec; (6 sc; dec)*5; 3 sc (42)

Round 37 :

(5 sc; dec)*6 (36) fill with stuffing, cut the yarn, leave a tail for sewing. Sew round 37 with round 1.

Info :

There are two ways to make pretty edges of the rings - in rounds 21 and 31 in the front loops make slip stitch round or reverse crochet (crab stitch) round.

โ€” Middle Ring :

Info :

Crochet with white color

Round 1 :

36 ch, sl st in 1st ch (36) continue to work in rounds

Round 2-11 :

1 ch; 36 sc; sl st (36) turn the work inside out and continue in rounds

Round 12 :

BLO (5 sc; inc)*6 (42)

Round 13 :

3 sc; inc; (6 sc; inc)*5; 3 sc (48)

Round 14 :

(7 sc; inc)*6 (54)

Round 15 :

4 sc; inc; (8 sc; inc)*5; 4 sc (60)

Round 16 :

(9 sc; inc)*6 (66)

Round 17 :

5 sc; inc; (10 sc; inc)*5; 5 sc (72)

Round 18 :

(11 sc; inc)*6 (78)

Round 19 :

BLO (11 sc; dec)*6 (72)

Round 20-23 :

72 sc (72)

Round 24 :

5 sc; dec; (10 sc; dec)*5; 5 sc (66)

Round 25-28 :

66 sc (66)

Round 29 :

BLO (9 sc; dec)*6 (60)

Round 30 :

(5 sc; dec)*6 (36) fill with stuffing, cut the yarn, leave a tail for sewing. Sew round 29 with round 1.

โ€” Small Ring :

Info :

Crochet with red color

Round 1 :

36 ch, sl st in 1st ch (36) continue to work in rounds

Round 2-11 :

1 ch; 36 sc; sl st (36) turn the work inside out and continue in rounds.

Round 12 :

BLO (5 sc; inc)*6 (42)

Round 13 :

3 sc; inc; (6 sc; inc)*5; 3 sc (48)

Round 14 :

(7 sc; inc)*6 (54)

Round 15 :

4 sc; inc; (8 sc; inc)*5; 4 sc (60)

Round 16 :

(9 sc; inc)*6 (66)

Round 17 :

BLO (9 sc; dec)*6 (60)

Round 18-21 :

60 sc (60)

Round 22 :

4 sc; dec; (8 sc; dec)*5; 4 sc (54)

Round 23-26 :

54 sc (54)

Round 27 :

BLO (7 sc; dec)*6 (48)

Round 28 :

3 sc; dec; (6 sc; dec)*5; 3 sc (42)

Round 29 :

(5 sc; dec)*6 (36) fill with stuffing, cut the yarn, leave a tail for sewing. Sew round 29 with round 1.

โ€” Top :

Info :

Crochet with grey color

Round 1 :

6 sc in MR (6)

Round 2 :

6 inc (12)

Round 3 :

(1 sc; inc)*6 (18)

Round 4 :

(2 sc; inc)*6 (24)

Round 5 :

(3 sc; inc)*6 (30)

Round 6 :

(4 sc; inc)*6 (36)

Round 7-14 :

1 ch; 36 sc; sl st (36) turn the work inside out and continue in rounds.

Round 15 :

BLO (5 sc; inc)*6 (42)

Round 16 :

3 sc; inc; (6 sc; inc)*5; 3 sc (48)

Round 17 :

(7 sc; inc)*6 (54)

Round 18 :

4 sc; inc; (8 sc; inc)*5; 4 sc (60)

Round 19 :

(9 sc; inc)*6 (66)

Round 20 :

5 sc; inc; (10 sc; inc)*5; 5 sc (72)

Round 21 :

BLO 72 sc (72)

Round 22-24 :

72 sc (72)

Round 25 :

BLO 5 sc; dec; (10 sc; dec)*5; 5 sc (66)

Round 26 :

(9 sc; dec)*6 (60)

Round 27 :

4 sc; dec; (8 sc; dec)*5; 4 sc (54)

Round 28 :

(7 sc; dec)*6 (48)

Round 29 :

3 sc; dec; (6 sc; dec)*5; 3 sc (42)

Round 30 :

(5 sc; dec)*6 (36) fill with stuffing, change to yellow color

Round 31 :

FLO 36 sc (36)

Round 32-38 :

36 sc (36) change to grey color

Round 39 :

FLO (5 sc; inc)*6 (42)

Round 40 :

3 sc; inc; (6 sc; inc)*5; 3 sc (48) cut the yarn, hide a tail, fill with stuffing.

โ€” Roof :

Info :

Crochet with grey color

Round 1 :

6 sc in MR (6)

Round 2 :

6 sc (6)

Round 3 :

6 inc (12)

Round 4 :

12 sc (12)

Round 5 :

12 inc (24)

Round 6 :

24 sc (24)

Round 7 :

(1 sc; inc)*6 (36)

Round 8 :

36 sc (36)

Round 9 :

(2 sc; inc)*6 (48)

Round 10-12 :

48 sc (48) connect the roof with the top of lighthouse with one single crochet round (48 sc), fill with stuffing as you go.

Round 10-12 Note :

In rounds 21/25 in the front loops make one slip stitch round (72slst) or reverse crochet (crab stitch) round (36 rev).

โ€” Door :

Info :

Crochet with grey color

Row 1 :

8 ch (8)

Row 2 :

7 sc (7)

Round 3 :

1 ch, 6 sc; 3 sc in one; 6 sc; turn (15)

Round 4 :

1 ch, 6 sc; 3 inc; 6 sc; turn (18) cut the yarn leave a tail for sewing.

โ€” Windows (make 3) :

Info :

Crochet with grey color

Round 1 :

6 sc in MR (6)

Round 2 :

6 inc (12)

Round 3 :

(1 sc; inc)*6 (18) cut the yarn leave a tail for sewing.

Info :

Sew the door and windows to a rings (blocks). That's it! Your lighthouse is finished. Congratulations! The only thing is left to do is to find a good lighthouse keeper:)

Assembly Instructions

  • Sew the pole into the base at the base part created in round 5 and secure it firmly before continuing with the base assembly.
  • Join the two base parts together by sewing into the back loops of rounds 6 and 11, filling with stuffing as you work to keep the shape even.
  • Sew the finished rings together by placing each ring over the pole and stacking in order; tack each ring in a few places to prevent shifting.
  • Attach roof to the top by joining its last round to the top of the lighthouse with one round of single crochet (48 sc), stuffing as you go.
  • Sew windows and door onto the appropriate rings using the long tails left after finishing those pieces, positioning them symmetrically and securing with small stitches.

Important Notes

  • ๐Ÿ’กWork consistently with the recommended hook or adjust hook size to match gauge so rings stack evenly and the pole fits through the openings.
  • ๐Ÿ’กUse stitch markers to mark the beginning of each round, particularly when rounds are long or when changing between BLO/FLO instructions.
  • ๐Ÿ’กStuff gradually and evenly to avoid lumps and maintain the rounded shapes for each ring and the pole.

This lighthouse stacking toy pattern is a delightful project that results in a sturdy, colorful toy perfect for little hands and nursery decor. ๐Ÿงถ Make each ring in different colors for a playful look, or follow the original palette for classic charm. โœจ Finish with careful sewing and enjoy a whimsical handmade piece that will bring smiles and imaginative play for years to come. ๐Ÿงต

You ask,

we answer.

FAQs

What size will the finished piece be?

The finished lighthouse measures approximately 25-30 cm tall when using Alize Cotton Gold yarn and a 3 mm hook; exact size will vary slightly with yarn tension and chosen hook.

Can I use different yarn weights for this pattern?

Yes, you can use different yarn weights, but this will affect the size and proportion of the rings and pole; adjust your hook size accordingly and remember the pole opening must still fit all rings.

Do I need prior crochet experience for this pattern?

This pattern is rated intermediate, so basic knowledge of single crochet, increases/decreases, working in rounds and front/back loop variations is recommended.

How long does this project typically take to complete?

Most crocheters complete this project in 5-7 hours, though time may vary based on experience level, number of rings made, and assembly complexity.

How should I assemble the pieces to prevent shifting?

Tack each ring to the pole with a few stitches and sew the pole securely into the base round to provide stability and prevent the rings from rotating or sliding off.