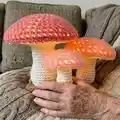
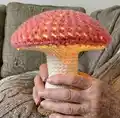
Create a set of charming illuminated flat mushrooms in three sizes (small, medium, large). This pattern guides you step-by-step to crochet the cap, gills, stem, and self-standing base, and shows how to insert clear craft plastic and fairy lights for a warm internal glow. You can mix and match colors for playful or subtle lighting effects. Perfect for gifting, home accents, or cozy nightlights.
Progress Tracker
0% Complete
— Instructions for All Mushrooms :
Info :
When the mushroom cap is complete, you will be instructed to pause without finishing off in order to measure and insert clear craft plastic. This piece will help preserve the mushroom's shape and provide additional structure. Rather than interrupt the pattern for a detailed explanation of how to use the craft plastic, the complete instructions are given in advance here. Example photos are of the large mushroom cap, but the steps are the same for all 3 sizes.
Info :
Please note that purple card stock was used in the example photos for photographic purposes only. Use clear craft plastic wherever purple card stock appears in the example photos. Do not use any colored or opaque material, because it will block or distort light.
Info :
For the small or medium mushroom, cut four strips of 6 mil clear craft plastic. For the large mushroom, cut six strips of 6 mil clear craft plastic. Refer to the cut plastic strips table for widths and lengths. Using clear tape, fasten strips into X shapes as directed, then insert into the cap bowl and trim excess so the craft plastic is even with the last round of single crochet. Continue working pattern with the fitted plastic inside the cap.
Info :
After crocheting the mushrooms, gently unwind and straighten fairy lights, feed the lights up through the base into the mushroom until all the lights are inside the cap. Leave the battery control outside the base for easy access. After inserting the lights, perform a simple clear craft plastic reinforcement: roll a length of clear craft plastic for stem reinforcement (length varies by size), insert into stem to firm it, and trim if necessary until mushroom sits as desired.
— Small Size: Lighted Flat Mushroom :
Cap - Rnd 1 :
6 sc. Sl st to join. (6 st)
Cap - Rnd 2 :
ch 3 (counts as first dc + ch), dc in same st, ch 1, (dc, ch 1, dc, ch 1) in next 5 stitches. Sl st in second chain to join. (24 st)
Cap - Rnd 3 :
sl st into ch-1 space, ch 3 (counts as first dc + ch), dc in same st, ch 1, sk st, *dc in next ch-1 space, ch 1, sk st, (dc, ch 1, dc, ch 1) in next ch-1 space, sk st.** repeat from * to ** 4 more times, dc in next ch-1 space, ch 1, sk st. Sl st in second chain to join. (36 st)
Cap - Rnd 4 :
sl st into ch-1 space, ch 3 (counts as first dc + ch), sk st, [dc in next ch-1 space, ch 1, sk st] all the way around. Sl st in second chain to join. (36 st)
Cap - Rnd 5 :
sl st into ch-1 space, ch 3 (counts as first dc + ch), dc in same st, ch 1, sk st, *[dc in next ch-1 space, ch 1, sk st] 2 times, (dc, ch 1, dc, ch 1) in next ch-1 space, sk st, [dc in next ch-1 space, ch 1, sk st] 2 times.** repeat from * to ** 4 more times, [dc in next ch-1 space, ch 1, sk st] 2 times. (48 st)
Cap - Info :
Note: There is no “sl st in second ch to join” between Rounds 5 & 6. Skip the last stitch in Round 5 as instructed, and begin the first sc of Round 6 directly in the second chain. (Fig. S-1)
Cap - Rnd 6 :
sc in each st around. Sl st in first st to join. DO NOT FINISH OFF. (48 st)
Gills - Rnd 7 :
– working in back loops only – ch 3 (counts as first dc + ch), sk st, dc in next st, ch 1, sk st, *dc2tog across next 3 st, ch 1, sk st, [dc in next st, ch 1, sk st] 2 times,** repeat from * to ** 4 more times, dc2tog across next 3 st, ch 1, sk st. Sl st in second chain to join. (36 st)
Gills - Rnd 8 :
– working in both loops only – ch 3 (counts as first dc + ch), sk st, [dc2tog across next 3 st, ch 1, sk st, dc in next st, ch 1, sk st] 5 times, dc2tog across next 3 st, ch 1, sk st. Sl st in second chain to join. (24 st)
Gills - Rnd 9 :
ch 1 (does not count as first st), [sc in next st, sk st] all the way around. Sl st in first st to join. (12 st)
Stem - Rnd 10 :
– working in front loops only – ch 1 (does not count as first st), sc in each st around. (12 st)
Stem - Rnd 11-14 :
– working in both loops from now on – sc in each st around. (12 st)
Stem - Rnd 15 :
[2 sc in next st, sc in next 3 st] 3 times. (15 st)
Stem - Rnd 16-17 :
sc in each st around. (15 st)
Stem - Rnd 18 :
[invdec, sc in next 3 st] 3 times. DO NOT FINISH OFF. (12 st)
Stem - Info :
Note: Use safety-pin style stitch markers to mark the back loops of the first and last stitches of Round 18. These will come in handy later on when finishing the base. (Fig. S-7)
Base - Rnd 19 :
– working in front loops only – [2 sc in next st, sc in next st] 6 times. (18 st)
Base - Rnd 20 :
– working in both loops from now on – [sc in next st, 2 sc in next st, sc in next st] 6 times. (24 st)
Base - Rnd 21 :
sc in each st around. (24 st)
Base - Rnd 22 :
[sc in next st, invdec, sc in next st] 6 times. (18 st)
Base - Rnd 23 :
[invdec, sc in next st] 6 times. (12 st)
Base - Info :
Flatten the base to create a disc-shape. Locate the stitch markers from Round 18. Align the first stitch from Round 18 with the first stitch to be worked in the following round.
Base - Rnd 24 :
sl st through both loops of Round 23 and back loops of Round 18, all the way around. FINISH OFF AND HIDE END. (12 st)
— Medium Size: Lighted Flat Mushroom :
Cap - Rnd 1 :
6 sc. Sl st to join. (6 st)
Cap - Rnd 2 :
ch 3 (counts as first dc + ch), dc in same st, ch 1, (dc, ch 1, dc, ch 1) in next 5 stitches. Sl st in second chain to join. (24 st)
Cap - Rnd 3 :
sl st into ch-1 space, ch 3 (counts as first dc + ch), dc in same st, ch 1, sk st, *dc in next ch-1 space, ch 1, sk st, (dc, ch 1, dc, ch 1) in next ch-1 space, sk st.** repeat from * to ** 4 more times, dc in next ch-1 space, ch 1, sk st. Sl st in second chain to join. (36 st)
Cap - Rnd 4 :
sl st into ch-1 space, ch 3 (counts as first dc + ch), sk st, [dc in next ch-1 space, ch 1, sk st] 2 times, * (dc, ch 1, dc, ch 1) in next ch-1 space, sk st, [dc in next ch-1 space, ch 1, sk st] 2 times.** repeat from * to ** 4 more times, (dc, ch 1, dc, ch 1) in next ch-1 space, sk st. Sl st in second chain to join. (48 st)
Cap - Rnd 5 :
sl st into ch-1 space, ch 3 (counts as first dc + ch), sk st, [dc in next ch-1 space, ch 1, sk st] 2 times, *(dc, ch 1, dc, ch 1) in next ch-1 space, sk st, [dc in next ch-1 space, ch 1, sk st] 2 times,** repeat from * to ** 4 more times. (60 st)
Cap - Rnd 6 :
sl st into ch-1 space, ch 3 (counts as first dc + ch), dc in same st, ch 1, sk st, [dc in next ch-1 space, ch 1, sk st] 14 times, (dc, ch 1, dc, ch 1) in next ch-1 space, sk st, [dc in next ch-1 space, ch 1, sk st] 14 times. Sl st in second chain to join. (64 st)
Cap - Rnd 7 :
sl st into ch-1 space, ch 3 (counts as first dc + ch), sk st, [dc in next ch-1 space, ch 1, sk st] all the way around. Sl st in second chain to join. (64 st)
Cap - Info :
Note: There is no “sl st in second ch to join” between Rounds 7 & 8. Skip the last stitch in Round 7 as instructed, and begin the first sc of Round 8 directly in the second chain. (Fig. M-3)
Cap - Rnd 8 :
sc in each st around. Sl st in first st to join. DO NOT FINISH OFF. (64 st)
Gills - Rnd 9 :
– working in back loops only – ch 3 (counts as first dc + ch), sk st, [dc in next st, ch 1, sk st] 2 times, dc2tog across next 3 st, ch 1, sk st, [dc in next st, ch 1, sk st] 3 times, dc2tog across next 3 st, ch 1, sk st, [dc in next st, ch 1, sk st] 3 times, dc2tog across next 3 st, ch 1, sk st. Sl st in second chain to join. (52 st)
Gills - Rnd 10 :
– working in both loops only – ch 3 (counts as first dc + ch), sk st, *[dc in next st, ch 1, sk st] 2 times, dc2tog across next 3 st, ch 1, sk st,** repeat from * to ** around as directed. Sl st in second chain to join. (40 st)
Gills - Rnd 11 :
ch 1 (counts as first half of dc2tog across next 3 st), sk st, dc in next st, ch 1, sk st, [dc2tog across next 3 st, ch 1, sk st] 9 times. Sl st in top of first dc2tog to join. (20 st)
Gills - Rnd 12 :
ch 1 (does not count as first st), [sc in next 8 st, sk st, sc in next st] 2 times. Sl st in first st to join. (18 st)
Stem - Rnd 13 :
– working in front loops only – ch 1 (does not count as first st), sc in each st around. (18 st)
Stem - Rnd 14-17 :
– working in both loops from now on – sc in each st around. (18 st)
Stem - Rnd 18 :
[sc in next 4 st, 2 sc in next st, sc in next 4 st] 2 times. (20 st)
Stem - Rnd 19 :
sc in each st around. (20 st)
Stem - Rnd 20 :
[2 sc in next st, sc in next 9 st] 2 times. (22 st)
Stem - Rnd 21-23 :
sc in each st around. (22 st)
Stem - Rnd 24 :
[sc in next 3 st, invdec, sc in next 4 st, invdec] 2 times. DO NOT FINISH OFF. (18 st)
Stem - Info :
Note: Use safety-pin style stitch markers to mark the back loops of the first and last stitches of Round 24. These will come in handy later on when finishing the base. (Fig. M-8)
Base - Rnd 25 :
– working in front loops only – [sc in next st, 2 sc in next st, sc in next st] 6 times. (24 st)
Base - Rnd 26 :
– working in both loops from now on – [2 sc in next st, sc in next 3 st] 6 times. (30 st)
Base - Rnd 27 :
[sc in next 2 st, 2 sc in next st, sc in next 2 st] 6 times. (36 st)
Base - Rnd 28 :
sc in each st around. (36 st)
Base - Rnd 29 :
[sc in next 2 st, invdec, sc in next 2 st] 6 times. (30 st)
Base - Rnd 30 :
[invdec, sc in next 3 st] 6 times. (24 st)
Base - Rnd 31 :
[sc in next st, invdec, sc in next st] 6 times. (18 st)
Base - Info :
Flatten the base to create a disc-shape. Locate stitch markers from Round 24 and align them. The first stitch from Round 24 aligns with the first stitch to be worked in the following round.
Base - Rnd 32 :
sl st through both loops of Round 31 and back loops of Round 24, all the way around. FINISH OFF AND HIDE END. (18 st)
— Large Size: Lighted Flat Mushroom :
Cap - Rnd 1 :
6 sc. Sl st to join. (6 st)
Cap - Rnd 2 :
ch 3 (counts as first dc + ch), dc in same st, ch 1, (dc, ch 1, dc, ch 1) in next 5 stitches. Sl st in second chain to join. (24 st)
Cap - Rnd 3 :
sl st into ch-1 space, ch 3 (counts as first dc + ch), dc in same st, ch 1, sk st, *dc in next ch-1 space, ch 1, sk st, (dc, ch 1, dc, ch 1) in next ch-1 space, sk st.** repeat from * to ** 4 more times, dc in next ch-1 space, ch 1, sk st. Sl st in second chain to join. (36 st)
Cap - Rnd 4 :
sl st into ch-1 space, ch 3 (counts as first dc + ch), sk st, [dc in next ch-1 space, ch 1, sk st] 2 times, *(dc, ch 1, dc, ch 1) in next ch-1 space, sk st, [dc in next ch-1 space, ch 1, sk st] 2 times.** repeat from * to ** 4 more times. (48 st)
Cap - Rnd 5 :
sl st into ch-1 space, ch 3 (counts as first dc + ch), sk st, [dc in next ch-1 space, ch 1, sk st] 2 times, *(dc, ch 1, dc, ch 1) in next ch-1 space, sk st, [dc in next ch-1 space, ch 1, sk st] 2 times,** repeat from * to ** 4 more times. (48 st?)
Cap - Rnd 6 :
sl st into ch-1 space, ch 3 (counts as first dc + ch), dc in same st, ch 1, sk st, [dc in next ch-1 space, ch 1, sk st] 4 times, (dc, ch 1, dc, ch 1) in next ch-1 space, ... repeat as pattern increases. (72 st)
Cap - Rnd 7 :
sl st into ch-1 space, ch 3 (counts as first dc + ch), sk st, [dc in next ch-1 space, ch 1, sk st] all the way around. Sl st in second chain to join. (84 st)
Cap - Info :
There is no “sl st in second ch to join” between the final growth round and the finishing sc round. Skip the last stitch as instructed and begin the next round directly. Pause to insert clear craft plastic (6 strips for large) as directed earlier, then continue with gills.
Cap - Rnd 8 :
sc in each st around. Sl st in first st to join. DO NOT FINISH OFF. (96 st)
Gills - Rnd 9 :
With gill color, Rnd 9: – working in back loops only – ch 3 (counts as first dc + ch), sk st, [dc in next ch-1 space, ch 1, sk st] 2 times, *(dc, ch 1, dc, ch 1) in next ch-1 space, sk st, [dc in next ch-1 space, ch 1, sk st] 3 times, dc2tog across next 3 st,** continue pattern as written in full pattern. (96 st reduced by patterning as shown in instructions)
Gills - Rnd 12-16 :
Work gill rounds in back loops and both loops as instructed, performing dc2tog across next 3 sts at the indicated intervals and reducing stitch counts to form gill rings. Follow pattern numbering sequentially as in medium and small sections to reduce to 24 st by the end of the gill section.
Stem - Rnd 17 :
– working in front loops only – ch 1 (does not count as first st), sc in each st around. (24 st)
Stem - Rnd 18-24 :
– working in both loops from now on – sc in each st around. (24 st)
Stem - Rnd 25 :
[sc in next 3 st, 2 sc in next st] 6 times. (30 st)
Stem - Rnd 26 :
sc in each st around. (30 st)
Stem - Rnd 27 :
[sc in next 2 st, 2 sc in next st, sc in next 2 st] 6 times. (36 st)
Stem - Rnd 28-31 :
sc in each st around. (36 st)
Stem - Rnd 32 :
[sc in next 2 st, invdec, sc in next 2 st] 6 times. (30 st)
Stem - Rnd 33 :
[sc in next 3 st, invdec] 6 times. DO NOT FINISH OFF. (24 st)
Stem - Info :
Note: Use safety-pin style stitch markers to mark the back loops of the first and last stitches of Round 33. These markers will be used later when finishing the base. Continue on to base instructions.
Base - Rnd 34 :
– working in front loops only – [2 sc in next st, sc in next 3 st] 6 times. (30 st)
Base - Rnd 35 :
– working in both loops from now on – [sc in next 2 st, 2 sc in next st, sc in next 2 st] 6 times. (36 st)
Base - Rnd 36 :
[2 sc in next st, sc in next 5 st] 6 times. (42 st)
Base - Rnd 37 :
[sc in next 3 st, 2 sc in next st, sc in next 3 st] 6 times. (48 st)
Base - Rnd 38 :
sc in each st around. (48 st)
Base - Rnd 39 :
[sc in next 3 st, invdec, sc in next 3 st] 6 times. (42 st)
Base - Rnd 40 :
[invdec, sc in next 5 st] 6 times. (36 st)
Base - Rnd 41 :
[sc in next 2 st, invdec, sc in next 2 st] 6 times. (30 st)
Base - Rnd 42 :
[invdec, sc in next 3 st] 6 times. (24 st)
Base - Info :
Flatten the base to create a disc-shape. Locate stitch markers from Round 33 and align. The first stitch from Round 33 aligns with the first stitch to be worked in the following round.
Base - Rnd 43 :
sl st through both loops of Round 42 and back loops of Round 33, all the way around. FINISH OFF AND HIDE END. (24 st)
These lighted mushrooms are a delightful way to bring a handmade glow to any shelf or bedside table. Choose bright caps for a cheerful, luminous display or softer hues for a calming nightlight effect. Mix sizes to create whimsical clusters that brighten corners and gift them with cozy charm. 🧶✨