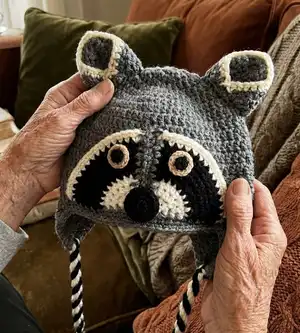
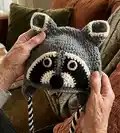
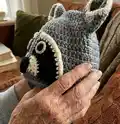
Make a cosy, stylish leopard earflap hat with spotted details and a cute crocheted nose. This pattern includes child and adult sizes, full stitch-by-stitch instructions and charted diagrams to guide your work. Youll enjoy shaping the crown, forming triangular earflaps and adding spots and ears for a playful finish. Perfect as a fun gift or a statement winter accessory.
Progress Tracker
0% Complete
— Method :
Info :
The main part of the hat is crocheted in rounds, starting from the top and increasing the stitches to shape the crown.
Info :
The earflaps are crocheted in rows and decreased to form the triangular shape.
Info :
The leopard's ears are worked in rounds. They are lightly stuffed and attached to the hat along with a crocheted nose and leopard spots.
Info :
The number of spots can be increased to create a denser pattern, if preferred. Buttons are stitched on for eyes.
— Main piece :
Info :
Both sizes: Starting at the top of the hat, with 6mm hook and A, make 4 ch and sl st to first ch to form a ring.
Round 1 :
1 ch (does not count as a st), work 6 dc into ring, sl st into first dc (6 sts).
Round 2 (inc) :
1 ch (does not count as a st), (dc2inc) 6 times, sl st into first dc (12 sts).
Round 3 (inc) :
1 ch (does not count as a st), (dc2inc, 1 dc) 6 times, sl st into first dc (18 sts).
Round 4 (inc) :
1 ch (does not count as a st), (dc2inc, 2 dc) 6 times, sl st into first dc (24 sts).
Round 5 (inc) :
1 ch (does not count as a st), (dc2inc, 3 dc) 6 times, sl st into first dc (30 sts).
Round 6 (inc) :
1 ch (does not count as a st), (dc2inc, 4 dc) 6 times, sl st into first dc (36 sts).
Round 7 (inc) :
1 ch (does not count as a st), (dc2inc, 5 dc) 6 times, sl st into first dc (42 sts).
Round 8 (inc) :
1 ch (does not count as a st), (dc2inc, 6 dc) 6 times, sl st into first dc (48 sts).
Round 9 (inc) :
1 ch (does not count as a st), (dc2inc, 7 dc) 6 times, sl st into first dc (54 sts).
Round 10 (inc) :
1 ch (does not count as a st), (dc2inc, 8 dc) 6 times, sl st into first dc (60 sts).
Round 11 (inc) :
Adult size only: 1 ch (does not count as a st), (dc2inc, 9 dc) 6 times, sl st into first dc (66 sts).
Next :
Both sizes: 1 ch (does not count as a st), work 1 dc in each dc, sl st into first dc.
Repeat :
Rep last round 16 [18] times more.
— Earflaps and edging :
First earflap :
Next: Starting at the centre back, 1 ch (does not count as a st), work 1 dc in next 5[6] dc. The following is worked in rows:
Row 1 (RS) :
Adult size only: Work 1 dc in next 15 dc, turn.
Row 2 (WS) (dec) :
Adult size only: 1 ch (does not count as a st), dc2dec, 1 dc in next 11 dc, dc2dec, turn, 1 ch (does not count as a st).
Next :
Both sizes: Work 1 dc in next 13 dc, turn.
Next (dec) :
Both sizes: *1 ch (does not count as a st), dc2dec, 1 dc in next 9 dc, dc2dec, turn (11 sts).
Next :
1 ch (does not count as a st), work 1 dc in each dc, turn.
Next (dec) :
1 ch (does not count as a st), dc2dec, 1 dc in next 7 dc, dc2dec, turn (9 sts).
Next :
1 ch (does not count as a st), work 1 dc in each dc, turn.
Next (dec) :
1 ch (does not count as a st), dc2dec, 1 dc in next 5 dc, dc2dec, turn (7 sts).
Next :
1 ch (does not count as a st), work 1 dc in each dc, turn.
Next (dec) :
1 ch (does not count as a st), dc2dec, 1 dc in next 3 dc, dc2dec, turn (5 sts).
Next :
1 ch (does not count as a st), work 1 dc in each dc, turn.
Next (dec) :
1 ch (does not count as a st), dc2dec, 1 dc in next 1 dc, dc2dec, turn (3 sts).* Fasten off.
Second earflap :
Next: With right side facing, rejoin A to the front of the hat. Work 1 dc in each of the 24 dc across the front of the hat. The following is worked in rows:
Row 1 (RS) :
Adult size only: Work 1 dc in next 15 dc, turn.
Row 2 (WS) (dec) :
Adult size only: 1 ch (does not count as a st), dc2dec, 1 dc in next 11 dc, dc2dec, turn, 1 ch (does not count as a st).
Next :
Both sizes: Work 1 dc in next 13 dc, turn.
Next :
Both sizes: Work from * to * of first earflap. Fasten off.
— Earflap facings (Make 2) :
Info :
Omit if you plan to add a crocheted lining.
Both sizes :
Using 6mm hook and A, make 14[16] ch. Row 1 (RS): Work 1 dc in second ch from hook, 1 dc into the next 12[14] ch, turn (13[15] sts).
Row 2 (dec) :
Adult size only: 1 ch (does not count as a st), dc2dec, 1 dc in next 11 dc, dc2dec, turn (13 sts).
Row 3 :
Adult size only: 1 ch (does not count as a st), work 1 dc in each dc, turn.
Next :
Both sizes: Work from * to * of the first earflap in the main piece pattern. Fasten off.
— Edging :
Edging :
Using 5mm hook and A, with right side of work facing and starting at row 1 of the earflap facing, work 1 dc into each stitch down the edge of the next 10[12] rows, work dc2inc, 1 dc, dc2inc in the next 3 dc along the lower edge of the earflap facing, work 1 dc into each stitch at the edge of the next 10[12] rows up the other side of the earflap facing (25[29] sts). Fasten off, leaving a long length of yarn at the end.
— Ears (Make 2) :
Both sizes :
Starting at the top of the ear, with 6mm hook and A, make 4 ch and sl st to first ch to form a ring.
Round 1 :
1 ch (does not count as a st), work 5 dc into ring, sl st into first dc (5 sts).
Round 2 (inc) :
1 ch (does not count as a st), (dc2inc) 5 times, sl st into first dc (10 sts).
Round 3 (inc) :
1 ch (does not count as a st), (dc2inc, 1 dc) 5 times, sl st into first dc (15 sts).
Round 4 (inc) :
1 ch (does not count as a st), (dc2inc, 2 dc) 5 times, sl st into first dc (20 sts).
Next (inc) :
Adult size only: 1 ch (does not count as a st), (dc2inc, 4 dc) 4 times, sl st into first dc (24 sts).
Next :
Both sizes: 1 ch (does not count as a st), work 1 dc in each dc, sl st into first dc.
Repeat :
Rep last round 4[6] more times. Fasten off, leaving a long length of yarn at the end.
— Nose :
Both sizes :
With 3mm hook and B, make 4 ch and sl st to first ch to form a ring. Next: 1 ch (does not count as a st), work 6 dc into ring, sl st into first dc (6 sts).
Child size only :
Next round: 1 ch (does not count as a st), work 1 dc in each dc, sl st to first dc.
Next round (inc) :
Child size only: 1 ch (does not count as a st), (dc2inc) 6 times, sl st into first dc (12 sts).
Next round (inc) :
Child size only: 1 ch (does not count as a st), (dc2inc) 12 times, sl st into first dc (24 sts).
Adult size only :
Next (inc): 1 ch (does not count as a st), (dc2inc) 6 times, sl st into first dc (12 sts).
Next round :
Adult size only: 1 ch (does not count as a st), work 1 dc in each dc, sl st to first dc.
Next round :
Adult size only: Rep last round.
Next round (inc) :
Adult size only: 1 ch (does not count as a st), (dc2inc) 12 times, sl st into first dc (24 sts).
Next round :
Adult size only: 1 ch (does not count as a st), (dc2inc, 2 dc) 8 times, sl st into first dc (32 sts).
Finishing :
Both sizes: Fasten off, leaving a long length of yarn at the end.
— Spots :
Tiny (make 10[10]) :
With 3mm hook and C, make 4 ch and sl st to first ch to form a ring. Round 1: 1 ch (does not count as a st), work 5 dc into ring, sl st into first dc (5 sts). Join in yarn B. Round 2 (inc): With B, make 1 ch (does not count as a st), (dc2inc) 5 times (10 sts). Fasten off, leaving a long length of B at the end.
Small (make 10[6]) :
With 3mm hook and C, make 4 ch and sl st to first ch to form a ring. Row 1: 1 ch (does not count as a st), work 6 dc into ring, turn (6 sts). Row 2 (inc): 1 ch (does not count as a st), (dc2inc) 3 times, join and continue in yarn B, (dc2inc) 3 times, turn (12 sts). Row 3 (inc): With B, 1 ch (does not count as a st), (dc2inc, 1 dc) 6 times (18 sts). Fasten off, leaving a long length of B at the end.
Medium (make 6[6]) :
With 3mm hook and C, make 4 ch and sl st to first ch to form a ring. Round 1: 1 ch (does not count as a st), work 5 dc into ring, sl st into first dc (5 sts). Round 2 (inc): 1 ch (does not count as a st), (dc2inc) 5 times, sl st into first dc (10 sts). Round 3 (inc): 1 ch (does not count as a st), (dc2inc,1dc) twice, join and continue in yarn B, (dc2inc,1dc) 3 times, sl st into first dc (15 sts). Round 4 (inc): With B, 1 ch (does not count as a st), (dc2inc,2dc) 4 times, sl st to next dc. Fasten off, leaving a long length of B at the end.
Large (make 0[6]) :
With 3mm hook and C, make 4 ch and sl st to first ch to form a ring. Round 1: 1 ch (does not count as a st), work 6 dc into ring, sl st into first dc (6 sts). Round 2 (inc): 1 ch (does not count as a st), (dc2inc) 6 times, sl st into first dc (12 sts). Join in yarn B. Round 3 (inc): With B, make 1 ch (does not count as a st), (dc2inc,1dc) 6 times, turn (18 sts). Next: With B, miss first dc, 1 dc in next 2 dc, (dc2inc,2dc) 3 times, sl st to next dc. Fasten off, leaving a long length of B at the end.
This leopard hat pattern is a playful and cozy project that makes a wonderful handmade gift. The combination of chunky and DK yarns gives great texture while the spots and ears add delightful character. Make one in bold colours or natural tones for a stylish winter look. 🐆🧶