🧢 Beautiful ✨ Detailed πŸ’ Adorable

Lemon gnome Amigurumi Pattern

Lemon gnome Amigurumi Pattern
4.6β˜… Rating
5-7 Hours Time Needed
2.3K Made This
βœ‚οΈ

Intermediate Level

Ideal for those with basic crochet experience, featuring slightly more advanced stitches and techniques to expand your skills.

⏱️

Weekend Treat

Takes 5-7 hours, making it an enjoyable project to finish over a couple of days.

🧸

Cute Companion

An adorable friend to cherish, handcrafted with love to bring comfort and joy for years to come.

About This Lemon gnome Amigurumi Pattern

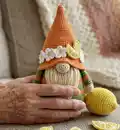
This pattern teaches you how to crochet a charming lemon gnome amigurumi complete with hat decorations, a beard, nose and tiny accessories. It uses cotton yarn and a small hook for firm stitches and neat shaping. The instructions include every round and assembly steps with photos for guidance.

Lemon gnome Amigurumi Pattern crochet pattern - detailed view of completed project

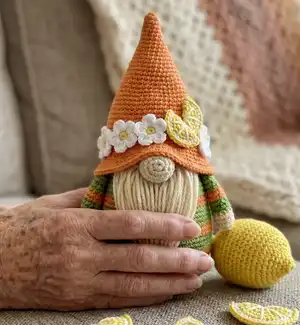
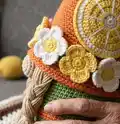
You will crochet the body in stripes, construct the hat and decorate it with a lemon slice, flowers and leaves. The pattern is written in rounds and includes tips for finishing and assembly.

Why You'll Love This Lemon gnome Amigurumi Pattern

I absolutely love this pattern because it combines a classic amigurumi shape with bright, cheerful lemon-themed details that make it unique. I enjoy small, detailed decorations like the lemon slice and tiny flowersβ€”they bring so much personality to the gnome. The construction uses simple round shaping but the color changes and finishing give you a satisfying project that looks polished. I designed it to be rewarding to sew together, with clear photos to help at assembly time.

Lemon gnome Amigurumi Pattern step 1 - construction progress Lemon gnome Amigurumi Pattern step 2 - assembly progress Lemon gnome Amigurumi Pattern step 3 - details and accessories Lemon gnome Amigurumi Pattern step 4 - final assembly and finishing

Switch Things Up

I love how many ways you can customize this pattern β€” try different color schemes like pastel lemons or autumn oranges for totally new looks.

You can change yarn weight to make a mini keychain version or a larger cuddly gnome; just match your hook to the yarn and watch the size change.

I often swap the lemon slice for a tiny pumpkin or star depending on the season, which makes a lovely holiday variation.

Try adding wire inside the hat if you want the brim to be poseable β€” it lets you shape the hat exactly how you like it.

Switch the flowers to felt appliques for an easier finish, or embroider tiny details like seeds on the lemon slices for extra charm.

If you prefer a softer look, use a different fiber such as acrylic or a cotton-acrylic blend to change the drape and texture of the hat.

I sometimes add bead centers to the flowers or use contrasting yarn for a folk-art effect β€” these little details make each gnome unique.

For a stroller-friendly toy, avoid small beads and sew all parts securely, then wash gently according to yarn care instructions.

Make coordinated sets by creating matching lemon slices as ornaments or magnets to sell or gift alongside your gnome.

Change the beard style by trimming a looped fringe or adding embroidered eyebrows β€” small facial changes completely change the gnome's personality.

Common Mistakes & How to Fix Them

βœ— Skipping the stitch marker at the start of rounds can cause you to lose track of rows; always place and move a stitch marker at the start of each round to stay accurate. βœ— Not stuffing gradually will give an uneven shape and lumps; stuff small amounts as you go and shape with your fingers for a smooth finish. βœ— Changing yarn without securing ends can lead to unraveling later; weave in ends or secure color changes tightly and leave tails for sewing if needed. βœ— Forgetting the bottom circle will make the gnome unstable; place a plastic or paper circle at the bottom before filling the body to keep a neat, flat base.

Lemon gnome Amigurumi Pattern

Make a delightful lemon-themed gnome with this detailed crochet pattern. You will create a striped body, pointed hat with floral and lemon slice decorations, a cute beard and nose, and tiny accessories. The pattern is written in clear rounds with helpful photos to guide assembly. Perfect for gifting or brightening your home with a sunny handmade friend.

Intermediate 5-7 Hours

Materials Needed for Lemon gnome Amigurumi Pattern

β€” Main Fabric

  • 01
    YarnArt Begonia (100% cotton, 169 m/50 g = 185 yds/1.76 oz) - Yellow (main) approx 50 g
  • 02
    YarnArt Begonia (100% cotton) - Light green approx 25 g
  • 03
    YarnArt Begonia (100% cotton) - White approx 20 g for details
  • 04
    YarnArt Begonia (100% cotton) - Beige and light beige approx 25 g each for nose, hands and beard
  • 05
    Poly fiber fill (holofiber) for stuffing
  • 06
    Plastic or paper circle to insert in the base for stability

β€” Tools Required

  • 01
    Crochet hook size 1.75 mm (US 4)
  • 02
    Sewing needle and scissors
  • 03
    Stitch marker
  • 04
    Yarn needle for sewing and weaving ends
  • 05
    Polyester stuffing (holofiber)
  • 06
    Plastic or paper circle for base support
  • 07
    Pins for assembly and placement

Progress Tracker

0% Complete

β€” Body :

R 1 :

6 sc in MR (6)

R 2 :

(inc) x 6 (12)

R 3 :

(1 sc, inc) x 6 (18)

R 4 :

(2 sc, inc) x 6 (24)

R 5 :

(3 sc, inc) x 6 (30)

R 6 :

(4 sc, inc) x 6 (36)

R 7 :

(5 sc, inc) x 6 (42)

R 8 :

(6 sc, inc) x 6 (48)

R 9 :

(7 sc, inc) x 6 (54)

R 10 :

54 sc (1 row) - crochet this row for the back wall of the loops !!!!!

R 11 :

54 sc (1 row)

R 12 :

(8 sc, inc) x 6 (60)

R 13 :

60 sc (1 row)

R 14 :

(9 sc, inc) x 6 (66)

Info :

Change to green yarn

R 15-19 :

66 sc (5 rows)

Info :

Change to yellow yarn

R 20-24 :

66 sc (12 rows)

Info :

Change to green yarn

R 25-26 :

66 sc (12 rows)

R 27 :

(20 sc, dec) x 3 (63)

R 28-29 :

63 sc (2 rows)

Info :

Change to yellow yarn

R 30 :

(19 sc, dec) x 3 (60)

R 31-32 :

60 sc (2 rows)

R 33 :

(18 sc, dec) x 3 (57)

R 34-35 :

57 sc (2 rows)

R 36 :

(17 sc, dec) x 3 (54)

R 37 :

54 sc (1 row)

R 38 :

(7 sc, dec) x 6 (48)

R 39 :

48 sc (1 row)

R 40 :

(6 sc, dec) x 6 (42)

R 41 :

42 sc (1 row)

R 42 :

(5 sc, dec) x 6 (36)

R 43 :

36 sc (1 row)

R 44 :

(7 sc, dec) x 4 (32)

R 45 :

(6 sc, dec) x 4 (28)

R 46 :

(5 sc, dec) x 4 (24)

R 47 :

24 sc (1 row)

R 48 :

(4 sc, dec) x 4 (20)

R 49 :

20 sc (1 row)

R 50 :

(3 sc, dec) x 4 (16)

R 51 :

(2 sc, dec) x 4 (12)

R 52 :

(1 sc, dec) x 4 (8)

R 53 :

(dec) x 4 (4)

Info :

Do not forget to put a plastic or paper circle on the bottom of the gnome's body (the diameter of the circle should correspond to the diameter of the bottom of the body). After that, we fill the body with holofiber.

β€” Nose (make 1) :

R 1 :

7 sc in MR (7)

R 2 :

(inc) x 7 (14)

R 3 :

(1 sc, inc) x 7 (21)

R 4-5 :

21 sc (2 rows)

R 6 :

(1 sc, dec) x 7 (14)

R 7 :

(dec) x 7 (7)

Info :

Fill the nose with holofiber. F.o. and leave a long tail for sewing

β€” Beard (make 1) :

R 1 :

6 sc in MR (6)

R 2 :

6 sc (1 row)

R 3 :

(1 sc, inc) x 3 (9)

R 4 :

(2 sc, inc) x 3 (12)

R 5 :

(2 sc, inc) x 4 (16)

R 6 :

(3 sc, inc) x 4 (20)

R 7 :

(4 sc, inc) x 4 (24)

R 8 :

24 sc (1 row)

R 9 :

(5 sc, inc) x 4 (28)

R 10 :

(6 sc, inc) x 4 (32)

R 11 :

(7 sc, inc) x 4 (36)

R 12 :

(8 sc, inc) x 4 (40)

R 13-19 :

40 sc (7 rows)

R 20 :

(8 sc, dec) x 4 (36)

R 21 :

(7 sc, dec) x 4 (32)

R 22-23 :

32 sc (2 rows)

Info :

Don't stuff with fiberfill. We fold the part in half and knit 1 row, tying both halves together. F.o. and leave a long tail for sewing

β€” Hands (make 2) :

R 1 :

6 sc in MR (6)

R 2 :

(inc) x 6 (12)

R 3 :

(2 sc, inc) x 4 (16)

R 4-7 :

16 sc (4 rows)

Info :

Change to yellow yarn

R 8-11 :

16 sc (4 rows)

R 12 :

(6 sc, dec) x 2 (14)

R 13-20 :

14 sc (8 rows)

Info :

Don't stuff with fiberfill. We fold the part in half and knit 1 row, tying both halves together. F.o. and leave a long tail for sewing

β€” Gnome hat (make 1) :

R 1 :

8 sc in MR (8)

R 2 :

8 sc (1 row)

R 3 :

(1 sc, inc) x 4 (12)

R 4 :

12 sc (1 row)

R 5 :

(2 sc, inc) x 4 (16)

R 6 :

16 sc (1 row)

R 7 :

(3 sc, inc) x 4 (20)

R 8 :

20 sc (1 row)

R 9 :

(4 sc, inc) x 4 (24)

R 10 :

24 sc (1 row)

R 11 :

(5 sc, inc) x 4 (28)

R 12 :

28 sc (1 row)

R 13 :

(6 sc, inc) x 4 (32)

R 14 :

32 sc (1 row)

R 15 :

(7 sc, inc) x 4 (36)

R 16 :

36 sc (1 row)

R 17 :

(5 sc, inc) x 6 (42)

R 18 :

42 sc (1 row)

R 19 :

(6 sc, inc) x 6 (48)

R 20 :

48 sc (1 row)

R 21 :

(7 sc, inc) x 6 (54)

R 22 :

54 sc (1 row)

R 23 :

(8 sc, inc) x 6 (60)

R 24 :

60 sc (1 row)

R 25 :

(9 sc, inc) x 6 (66)

R 26 :

66 sc (1 row)

R 27 :

(10 sc, inc) x 6 (72)

R 28 :

72 sc (1 row)

R 29 :

(8 sc, inc) x 8 (80)

R 30 :

80 sc (1 row)

R 31 :

(9 sc, inc) x 8 (88)

R 32 :

(10 sc, inc) x 8 (96)

R 33 :

96 sc (1 row)

R 34 :

(11 sc, inc) x 8 (104)

R 35-36 :

104 sc (2 rows)

Info :

F.o. and leave a long tail for sewing

β€” Slice of lemon (make 1) :

R 1 :

6 sc in MR (6)

R 2 :

(inc) x 6 (12)

R 3 :

(1 sc, inc) x 6 (18)

R 4 :

(2 sc, inc) x 6 (24)

R 5 :

(3 sc, inc) x 6 (30)

Info :

Change to white yarn

R 6 :

(4 sc, inc) x 6 (36)

Info :

Change to yellow yarn

R 7 :

(5 sc, inc) x 6 (42)

Info :

Don't stuff with fiberfill. We fold the part in half and knit 1 row, tying both halves together. F.o. and leave a long tail for sewing

β€” Flowers (make 3) :

R 1 :

6 sc in MR (6)

Info :

Change to white yarn

Infos :

Next, we crochet 6 flower petals. Crochet 1 petal in each of the 6 loops. Petal: 1 sl st, 2 ch, 2 dc, 2 ch, 1 sl st in the same loop (in the one in which we knit the petal)

β€” Small leaf (make 1) :

Info :

Make 12 ch. From the 2nd ch from hook: 1 sl st, 1 sc, 1 HDC, 2 dc, 2 tr, 2 dc, 1 HDC, 1 sl st

β€” Big leaf (make 1) :

Info :

Make 12 ch. From the 2nd ch from hook: 1 sl st, 1 sc, 1 HDC, 2 dc, 2 tr, 2 dc, 1 HDC, 3 sc in 1 loop; further crochet the second half of the braid 1 HDC, 2 dc, 2 tr, 2 dc, 1 HDC, 1 sc, 1 sl st.

β€” Assembly :

Info :

Sew the beard and nose.

Info :

Sew the hands to the body.

Info :

Sew a hat. Gradually fill the hat with holofiber during sewing.

Info :

Make the design of the hat - sew a slice of lemon, leaves and flowers (see photo).

Assembly Instructions

  • Sew the beard and nose to the front of the body, centering the nose above the beard and securing with tight whipstitching.
  • Position the hands on either side of the body around the row indicated by the stripes and sew each hand firmly with a yarn needle using the long tail.
  • Sew the hat onto the top of the body and fill the hat gradually with holofiber while stitching to keep the cone shape stable.
  • Attach the lemon slice, three flowers and two leaves to the brim of the hat as shown in the photos, arranging the flowers around the lemon slice and securing with small stitches.

Important Notes

  • πŸ’‘Fasten off your work always with needle join for a neat finish and secure ends properly.
  • πŸ’‘Stuff your amigurumi as you go to keep even shaping and avoid gaps or lumps in the body and hat.
  • πŸ’‘Use a stitch marker or a piece of yarn to mark the beginning of each round β€” this keeps your count accurate, especially during increases and decreases.
  • πŸ’‘Place a plastic or paper circle in the bottom of the body before filling to create a stable, neat base.

This bright Lemon Gnome pattern brings a sunny pop of handmade charm to your home or gift list! πŸ‹ Crochet the striped body, a pointed hat and pretty lemon-slice decorations for a cheerful finished piece. 🧢 Make a set or a single happy gnome to brighten any shelf or desk β€” happy crocheting! ✨

You ask,

we answer.

FAQs

What size will the finished piece be?

If you use the same yarn and hook recommended, the gnome will be about 13 cm (5.1 inches) tall.

Can I use different yarn weights for this pattern?

Yes, you can use different yarn weights, but the final size will change; adjust the hook size accordingly and expect a different fabric density.

Do I need prior crochet experience for this pattern?

This pattern is rated Intermediate and assumes knowledge of basic amigurumi techniques such as magic ring, single crochet, increases and decreases.

How long does this project typically take to complete?

Most crocheters complete this project in 5-7 hours, though time will vary based on experience level and assembly care.