๐Ÿงถ Beautiful โœจ Detailed ๐Ÿ’ Adorable

Christmas Minion Amigurumi Pattern

Christmas Minion Amigurumi Pattern
4.0โ˜… Rating
5-7 Hours Time Needed
2.4K Made This
โœ‚๏ธ

Intermediate Level

Ideal for those with basic crochet experience, featuring slightly more advanced stitches and techniques to expand your skills.

โฑ๏ธ

Weekend Treat

Takes 5-7 hours, making it an enjoyable project to finish over a couple of days.

๐Ÿงธ

Cute Companion

An adorable friend to cherish, handcrafted with love to bring comfort and joy for years to come.

About This Christmas Minion Amigurumi Pattern

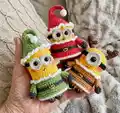
This pattern teaches you how to crochet three tiny Christmas minions with hats, collars, belt details and glasses. It uses sport weight yarn and small hooks to create compact amigurumi that are great for gifting or holiday display. The instructions include body shaping, color changes, small accessories and assembly notes to finish your characters with personality.

Christmas Minion Amigurumi Pattern crochet pattern - detailed view of completed project

Youll learn to work in rounds, use BLO/FLO techniques for attaching decorative pieces and sew small parts securely. Photos and step instructions guide placement of eyes, glasses and horns for the perfect festive look.

Why You'll Love This Christmas Minion Amigurumi Pattern

I absolutely love this pattern because it combines bright holiday colors with the playful charm of minions for an instant smile. I enjoy the small-scale construction that lets me finish a whole character in a few hours. The design gives lots of room for personalization โ€” you can change hats, outfits or add tiny accessories. Creating a set of three with different color schemes is especially satisfying and makes a thoughtful handmade gift.

Christmas Minion Amigurumi Pattern step 1 - construction progress Christmas Minion Amigurumi Pattern step 2 - assembly progress Christmas Minion Amigurumi Pattern step 3 - details and accessories Christmas Minion Amigurumi Pattern step 4 - final assembly and finishing

Switch Things Up

I love how easy it is to customize the minions by swapping the shirt color and hat โ€” try pastel tones for a soft holiday look or bright colors for a playful set.

You can change the size by altering yarn weight and hook; bulky yarn with a larger hook creates a chunky ornament while thinner yarn makes a delicate keychain-sized minion.

I often replace safety eyes with embroidered eyes for baby-safe toys or use felt pieces glued and stitched on for different textures.

Try adding tiny accessories like a crocheted present, scarf, or mini candy cane to give each minion its own personality.

For more posability, add a short length of wire into the arms before stuffing so they can be slightly posed.

Embroider different mouths to change expression โ€” a smile, a smirk or an open mouth can totally alter the character.

I sometimes make matching mini hats for a set and vary the pompom styles โ€” fuzzy pompom, crocheted bobble or a simple slst nubbins.

Use metallic or variegated yarn for the belt or collar to add a festive shimmer without changing the construction.

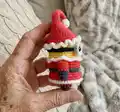
Make a themed trio by coordinating colors โ€” Santa red, elf green and reindeer brown โ€” for an instant holiday display.

If you want smaller gifts, use thinner yarn and a finer hook to create miniature versions suitable as ornaments or keychains.

Common Mistakes & How to Fix Them

โœ— Skipping stitch markers during rounds with increases or decreases causes counting errors; use a marker at the start of each round and move it as you work. โœ— Switching colors without securing tails leads to loose ends and fraying; fasten off or weave in ends immediately and carry yarn neatly between color sections. โœ— Understuffing results in a floppy, misshapen body; stuff gradually and firmly, especially before closing decreases to maintain shape. โœ— Forgetting to change to BLO or FLO when instructed will distort placement of collars and shirt pieces; double-check rounds that specify BLO or FLO and insert hook accordingly. โœ— Sewing arms or legs in the wrong position makes the minion look uneven; pin parts in place and compare both sides before stitching them securely.

Christmas Minion Amigurumi Pattern

Make a trio of festive minions perfect for holiday gifts and decorations. This pattern guides you through creating three tiny amigurumi minions with hats, glasses and cute details. Youll work small pieces, color changes and simple assembly to bring these cheerful characters to life. Great for using scrap yarn and making holiday-themed handmade gifts.

Intermediate 5-7 Hours

Materials Needed for Christmas Minion Amigurumi Pattern

โ€” Main Fabric

  • 01
    Sport weight yarn (size 1.5-2mm) - main color Yellow for body (small amounts each)
  • 02
    Sport weight yarn - Minion shirt colors (red, green, brown/orange) small amounts for each outfit
  • 03
    White yarn - small amount for glasses and collar
  • 04
    Gray yarn - small amount for glasses edging
  • 05
    Black yarn or black embroidery thread for decorating and belts
  • 06
    Dark brown yarn - for Stuart horns
  • 07
    Fiberfill stuffing - small bag
  • 08
    Black safety eyes size 8-10mm (I used 8mm eyes)

โ€” Tools Required

  • 01
    Crochet hook size 2.0mm - 2.5mm (use size to obtain gauge)
  • 02
    Black safety eyes 8-10mm (2 pieces per minion)
  • 03
    Scissors
  • 04
    Yarn needle for sewing and weaving ends
  • 05
    Stitch markers
  • 06
    Polyester stuffing (fiberfill)
  • 07
    Glue (for securing glasses placement)
  • 08
    Pins for assembly

Progress Tracker

0% Complete

โ€” Materials :

Info :

Yarn: sport yarn size 1.5-2mm. Crochet hook: 2.0mm - 2.5mm sport yarn or any size to obtain gauge. Gauge: 9 single crochet and 9 rows yield a square with 1 inch sides for 2.0mm hook. Black safety eyes size 8-10mm (i used 8mm eyes). Black yarn or black embroidery thread for decorating. Fiberfill. Yarn needle. Stitch markers (if you need).

โ€” Abbreviation :

Infos :

MR: magic ring. Ch: chain. Slst: slip stitch. Sc: single crochet. Inc: increase (2 single crochet in one stitch). Dec: decrease (use invisible decrease). Hdc: half double crochet. Hdc-inc: half double crochet increase (2 half double crochet in one stitch). Dc: double crochet. Dc-dec: double crochet decrease. Dc-inc: double crochet increase. BLO: back loop only. FLO: front loop only. Rnds: rounds. Sts: stitch.

โ€” Bob's Body :

Round 1 :

7sc in MR (7)

Round 2 :

7 - inc (14)

Round 3 :

(sc, inc) * 7 (21)

Round 4 :

(inc, 2sc) * 7 (28)

Round 5 :

(3sc, inc) * 7 (35)

Round 6-14 :

(9 rnds) 35sc (35)

Info :

Switch to red yarn

Round 15 :

BLO (4sc, inc) * 7 (42)

Round 16-17 :

(2 rnds) 42sc (42)

Info :

Switch to black yarn

Round 18-19 :

(2 rnds) 42sc (42)

Info :

Switch to red yarn

Round 20 :

BLO 42sc (42)

Round 21 :

42sc (42)

Round 22 :

(4sc, dec) * 7 (35)

Round 23 :

(3sc, dec) * 7 (28)

Info :

Stuff the body tight with fiberfill

Round 24 :

(2sc, dec) * 7 (21)

Round 25 :

(sc, dec) * 7 (14)

Round 26 :

7 - dec (7)

Info :

Cut the yarn. Invisible fasten off. Thread a needle with your yarn tail and close the ramaning gap.

โ€” Kevin's Body :

Round 1 :

7sc in MR (7)

Round 2 :

7 - inc (14)

Round 3 :

(sc, inc) * 7 (21)

Round 4 :

(inc, 2sc) * 7 (28)

Round 5 :

(3sc, inc) * 7 (35)

Round 6-21 :

(16 rnds) 35sc (35)

Info :

Switch to green yarn

Round 22 :

BLO (4sc, inc) * 7 (42)

Round 23-24 :

(2 rnds) 42sc (42)

Info :

Switch to black yarn

Round 25-26 :

(2 rnds) 42sc (42)

Info :

Switch to green yarn

Round 27 :

BLO 42sc (42)

Round 28 :

42sc (42)

Round 29 :

(4sc, dec) * 7 (35)

Round 30 :

(3sc, dec) * 7 (28)

Info :

Stuff the body tight with fiberfill

Round 31 :

(2sc, dec) * 7 (21)

Round 32 :

(sc, dec) * 7 (14)

Round 33 :

7 - dec (7)

Info :

Cut the yarn. Invisible fasten off. Thread a needle with your yarn tail and close the remaining gap.

โ€” Stuart's Body :

Round 1 :

7sc in MR (7)

Round 2 :

7 - inc (14)

Round 3 :

(sc, inc) * 7 (21)

Round 4 :

(inc, 2sc) * 7 (28)

Round 5 :

(3sc, inc) * 7 (35)

Round 6-17 :

(12 rnds) 35sc (35)

Info :

Switch to brrown yarn

Round 18 :

BLO (4sc, inc) * 7 (42)

Round 19-20 :

(2 rnds) 42sc (42)

Info :

Switch to black yarn

Round 21-22 :

(2 rnds) 42sc (42)

Info :

Switch to brown yarn

Round 23 :

BLO 42sc (42)

Round 24 :

42sc (42)

Round 25 :

(4sc, dec) * 7 (35)

Round 26 :

(3sc, dec) * 7 (28)

Info :

Stuff the body tight with fiberfill

Round 27 :

(2sc, dec) * 7 (21)

Round 28 :

(sc, dec) * 7 (14)

Round 29 :

7 - dec (7)

Info :

Cut the yarn. Invisible fasten off. Thread a needle with your yarn tail and close the remaining gap.

โ€” Arms :

Info :

With black and minion shirt's yarn (make two)

Round 1 :

start with black 4sc in MR (4)

Round 2 :

4 - inc (8)

Info :

Switch color

Round 3-8 :

(6 rnds) 8sc (8)

Info :

Cut the yarn. Leave a long tail. Thread a needle with your yarn tail and sew to the body at the round you switch to minion shirt's color yarn.

โ€” Legs :

Info :

With black and minion shirt's yarn.

Round 1 :

start with black 7sc in MR (7)

Round 2 :

inc, 6sc (8)

Info :

Switch color

Round 3-4 :

8sc (8)

Info :

Cut the yarn. Leave a long tail. Thread a needle with your yarn tail and sew the legs to bottom of the body.

โ€” Bob's and Kevin's Glasses :

Info :

With white and gray.

Round 1 :

start with white 7sc in MR (7)

Round 2 :

7 - inc (14)

Info :

Switch to gray

Round 3 :

FLO 14sc, slst(14)

Info :

Cut the yarn. Leave a long tail. Thread a needle with your yarn tail and sew the glasses to the body. Place the eyes on glasses and use glue to stick them to the body.

โ€” Stuart's Glasses :

Info :

With white and gray.

Round 1 :

start with white 7sc in MR (7)

Round 2 :

7 - inc (14)

Round 3 :

(sc, inc) * 7 (21)

Info :

Switch to gray

Round 4 :

FLO 21sc, slst (21)

Round :

Black trap for Bob and Kevin glasses: Start with black yarn, ch32, 31 - slst on chain.

Info :

Cut the yarn. Leave a long tail. Thread a needle with your yarn tail and sew it to the body of minion.

Round :

Black trap for Stuart glasses: Start with black yarn, ch37, 36sc on chain.

Info :

Cut the yarn. Leave a long tail. Thread a needle with your yarn tail and sew it to the body of minion.

โ€” Piece of shirt :

Info :

With minion shirt's yarn Insert your hook to FLO stitches of the second BLO round on the body,

Round 1 :

ch1, (5sc, inc) * 7, slst (49)

Round 2-3 :

(2 rnds) ch1, 49sc, slst (49)

Info :

Switch to white yarn

Round 4 :

49sc, slst (49)

Info :

Cut the yarn. Invisible fasten off. Hide your yarn tail.

โ€” Collar :

Info :

With white yarn Insert your hook to FLO stitches of the first BLO round on the body, (ch 3, slst to the next stitch) * end round

Info :

Cut the yarn. Invisible fasten off. Hide your yarn tail.

โ€” Bob's and Kevin's hat :

Round 1 :

4sc in MR (4)

Round 2-4 :

(3 rnds) 4sc (4)

Round 5 :

3sc, inc (5)

Round 6-8 :

(3 rnds) 5sc (5)

Round 9 :

4sc, inc (6)

Round 10-12 :

(3 rnds) 6sc (6)

Round 13 :

(sc, inc) * 3 (9)

Round 14 :

9sc (9)

Round 15 :

(2sc, inc) * 3 (12)

Round 16-17 :

(2 rnds) 12sc (12)

Round 18 :

(sc, inc) * 6 (18)

Round 19 :

18sc (18)

Round 20 :

(2sc, inc) * 6 (24)

Round 21 :

24sc (24)

Round 22 :

(3sc, inc) * 6 (30)

Round 23 :

(4sc, inc) * 6 (36)

Round 24 :

2sc, inc, (5sc, inc) * 5, 3sc (42)

Round 25 :

42sc (42)

Info :

Switch to white yarn

Round 26 :

42sc (42)

Round 27 :

(Ch 3, slst to the next stitch) * end round

Info :

Cut the yarn. Invisible fasten off. Hide your yarn tail.

โ€” Stuart's horn :

Info :

With dark brown yarn. Make two.

Big piece Rnd 1 :

6sc in MR (6)

Big piece Rnd 2 :

(2sc, inc) * 2 (8)

Big piece Rnd 3 :

8sc (8)

Big piece Rnd 4 :

2sc, 2- dec, 2sc (6)

Big piece Rnd 5 :

2sc, dec, 2sc (5)

Big piece Rnd 6-7 :

(2 rnds) 5sc (5)

Big piece Rnd 8 :

3sc, dec, slst (4)

Info :

Cut the yarn. Leave a long tail for sewing.

Small piece Rnd 1 :

4sc in MR (4)

Small piece Rnd 2-3 :

(2 rnds) 4sc (4)

Info :

Cut the yarn. Leave a long tail. Thread a needle with your yarn tail. Sew small piece to big piece spanning rounds 5&6.

Info :

Sew the horn to the top of minion spanning rounds 4&5

Assembly Instructions

  • Sew arms to the body at the round where you switched to the minion shirt color, using the long tail and stitch marker for alignment.
  • Attach legs to the bottom of the body with a yarn needle, spacing them evenly and sewing securely so the minion stands upright.
  • Sew glasses to the body, place safety eyes on the glasses and use a small amount of glue to secure the eyes to the glasses before stitching the glasses in place.
  • Sew Stuart's horns by joining the small piece to the big piece spanning rounds 5 & 6, then sew each horn to the top of the head spanning rounds 4 & 5.
  • Attach hat and shirt piece by inserting the hook to the specified BLO/FLO rounds when indicated, then sew and weave in ends to hide tails.

Important Notes

  • ๐Ÿ’กUse stitch markers to mark the beginning of each round, especially when working increases or decreases to keep accurate stitch counts.
  • ๐Ÿ’กWork with consistent tension to ensure uniform stitch size; small changes in tension will significantly affect the finished size with sport yarn.
  • ๐Ÿ’กStuff the body firmly but gradually while working decreases to avoid lumps and to keep a smooth shape.
  • ๐Ÿ’กWeave in or hide yarn tails after each piece to prevent long tails from showing and to simplify final assembly.

These tiny Christmas minions are a joyful, handmade way to celebrate the season and give a cozy, personal gift. Theyre quick to make, colorful and perfect for both beginners expanding skills and intermediate crocheters. Try a trio in different outfits to decorate your tree or package as a sweet handmade present. ๐ŸŽ๐Ÿงถ

You ask,

we answer.

FAQs

What size will the finished piece be?

The finished amigurumi measures approximately 8-12 cm tall depending on your yarn and hook; using the recommended sport yarn and a 2.0mm hook will yield the sizes shown.

Can I use different yarn weights for this pattern?

Yes, you can use different yarn weights, but this will affect the final size; adjust your hook accordingly and expect a larger or smaller finished minion.

Do I need prior crochet experience for this pattern?

This pattern is rated intermediate, so basic knowledge of crochet stitches, working in rounds, increases and decreases is recommended for best results.

How long does this project typically take to complete?

Most crocheters complete a single minion in a few hours; making a set of three may take 5-7 hours total depending on experience and assembly time.