🧢 Beautiful ✨ Detailed πŸ’ Adorable

Leaf Deer Amigurumi Pattern

Leaf Deer Amigurumi Pattern
4.9β˜… Rating
8-10 Hours Time Needed
2.4K Made This
βœ‚οΈ

Intermediate Level

Ideal for those with basic crochet experience, featuring slightly more advanced stitches and techniques to expand your skills.

⏱️

All-Day Adventure

Requires 8-10 hours, ideal for a full day of immersive crocheting.

🧸

Cute Companion

An adorable friend to cherish, handcrafted with love to bring comfort and joy for years to come.

About This Leaf Deer Amigurumi Pattern

This pattern creates a small leafy deer amigurumi with textured head spikes, leafy ears, sprouts on the body and a curled tail. The design combines simple amigurumi shaping with small surface details and colour changes for character. Youll make multiple small pieces and sew them together for a finished, three-dimensional creature.

Leaf Deer Amigurumi Pattern crochet pattern - detailed view of completed project

Features include embroidered eyes, felt details for ears and multiple small sprouts to adorn the chest and legs. The pattern is modular so you can easily customise colours and leaf placement.

Why You'll Love This Leaf Deer Amigurumi Pattern

I absolutely love this pattern because it brings together cute animal shaping and botanical details in a way that feels playful and unique. I enjoy the process of crocheting many small pieces and watching them come together into a character with personality. The layering of spikes, ears and sprouts makes assembly creative and satisfying. Making the leafy ears and felt details always feels like adding the character's personality, which is my favourite part of the project.

Leaf Deer Amigurumi Pattern step 1 - construction progress Leaf Deer Amigurumi Pattern step 2 - assembly progress Leaf Deer Amigurumi Pattern step 3 - details and accessories Leaf Deer Amigurumi Pattern step 4 - final assembly and finishing

Switch Things Up

I love how easy it is to customise the colours on this pattern; swap the greens for autumnal red, orange and gold for a fall-themed deer.

I often make a mini version by using a smaller hook and finer yarn to create keychain-sized friends that are perfect as gifts.

Try adding wire inside the legs or tail for a posable version β€” just make sure to secure the wire ends safely inside the stuffing.

You can replace the felt inner ear with contrasting yarn and embroider the inner leaf lines for a softer, fully-yarn finish.

For a more whimsical look, embroider freckles or extra facial lines, or add tiny crocheted flowers among the sprouts for a floral touch.

If you want a sturdier toy for children, use tightly spun worsted yarn and smaller hooks for a dense fabric and hide any wire or small parts.

Experiment with different placements of the chest and back sprouts to give each deer its own personality β€” cluster them or space them out for variety.

I sometimes add a removable collar or scarf to give the deer seasonal clothing β€” make the collar in a contrasting colour and stitch it loosely so it can be changed.

You can make the forehead leaf larger or smaller by changing the foundation chain length and repeating the leaf pattern sequence as needed.

I recommend trying different facial expressions by moving the eyes and mouth position slightly; it really changes the character and makes each amigurumi feel unique.

Common Mistakes & How to Fix Them

βœ— Not leaving long tails when changing colours prevents neat joins later; always leave long tails to sew pieces together and tuck ends securely. βœ— Skipping stitch markers in the body decreases can cause the stomach orientation to be wrong; place a marker 6-7 stitches into round 23 to mark the stomach and keep orientation consistent. βœ— Understuffing or overstuffing the legs causes shape imbalance; stuff the front legs lightly and the back legs firmly so the front legs appear smaller and the figure stands well. βœ— Not pushing stuffing into the nose area flattens the face detail; push extra stuffing into the increases in round 17 of the head where the nose sits for correct shaping. βœ— Forgetting to leave room for head spikes and ears makes assembly crowded; arrange and pin spikes and ears before sewing to ensure spacing and balance.

Leaf Deer Amigurumi Pattern

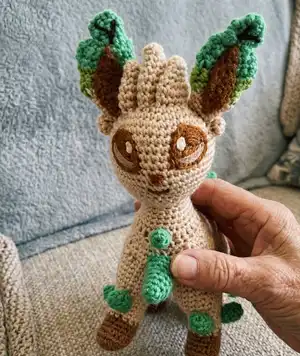
Create a charming leaf-decorated deer amigurumi with clear shaping, playful sprout details and embroidered facial features. This pattern walks you through the head, body, legs, ears, tails and all the tiny leaf accents so your finished friend is detailed and durable. Youll enjoy stitching the leafy ears and spikes, then assembling them into an adorable standing companion. Perfect as a handmade gift or a treasured shelf buddy.

Intermediate 8-10 Hours

Materials Needed for Leaf Deer Amigurumi Pattern

β€” Main Fabric

  • 01
    Cream yarn (main body and head) - approx 100g
  • 02
    Brown yarn (hooves, inner eye/face details) - approx 20g
  • 03
    Dark green yarn (darker leaf/ear shade) - approx 20g
  • 04
    Light green yarn (lighter leaf/ear shade) - approx 20g
  • 05
    Yellow yarn (small head pointed pieces/accents) - small amount (approx 10g)
  • 06
    Felt: brown for inner ears, black for leaf lines, white for eye highlights
  • 07
    Polyester stuffing (toy filling) - small bag

β€” Tools Required

  • 01
    Crochet hook size 3.5mm (recommended for amigurumi tension)
  • 02
    Optional smaller crochet hook 2.5-3.0mm for tight details or ears
  • 03
    Scissors
  • 04
    Tapestry/yarn needle for sewing pieces and weaving ends
  • 05
    Embroidery needle and thread for facial details
  • 06
    Felt & fabric glue (optional) for small felt pieces
  • 07
    Stitch markers
  • 08
    Pins for positioning pieces before sewing
  • 09
    Polyester stuffing
  • 10
    Pins or clips to hold layers when sewing

Progress Tracker

0% Complete

β€” Head :

Round 1 :

CH2, SCx6 in the 2nd stitch from the hook (6)

Round 2 :

2SCx6 (12)

Round 3 :

[2SC, SC]x6 (18)

Round 4 :

[2SC, SCx2]x6 (24)

Round 5 :

[2SC, SCx3]x6 (30)

Round 6 :

[2SC, SCx4]x6 (36)

Round 7 :

[2SC, SCx5]x6 (42)

Round 8 :

[2SC, SCx6]x6 (48)

Round 9 - 14 :

SCx48 (48, 6 rounds)

Round 15 :

SCx8, 2SCx3, SCx37 (51)

Round 16 :

SCx51 (51)

Round 17 :

SCx8, SC2togx3, SCx37 (48)

Round 18 :

[SC2tog, SCx6]x6 (42)

Round 19 :

[SC2tog, SCx5]x6 (36)

Round 20 :

[SC2tog, SCx4]x6 (30)

Round 21 :

[SC2tog, SCx3]x6 (24)

Round 22 :

[SC2tog, SCx2]x6 (18)

Round 23 :

SCx18 (18)

Round 24 :

[2SC, SCx2]x6 (24)

Round 25 - 26 :

SCx24 (24, 2 rounds)

Round 27 :

[2SC, SCx3]x6 (30)

Round 28 :

DCx15, SCx15 (30)

Info :

Leave a long tail to sew to body later. Stuff firmly, making sure to push extra stuffing into the increases in round 17 which is where the nose is.

β€” Body :

Round 1 :

CH2, SCx6 in the 2nd stitch from the hook (6)

Round 2 :

2SCx6 (12)

Round 3 :

[2SC, SC]x6 (18)

Round 4 :

[2SC, SCx2]x6 (24)

Round 5 :

[2SC, SCx3]x6 (30)

Round 6 :

[2SC, SCx4]x6 (36)

Round 7 - 16 :

SCx36 (36, 10 rounds)

Round 17 :

[SC2tog, SCx4]x3, SCx18 (33)

Round 18 :

[SC2tog, SCx3]x3, SCx18 (30)

Round 19 - 23 :

SCx30 (30, 5 rounds) [You may wish to leave a stitch marker 6 - 7 stitches into round 23 as this will mark the way the body should face - stitch marker facing down as the decreases are where the stomach is]

Round 24 :

[2SC, SCx3]x3, SCx18 (33)

Round 25 :

[2SC, SCx4]x3, SCx18 (36)

Round 26 - 33 :

SCx36 (36, 8 rounds)

Round 34 :

[SC2tog, SCx4]x6 (30)

Round 35 :

[SC2tog, SCx3]x6 (24)

Info :

Stuff firmly but ensuring you keep the decreased rounds so the stomach curves in slightly.

Round 36 :

[SC2tog, SCx2]x6 (18)

Round 37 :

[SC2tog, SC]x6 (12)

Round 38 :

SC2togx6 (6)

Info :

Sew closed. Sew the head onto the body.

β€” Legs :

Info :

Cream - make 4

Round 1 :

CH2, SCx6 in the 2nd stitch from the hook (6)

Round 2 :

2SCx6 (12)

Round 3 :

[2SC, SC]x6 (18)

Round 4 - 6 :

SCx18 (18, 3 rounds)

Round 7 :

[2SC, SCx2]x6 (24)

Round 8 - 10 :

SCx24 (24, 3 rounds)

Row 1 :

SCx12, chain and turn (12)

Row 2 :

SCx11, chain and turn (11)

Row 3 :

SCx10, chain and turn (10)

Row 4 :

SCx9, chain and turn (9)

Row 5 :

SCx8, chain and turn (8)

Info :

Stuff the front legs lightly and stuff the back legs firmly. That way the front legs will seem smaller than the back legs. Sew onto the body so the rows are on the outside of the body.

Info :

Brown - make 4

Round 1 :

CH2, SCx6 in the 2nd stitch from the hook (6)

Round 2 :

2SCx6 (12)

Round 3 :

2SCx3, SCx3, 2SCx3, SCx3 (18)

Round 4 :

SCx18 (18)

Round 5 :

SC2togx6, SCx6 (12)

Round 6 - 7 :

SCx12 (12, 2 rounds) change to cream

Round 8 - 9 :

SCx12 (12, 2 rounds)

Round 10 :

[2SC, SC]x6 (18)

Round 11 :

SCX18 (18)

Info :

Then SC into the next stitch to complete the join. Stuff lightly and then sew onto the leg so the front part faces forward.

β€” Ears :

Info :

Make 4 - start with darker of the two shades of green. When changing colour, it may help to leave a long tail for the colour you just changed from in order to sew the two pieces together in the end.

Row 1 :

CH2, SCx2 in the 2nd stitch from the hook, chain and turn (2)

Row 2 :

2SCx2, chain and turn (4)

Row 3 :

SCx4, chain and turn (4)

Row 4 :

SC, 2SCx2, Chain 2 (7)

Row 5 :

From the 2nd chain from the hook SC, then back in the normal row SCx3, chain 3, turn (7)

Row 6 :

From the 2nd chain from the hook, SCx2, then back in normal row SCx4, chain and turn (6)

Row 7 :

SC, [2SC, SC]x2, SC, chain and turn (8)

Row 8 - 9 :

SCx8, chain and turn (8, 2 rows) change to lighter shade of green

Row 10 :

SCx8, chain and turn (8)

Row 11 :

SCx7, chainx2, turn (9)

Row 12 :

From the 2nd chain from the hook SC, then into normal row, SCx7 chain and turn (8) change to cream

Row 13 :

SC2tog, SCx4, SC2tog chain and turn (6)

Row 14 :

SCx6, chain and turn (6)

Row 15 :

SC2tog, SCx2, SC2tog, chain and turn (4)

Row 16 :

SCx4, chain and turn (4)

Row 17 :

SC2togx2 chain and turn (2)

Row 18 :

SCx2 (2)

Info :

Leave a tail for 2 of the pieces to sew front and back pieces together and then onto the head. For the remaining 2, finish off. On 2 of the pieces, felt on some black lines to mark out the leaf and felt on brown for the inside of the ear. Then sew together and sew onto the head. Make sure to leave enough room for the yellow head pointed pieces. Felt on the eyes and nose.

β€” Head Spikes :

Info :

Make 2

Round 1 :

CH2, SCx6 in the 2nd stitch from the hook (6)

Round 2 :

SCx6 (6)

Round 3 :

[2SC, SC]x3 (9)

Round 4 :

SCx9 (9)

Round 5 :

[2SC, SCx2]x3 (12)

Round 6 :

[2SC, SC]x6 (18)

Round 7 - 8 :

SCx18 (18, 2 rounds)

Info :

Leave a long tail on both. Flatten one and sew onto the back of the head. Very lightly stuff the other and sew that to the middle of the top of the head standing up between the ears.

Info :

Make 2 (variant)

Round 1 :

CH2, SCx6 in the 2nd stitch from the hook (6)

Round 2 :

SCx6 (6)

Round 3 :

[2SC, SC]x3 (9)

Round 4 :

[2SC, SCx2]x3 (12)

Round 5 :

[2SC, SC]x6 (18)

Round 6 - 7 :

SCx18 (18, 2 rounds)

Info :

Leave a tail on both. Sew onto the top of the head on either side of the bigger spike that was sewn on as above.

Info :

Make 2:

Round 1 :

CH2, SCx6 in the 2nd stitch from the hook (6)

Round 2 :

SCx6 (6)

Info :

Sew onto the sides of the head next to the other side of the ear to the top spikes.

β€” Tail :

Info :

Make 2 - start with darker of the two shades of green. When changing colour, it may help to leave a long tail for the colour you just changed from in order to sew the two pieces together in the end.

Row 1 :

CH2, SCx2 in the 2nd stitch from the hook, chain and turn (2)

Row 2 :

2SC, SC, chain and turn (3)

Row 3 :

SCx2, 2SC, chain and turn (4)

Row 4 :

SCx2, 2SCx2, chain and turn (6)

Row 5 :

2SCx2, SCx2, SC2tog, chain and turn (7)

Row 6 :

SCx7, chain and turn (7)

Row 7 :

2SC, SCx6, chain and turn (8)

Row 8 :

SC2tog, SCx5, 2SC, chain and turn (8)

Row 9 - 12 :

SCx8, chain and turn (8, 4 rows)

Row 13 :

SC2tog, SCx5, 2SC chain and turn (8)

Row 14 :

2SC, SCx5, SC2tog, chain and turn (8)

Row 15 :

SC2tog, SCx5, 2SC chain and turn (8)

Row 16 :

SCx6, chainx3 (9)

Row 17 :

From 2nd chain from the hook, SCx2, then back into main piece, SCx6, chain and turn (8)

Row 18 - 19 :

SCx8, chain and turn (8, 2 rows)

Row 20 :

SC2tog, SCx4, chx3 (8)

Row 21 :

From 2nd chain from the hook, SCx2, then back in the main piece, SCx5, chain and turn (7)

Row 22 :

SCx7, chain and turn (7) change to light green

Row 23 :

SCx5, chainx3 (8)

Row 24 :

From the 2nd chain from the hook, SCx2, then back in the main piece, SCx5, chain and turn (7)

Row 25 - 26 :

SCx7, chain and turn (7, 2 rows) change to body colour

Row 27 :

SCx7, chain and turn (7)

Row 28 :

SC2tog, SCx5, chain and turn (6)

Row 29 :

SC2tog, SCx2, SC2tog, chain and turn (4)

Row 30 - 31 :

SCx4, chain and turn (4, 2 rows)

Row 32 :

SC2tog, SCx2, chain and turn (3)

Row 33 :

SC, SC2tog (2)

Info :

Finish off and leave a tail to sew the pieces together and onto the body. For the second piece, don't need to leave the long tails. Felt the black lines for the embellishment either onto one or both tail pieces according to your preference. Sew the two pieces together and then onto the body.

β€” Body Sprouts :

Large chest sprout :

Round 1: CH2, SCx6 in the 2nd stitch from the hook (6)

Round 2 :

SCx6 (6)

Round 3 :

[2SC, SC]x3 (9)

Round 4 - 8 :

HDCx4, SCx5 (9, 5 rounds)

Info :

Stuff lightly and sew onto the chest

Small chest sprout :

Round 1: CH2, SCx6 in the 2nd stitch from the hook (6)

Round 2 - 3 :

SCx6 (6, 2 rounds)

Info :

Stuff lightly and sew onto the chest.

Back sprout :

Round 1: CH2, SCx6 in the 2nd stitch from the hook (6)

Round 2 :

SCx6 (6)

Round 3 - 5 :

HDCx3, SCx3 (6, 3 rounds)

Info :

Stuff lightly and sew onto the upper back/neck.

β€” Leg Sprouts :

Info :

Make 6, 2 for each of the front legs and 1 for each of the back legs

Round 1 :

CH2, SCx6 in the 2nd stitch from the hook (6)

Round 2 :

SCx6 (6)

Round 3 - 4 :

HDCx3, SCx3 (6, 2 rounds)

Info :

Stuff each of them lightly. Sew one onto the front and side of each front leg. Sew one on the back of each back leg.

β€” Notes & Special Stitches :

Info :

DCINC - Double Crochet twice in the same stitch. TCINC - Treble Crochet twice in the same stitch.

β€” Forehead Leaf :

Info :

Dark Green. Make 2

CH :

CHx20

For 1 :

From the 2nd chain from the hook, SCx8, DCINCx2, [TCINC, TC]x2, DCINCx2, SCx4

Info :

Leave a long tail on one of the pieces. Sew the two pieces together and then sew onto the forehead.

Assembly Instructions

  • Sew the head onto the body securely using the long tail left from the head, centering the nose (round 17 increases) at the front and matching the head seam to the top body opening.
  • Position and sew legs so the rows are on the outside of the body; front legs should be stuffed lightly and back legs firmly to create a natural stance and stability.
  • Sew ear pieces together and attach to the head leaving room for the top spikes; felt inner ear details and add black lines before sewing the ear pairs onto the head.
  • Sew spikes to the top and back of the head as directed β€” flatten one spike for the back, lightly stuff the standing spike between the ears, and place variant spikes on either side.
  • Sew the two tail pieces together and attach to the rear; add felted black embellishments to tails and the forehead leaf pieces, then sew the leaf onto the forehead.

Important Notes

  • πŸ’‘Leave long yarn tails when changing colours so you can sew pieces together cleanly at the end.
  • πŸ’‘Use a stitch marker in round 23 of the body (6-7 stitches in) to mark body orientation and where the stomach decreases face.
  • πŸ’‘Stuff front legs lightly and back legs firmly to create the intended proportion and balance in the finished toy.
  • πŸ’‘Pin pieces in place before sewing to ensure correct placement and symmetry, especially for ears, spikes and forehead leaf.

This leafy deer makes a lovely handmade companion, full of tiny details and personality. Sewn sprouts, felt accents and embroidered facial features bring it to life. Perfect as a thoughtful gift or a charming shelf friend. 🧢🌿🧡

You ask,

we answer.

FAQs

What size will the finished piece be?

The finished amigurumi measures approximately 20-25 cm tall when using a 3.5mm hook and the recommended yarn thickness; exact size depends on yarn weight and tension.

Can I use different yarn weights for this pattern?

Yes, you can use different yarn weights, but this will affect the final size. Use an appropriate hook for your yarn and expect to adjust stuffing and placement of pieces accordingly.

Do I need prior crochet experience for this pattern?

This pattern is rated intermediate, so basic knowledge of crochet stitches, increases and decreases, and experience sewing amigurumi pieces together is recommended.

How long does this project typically take to complete?

Most crocheters complete this project in 8-10 hours, though time may vary based on experience level, customisation and assembly time.

Are the eyes and nose embroidered or safety pieces?

The pattern suggests felting or embroidering the eye and nose details and adding felt for inner ear accents; you can substitute safety eyes if you prefer but felt/embroidered details give the soft, crafted look.