🧢 Beautiful ✨ Detailed πŸ’ Adorable

Lavender Pattern

Lavender Pattern
4.7β˜… Rating
2-4 Hours Time Needed
3.0K Made This
βœ‚οΈ

Beginner Friendly Level

Perfect for those just starting their crochet journey, with clear instructions and simple techniques

⏱️

Bite-Sized Project

Finishes in 2-4 hoursβ€”perfect for an afternoon of creative relaxation.

🏑

Cozy Accent

A warm touch for your space that transforms ordinary corners into inviting nooks filled with handmade charm.

About This Lavender Pattern

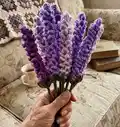
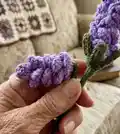
This pattern creates realistic crochet lavender stems you can arrange into bouquets or use as long-lasting decor. The design uses simple stitches to build the clustered texture of lavender florets and an optional leaf for realism. The finished stems are attached to floral wire and wrapped in green yarn for a polished, sturdy finish.

Lavender Pattern crochet pattern - detailed view of completed project

Works best with worsted weight (Weight 4) yarn and a 4.0mm hook for accurate scale and detail. Assembly uses hot glue and floral wire for a durable, display-ready stem.

Why You'll Love This Lavender Pattern

I absolutely love this pattern because it turns basic crochet stitches into something elegant and floral that looks professionally arranged. I find the textured treble clusters create beautiful depth without complicated shaping, so it feels rewarding and relaxing to make. The assembly steps let me customize length and fullness, making each bouquet unique and personal. I also enjoy gifting these lavender stems because they last forever and always brighten someone's day.

Lavender Pattern step 1 - construction progress Lavender Pattern step 2 - assembly progress Lavender Pattern step 3 - details and accessories Lavender Pattern step 4 - final assembly and finishing

Switch Things Up

I love how easy it is to customize this pattern by changing yarn colors and chain length to suit your style.

You can make mini lavender stems by chaining fewer stitches or extra long showpieces by chaining more for dramatic bouquets.

I often swap the purple for pastel shades or variegated yarn to create unique, soft-toned bunches.

Try different yarn textures β€” a cotton blend will look firmer while a softer acrylic will feel plush and delicate.

I sometimes add tiny beads or French knots for a dewdrop effect on the florets for a little sparkle.

If you want posable stems, use a thicker floral wire and wrap it more tightly with yarn for extra stiffness.

For a rustic look, use twine or jute to wrap the stems instead of green yarn and tie with raffia.

I like combining several color tones on one stalk: alternate worked segments of light and dark purple for a gradient effect.

Make matching leaves by varying the leaf size pattern or adding more leaves around the MR for a fuller base.

I often present stems in small bud vases or craft bouquets by varying how many stems I bundle together and adding decorative paper and ribbon.

To create keychain or mini charms, use smaller yarn (sport weight) and a smaller hook and shorten the chain substantially for miniatures.

Don’t be afraid to experiment with glue placement and wrapping direction β€” turning the chain loops slightly inward or outward changes the overall silhouette of the flower.

Common Mistakes & How to Fix Them

βœ— Making a chain that is too short will give you a stubby lavender stalk; plan the desired length and chain more stitches to lengthen the flower. βœ— Using a thicker yarn than recommended results in bulky, indistinct florets; stick to Weight 4 yarn and a 4.0mm hook for the intended look. βœ— Not leaving a large enough center hole in the magic ring prevents the floral wire from fitting through; pull the MR tail tightly but ensure the hole remains big enough for your stem. βœ— Rushing the hot glue step can cause yarn to slip or look messy; apply glue sparingly, press the yarn into place, and hold until secure to create a neat attachment. βœ— Not winding the green yarn tightly around the wire can cause the wrapping to slip; twist the wire and wrap the yarn firmly along the full length to ensure durability.

Lavender Pattern

Create beautiful, long-lasting crochet lavender stems to brighten any room or give as a handmade gift. This pattern walks you through simple stitches and assembly so you can make delicate lavender stalks with realistic texture. Perfect for a decorative bouquet, gift wrapping, or a charming mantel display.

Beginner Friendly 2-4 Hours

Materials Needed for Lavender Pattern

β€” Main Fabric

  • 01
    Worsted weight yarn (Weight 4) - Purple - main color for lavender florets, small skeins per bouquet
  • 02
    Worsted weight yarn (Weight 4) - Green - for stems and leaves, small skein for multiple stems
  • 03
    Big Twist Value (or similar acrylic worsted #4) recommended as example yarn
  • 04
    Red Heart Super Saver (worsted #4) listed as alternative yarn option

β€” Tools Required

  • 01
    Crochet hook size 4.0mm
  • 02
    Darning needle
  • 03
    Scissors
  • 04
    Hot glue and hot glue gun
  • 05
    Floral wire stems (2mm, 15" long) OR wooden skewers as optional stems
  • 06
    Ribbon for finishing bouquet
  • 07
    Decorative paper and mesh for wrapping

Progress Tracker

0% Complete

β€” Lavender Pattern :

Info :

In purple:

Step 1 :

Ch 63*

Step 2 :

In the fourth chain from the hook, place 4 TR, ch 3, sl st to the same ch you started with.

Step 3 :

Sl st to the next ch. [Ch 7. Sl st back to the same ch you started with. Sl st to the next stitch.] Repeat [ _ ] down the entire length of your chain.

Step 4 :

FO once you reach the last ch. Leave a 6" tail. Using a darning needle, weave in the end.

Info :

* The length of your chain will alter the length of your lavender. If you want a shorter lavender, chain fewer stitches. *

β€” Lavender Leaf :

Infos :

**OPTIONAL**. In green:

Step 1 :

Place 5 HDC in a MR. After the fifth HDC, sl st to the top of your first HDC to form a ring. Pull the end of the MR tail tightly to close the circle. Make sure to leave the center hole large enough for your floral wire to fit through.

Step 2 :

Ch 6. Working down the chain, 4 sl st, 1 sc in the last chain. Sl st to the next stitch from the MR. Repeat this process until you have 5 leaves. FO and leave a tail of a few inches. Using a darning needle, weave in the ends.

β€” Lavender Assembly :

Step 1 :

Cut your floral wire to your desired length.

Step 2 :

Put a small amount of hot glue on one end of the floral wire. Before the glue dries, place your green yarn on the glue to attach it.

Step 3 :

Twist the floral wire to wind the green yarn around the entire length of the wire.

Step 4 :

Place a small amount of hot glue on the other end of the wire, cut your green yarn, and glue it down.

Step 5 :

Place a small amount of hot glue on the end of the lavender where you made the 4 treble crochet stitches. Attach the lavender to the end of the floral wire.

Step 6 :

Wind the lavender around the floral wire. Make sure the chain loops face outwards. Once you reach the end of the lavender, glue the end down to the floral to secure it.

Step 7 :

With the correct side of your work facing upwards, insert the stem through the center of the magic ring. Make sure the correct side faces upwards so the leaves curl upwards and inwards. **OPTIONAL**

Step 8 :

Place a small amount of hot glue in a circle around the MR. Slide the leaf upwards to the bottom of the lavender stalk to glue it in place. **OPTIONAL**

Assembly Instructions

  • Cut your floral wire to your desired length before beginning the stem wrapping.
  • Put a small amount of hot glue on one end of the floral wire and press the green yarn onto the glue; attach the yarn before the glue fully dries.
  • Twist the floral wire and wind the green yarn tightly around the entire length of the wire so it is fully covered and secure.
  • Secure the loose end of the green yarn with a small dab of hot glue on the other end of the wire and trim any excess yarn.
  • Place a small amount of hot glue on the end of the lavender (where the 4 treble stitches are) and attach the lavender to the floral wire, pressing firmly until set.
  • Wind the lavender around the floral wire making sure the chain loops face outwards; once you reach the end, glue the end down to the floral wire to hold it in place.
  • Optional: insert the finished stem through the center of the leaf MR with the correct side facing up so the leaves curl upwards, then glue the leaf in place around the MR.

Important Notes

  • πŸ’‘Please read pages 3-4 in full before starting the pattern to understand materials and basic notes.
  • πŸ’‘The lavender pattern is suited for beginners with knowledge of basic crochet stitches.
  • πŸ’‘This pattern is written in US crochet terminology.
  • πŸ’‘Use Weight 4 acrylic yarn such as Big Twist Value or Red Heart Super Saver; thicker yarn will make the lavender too chunky and lose detail.

This Lavender Pattern helps you create everlasting bouquets that brighten any space and make thoughtful gifts. The simple stitches combine into a beautifully textured stalk you can arrange and customize. Enjoy making a bouquet that lasts forever and brings a touch of handmade charm to your home! 🌿🧢

You ask,

we answer.

FAQs

What size will the finished piece be?

The final lavender stalk length depends on your starting chain; the example uses Ch 63 to create a medium-length stalk. Chain fewer stitches for a shorter flower or more for longer stems.

Can I use different yarn weights for this pattern?

You can, but changing yarn weight will alter the scale and detail of the lavender; using thicker yarn will make florets bulkier. Use appropriate hook sizes to match your chosen yarn.

Do I need prior crochet experience for this pattern?

This pattern is beginner friendly, so basic knowledge of stitches like chain, treble, slip stitch, and half double crochet is recommended to follow the steps comfortably.

How long does this project typically take to complete?

Most crafters finish a small bouquet in about 2-4 hours, though time can vary with experience and the number of stems you make.