๐Ÿงถ Beautiful โœจ Detailed ๐Ÿ’ Adorable

Ladybug Amigurumi Pattern

Ladybug Amigurumi Pattern
4.8โ˜… Rating
2-3 Hours Time Needed
1.8K Made This
โœ‚๏ธ

Intermediate Level

Ideal for those with basic crochet experience, featuring slightly more advanced stitches and techniques to expand your skills.

โฑ๏ธ

Bite-Sized Project

Finishes in 2-4 hoursโ€”perfect for an afternoon of creative relaxation.

๐ŸŽ

Tiny Treasure

Small, sweet, and gift-worthy creations that fit perfectly in the palm of your hand with detailed charm.

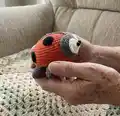
About This Ladybug Amigurumi Pattern

This pattern walks you through crocheting a small ladybug amigurumi about 7 cm tall using DK cotton and a 2.0 mm hook. It includes parts for the belly, back, muzzle, eyes, paws and spots plus clear assembly steps with pictures. Perfect for gift-making, decorations, or quick practice in shaping and seaming.

Ladybug Amigurumi Pattern crochet pattern - detailed view of completed project

You will work mostly in single crochet with simple increases and decreases and finish by sewing parts together. The pattern is photo-guided to help with positioning and finishing.

Why You'll Love This Ladybug Amigurumi Pattern

I absolutely love this pattern because it turns basic stitches into a charming little character you can finish in an afternoon. I enjoy the compact size โ€” it makes a wonderful gift or shelf companion that doesn't take long to complete. Sewing the muzzle and adding the eyes gives the ladybug so much personality and I always smile when I finish those final details. The pattern balances simple shaping with just enough assembly to be interesting without being overwhelming.

Ladybug Amigurumi Pattern step 1 - construction progress Ladybug Amigurumi Pattern step 2 - assembly progress Ladybug Amigurumi Pattern step 3 - details and accessories Ladybug Amigurumi Pattern step 4 - final assembly and finishing

Switch Things Up

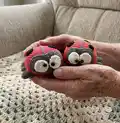
I love how easy it is to change the color palette to create different characters โ€” try pastel pink and gray for a sweet baby version or black and yellow to make a bumblebee-inspired friend.

If you want a larger toy, I often switch to a thicker yarn and a bigger hook; for example, DK to aran weight and increase the hook by two sizes will make a chunkier, cuddlier version.

You can swap the bead eyes for embroidered eyes for a child-safe toy; simply use black yarn to satin stitch small pupils onto the white eye discs.

For added personality, embellish the muzzle with tiny felt cheeks or use embroidery to add a smiling mouth or lashes.

I sometimes add a loop and keyring to make a miniature keychain version โ€” just use thinner yarn and a smaller hook to reduce the size for portability.

Try changing the stitch used for the body edging โ€” a reverse single crochet (crab stitch) gives a neat raised ridge for more contrast.

If you want posable legs, consider adding small wire inside the paws before closing them, then wrap the wire with yarn to hide it and secure it in place.

Make a family set by varying sizes: a tiny 3 cm keyring, a standard 7 cm, and a larger 12 cm toy for varied displays and gifts.

I also enjoy adding tiny accessories like a crocheted bow, tiny scarf, or hat to make seasonal or themed ladybugs for holidays and gifts.

For a decorative touch, sew on small sequins or safety-sewn beads around the spots for sparkle, or use variegated yarn for a subtle color shift across the back.

Common Mistakes & How to Fix Them

โœ— Crocheting too loosely can create holes where stuffing shows through; use tighter tension or a smaller hook to avoid gaps. โœ— Forgetting to stuff as you join the back and belly will make seaming difficult; stuff gradually while you crochet around the seam to keep the shape even. โœ— Not leaving long sewing tails on small pieces like the eyes and muzzle makes attachment awkward; leave enough thread to sew the pieces flat securely. โœ— Skipping the sc edging when joining the back and belly causes a weak seam; insert the hook through both loops and work single crochet around to form a sturdy join. โœ— Placing beads for the eyes without pinning first can result in uneven spacing; pin into position and check symmetry before sewing beads in place.

Ladybug Amigurumi Pattern

Create an adorable pocket-sized ladybug amigurumi with this clear step-by-step crochet pattern. You will make a rounded body, a cute muzzle with expressive eyes, six tiny paws and decorative spots. The pattern includes full assembly instructions and helpful photos so you can sew the parts together with confidence.

Intermediate 2-3 Hours

Materials Needed for Ladybug Amigurumi Pattern

โ€” Main Fabric

  • 01
    PaintBox Yarns Cotton DK (100% cotton), 125 m per 50 g skein
  • 02
    Pillar Red (415) - main back color, approx 25-40 g
  • 03
    Granite Grey (407) - belly, muzzle and paws, approx 20-30 g
  • 04
    Champagne White (403) - small amount for eye whites, approx 5 g
  • 05
    Pure Black (402) - small amount for spots and details, approx 5 g
  • 06
    Polyester stuffing (hollow fiber) - small amount

โ€” Tools Required

  • 01
    Crochet hook size 2.0 mm (I used Clover)
  • 02
    Black beads 6 mm in diameter (2 pieces) for eyes
  • 03
    Sewing needle with a big eye
  • 04
    Scissors
  • 05
    Yarn needle for sewing and weaving ends
  • 06
    Stitch markers or pins for assembly
  • 07
    Pins for positioning pieces while sewing
  • 08
    Polyester stuffing

Progress Tracker

0% Complete

โ€” Belly :

1 row :

6 sc in magic ring (6)

2 row :

2 sc in each sc (12)

3 row :

(1 sc, sc inc)* 6 (18)

4 row :

(2 sc, sc inc)* 6 (24)

5 row :

(3 sc, sc inc)* 6 (30)

6 row :

(4 sc, sc inc)* 6 (36)

7 row :

(5 sc, sc inc)* 6 (42)

8 row :

(6 sc, sc inc)* 6 (48)

9 row :

(7 sc, sc inc)* 6 (54)

10 row :

(8 sc, sc inc)* 6, sl.st (60)

Info :

Tie off the thread and cut it (pic. 1).

โ€” Back :

1 row :

6 sc in magic ring (6)

2 row :

2 sc in each sc (12)

3 row :

(1 sc, sc inc)* 6 (18)

4 row :

(2 sc, sc inc)* 6 (24)

5 row :

(3 sc, sc inc)* 6 (30)

6 row :

(4 sc, sc inc)* 6 (36)

7 row :

(5 sc, sc inc)* 6 (42)

8 row :

42 sc (42)

9 row :

(6 sc, sc inc)* 6 (48)

10 rows :

48 sc (48)

11 row :

(7 sc, sc inc)* 6 (54)

12 rows :

54 sc (54)

13 row :

(8 sc, sc inc)* 6 (60)

14 row :

60 sc (60)

Info :

Donโ€™t cut the work thread (pic. 2).

Info :

Join the belly and the back together: put the wrong sides of the pieces to each other (pic. 3), insert the crochet hook through the loops of the both pieces (pic. 4) and crochet sc (pic. 5). Work sc around the edge. Stuff the body as you go round. (pic. 6-10). Finish with sl.st. Tie off the thread and hide it inside.

โ€” Muzzle :

Info :

With dark gray yarn. Use a hook 2.0 mm. The muzzle is crocheted in rows. Crochet 5 ch (pic. 11)

1 row :

start in the second loop from the hook and crochet 1 sc inc, 2 sc, 1 sc inc, 1 ch, turn (6)

2 row :

1 sc inc, 4 sc, 1 sc inc, 1 ch, turn (8)

3-6 rows :

4 rows - 8 sc, 1 ch, turn (8)

7 row :

6 sc, 1 sc dec, 1 ch, turn (7)

8 row :

1 sc dec, 5 sc, 1 ch, turn (6)

9 row :

5 sc, 1 sc inc, 1 ch, turn (7)

10 row :

1 sc inc, 6 sc, 1 ch, turn (8)

11-14 rows :

4 rows - 8 sc, 1 ch, turn (8)

15 row :

1 sc dec, 4 sc, 1 sc dec, 1 ch, turn (6)

16 row :

1 sc dec, 2 sc, 1 sc dec, 1 ch (4)

Info :

Donโ€™t cut the thread and work sc around the edge of the muzzle. Finish with sl.st. (pic. 12-18). Tie off the thread and leave enough for sewing.

โ€” Eyes. 2 pcs :

Info :

With white yarn. Use a hook 2.0 mm. The eyes are crocheted in a spiral.

1 row :

6 sc in magic ring (6)

2 row :

2 sc in each sc (12)

3 row :

(1 sc, sc inc) *6 (18)

Info :

Finish with sl.st. Tie off and leave enough thread for sewing (pic. 19).

โ€” Paws. 6 pcs :

Info :

With dark gray yarn. Use a hook 2.0 mm. The paws are crocheted in a spiral.

1 row :

5 sc in magic ring (5)

2 row :

2 sc in each sc (10)

3-5 rows :

3 rows - 10 sc (10)

Info :

Fold two edges of the paw to each other and work 4 sc (pic. 20-23). Finish with 1 ch. Tie off the thread and leave enough for sewing. The paws donโ€™t need to be stuffed. (pic. 24).

โ€” Spots. (as many spots as youโ€™d like) :

Info :

With black yarn. Use a hook 2.0 mm. The spots are crocheted in a spiral.

Big spot :

1 row: 6 sc in magic ring (6)

Big spot 2 row :

2 row: 2 sc in each sc, sl.st (12)

Info :

Tie off and leave enough thread for sewing.

Small spot :

1 row: 6 sc in magic ring (6)

Info :

Finish with sl.st. Tie off and leave enough thread for sewing (pic. 25).

โ€” Assembly :

Step :

Crochet 27 ch with dark gray yarn and sew the chain onto the body (pic. 26-31).

Step :

Sew the muzzle onto the body (pic. 32-37).

Step :

Use two black beads 6 mm in diameter for eyes and sew them onto the whites of the ladybugโ€™s eyes. Note: If you donโ€™t have the beads I suggest, you can embroider the eyes. (pic. 38, 39).

Step :

Sew the whites of the ladybugโ€™s eyes onto the muzzle (pic. 40-43).

Step :

Sew the paws onto the body (pic. 44-50).

Step :

Sew the spots onto the back (pic. 51-53).

Assembly Instructions

  • Crochet a 27-chain with dark gray yarn and sew the chain onto the body as a decorative ridge (use the photos 26-31 for placement).
  • Join the belly and back: align wrong sides together, insert hook through loops of both pieces and work single crochet around while stuffing the body gradually; finish with a slip stitch and hide the yarn tail.
  • Sew the muzzle onto the front of the body using the long tail left from the muzzle; pin the muzzle in place first and sew evenly around the edges (see pics 32-37).
  • Sew the white eye discs onto the muzzle, then sew two black 6 mm beads onto the whites to form the eyes (or embroider the pupils if you prefer) as shown in pics 38-43.
  • Pin and sew the six paws to the underside of the body, folding two edges of each paw together and securing with 4 sc before attaching (pics 20-24 and 44-50).
  • Arrange the black spots on the red back, pin to check spacing, then sew each spot securely onto the back (pics 51-53).

Important Notes

  • ๐Ÿ’กCrochet with tight stitches to prevent stuffing showing through; if you see holes, switch to a smaller hook.
  • ๐Ÿ’กStuff the body gradually while seaming the back and belly so the stuffing remains even and the shape forms correctly.
  • ๐Ÿ’กPin pieces in place and check symmetry before sewing to ensure balanced placement of muzzle, eyes, paws and spots.
  • ๐Ÿ’กLeave long sewing tails on small parts so you can position and secure them easily when attaching to the body.

This cute Ladybug amigurumi is the perfect little handmade gift or pocket pal for crochet lovers. It combines tiny shaping, simple assembly and charming details so you can finish a delightful toy quickly. Give one as a present or make a whole collection in different colors for a playful display. ๐Ÿงถ๐ŸŽ

You ask,

we answer.

FAQs

What size will the finished piece be?

The finished ladybug measures approximately 7 cm (2.7 in) tall when using the recommended DK cotton yarn and 2.0 mm hook.

Can I use different yarn weights for this pattern?

Yes, you can use different yarn weights, but this will change the finished size; if you use thicker yarn, use a larger hook and adjust stuffing and assembly accordingly.

Do I need prior crochet experience for this pattern?

This pattern is rated intermediate and assumes you are comfortable with single crochet, increases and decreases, and simple seaming; beginners with patience can also try it.

How long does this project typically take to complete?

Most crocheters finish this little ladybug in about 2-3 hours, depending on speed and how much time you spend on assembly and finishing details.