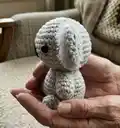
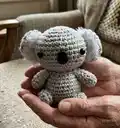
About This Koala Amigurumi Pattern
This pattern creates a small, 7 cm (approx) koala amigurumi with detailed instructions for head, body, limbs, ears and assembly. You will use cotton yarn for the body and acrylic yarn to create fluffy ear fur for a realistic koala look. The pattern includes step-by-step rounds, finishing tips and simple photo guidance. Ideal for those who enjoy small toy projects with charming details.

Complete rounds are provided for every part so you can follow along stitch-by-stitch. The finished koala is compact and makes a sweet gift or collectible.
Why You'll Love This Koala Amigurumi Pattern
I absolutely love this pattern because it captures the sweet, sleepy look of a koala in a tiny, handheld size. I enjoy how the shaggy ear technique adds personality and texture without complicated stitches. I also appreciate that the pattern uses simple construction—magic rings, increases and decreases—so it is accessible yet satisfying. Making a set of these is quick and addictive, and I always smile when I see their tiny faces.
Switch Things Up
I love experimenting with color when I make this koala; try soft pastels or a warm brown instead of gray to create different characters.
I sometimes make a mini family by using thinner yarn and a smaller hook for tiny keychain versions—adjust hook size and yarn weight to change the final size.
I add tiny embroidered eyebrows or different shaped noses to change the koala's expression and personality; a stitched smile can make a big difference.
For a plush, fluffy ear look use a boucle or mohair yarn instead of acrylic and trim carefully to shape the fur.
I often change eye sizes—smaller beads for a more baby-like look or safety eyes with sparkles for a playful expression.
If you want poseable limbs try slipping a short piece of craft wire inside the arms before stuffing to hold poses.
Want a festive koala? Add a tiny scarf, a bow, or a crochet flower to the head for a seasonal accessory.
I sometimes embroider tiny details like freckles or a belly button to add personality and a handmade touch.
For gifting, stitch a small loop at the top of the head and add a key ring to make an instant keychain or bag charm.
When making the shaggy ear fur, I vary knot spacing and loop lengths to create a more natural look—practice on a scrap ear first to find your favorite style.
Common Mistakes & How to Fix Them
✗ Placing safety eyes too low or too high will change the face proportions; insert safety eyes between rounds 8 and 9 and check symmetry before locking them.
✗ Overstuffing the head or body makes seams and shaping distorted; stuff gradually and check the shape frequently to maintain soft, round contours.
✗ Skipping stitch counts on increase/decrease rounds causes uneven shaping; count stitches after each round, especially when working (sc,next st,inc) or decrease rows.
✗ Forgetting to leave sewing tails results in short ends for assembly; always fasten off leaving a long tail for sewing parts together securely.