🧢 Beautiful ✨ Detailed πŸ’ Adorable

Koala Amigurumi Pattern

Koala Amigurumi Pattern
4.1β˜… Rating
2-3 Hours Time Needed
3.6K Made This
βœ‚οΈ

Intermediate Level

Ideal for those with basic crochet experience, featuring slightly more advanced stitches and techniques to expand your skills.

⏱️

Bite-Sized Project

Finishes in 2-4 hoursβ€”perfect for an afternoon of creative relaxation.

πŸ₯

Charming Critter

Delightful animal designs with sweet details that capture the essence of your favorite woodland and farmyard friends.

About This Koala Amigurumi Pattern

This pattern shows you how to crochet a small koala amigurumi using cotton yarn and simple stitches. It includes full round-by-round instructions for the head, body, arms, legs and ears plus assembly guidance. Photographs demonstrate positioning, sewing, and creating the fluffy ear details for a polished finish.

Koala Amigurumi Pattern crochet pattern - detailed view of completed project

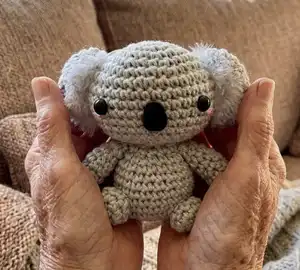
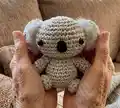
The finished doll is approximately 7 cm (2.8") using the recommended hook and yarn. Techniques include single crochet shaping, simple decreases/increases, and a fluffy ear finishing method.

Why You'll Love This Koala Amigurumi Pattern

I absolutely love this pattern because it turns simple stitches into a charming little koala with personality. I enjoy the approachable shaping that still gives a satisfying three-dimensional result. The fluffy ear finishing is one of my favorite steps β€” it adds so much character with a small amount of extra work. I find the clear step-by-step photos make assembly and finishing much easier, and I hope you feel the same excitement as you bring your koala to life.

Koala Amigurumi Pattern step 1 - construction progress Koala Amigurumi Pattern step 2 - assembly progress Koala Amigurumi Pattern step 3 - details and accessories Koala Amigurumi Pattern step 4 - final assembly and finishing

Switch Things Up

I love how easy it is to customize this koala by changing yarn colors to make pandas, bears, or fantasy critters.

I sometimes use pastel yarns and smaller hooks to make mini keychain versions that are perfect as tiny gifts.

Switching to a thicker yarn and a larger hook creates a chunkier, cuddlier koala that is great for kids to hug.

I often swap the safety eyes for embroidered eyes for baby-safe toys or to give a softer look.

You can add a tiny crocheted scarf, hat or bow to personalize each koala and create themed sets.

I recommend experimenting with felt shapes or embroidered noses to change facial expression and character.

If you like posable toys, try adding a small wire inside the limbs for gentle posing, taking care to secure wire ends safely.

Try adding tiny accessories like a leaf, mini eucalyptus or a backpack to tell a story with your koala.

Embroider different cheek styles or use blush/pastel yarn to vary personality and age of the toy.

I also like to change ear fluff by using a different synthetic yarn and brushing technique to create longer or more subtle shag.

Common Mistakes & How to Fix Them

βœ— Forgetting to place safety eyes between rounds 8 and 9 will misplace facial features; mark the position with pins before attaching the eyes to ensure symmetry. βœ— Overstuffing the head or body can distort the shape and make sewing difficult; stuff gradually and check shape as you work to maintain the intended silhouette. βœ— Skipping stitch counts during increases or decreases causes uneven shaping; count your stitches after each round and mark round starts to stay accurate. βœ— Using a yarn that is too loose or an oversized hook makes the fabric floppy; use a 2.5 mm hook and yarn that produces firm stitches for best results.

Koala Amigurumi Pattern

Make an adorable pocket-sized koala with this friendly amigurumi pattern. You will follow clear rounds and step-by-step assembly photos to create the head, body, limbs and shaggy ears. Perfect as a sweet gift or desk companion, this pattern walks you through shaping, sewing and finishing details. Enjoy a satisfying small project that results in a cuddly handmade toy.

Intermediate 2-3 Hours

Materials Needed for Koala Amigurumi Pattern

β€” Main Fabric

  • 01
    Gray cotton yarn (main color) - small amount for head, body, limbs
  • 02
    Pink cotton yarn (small amount) - for cheek detail
  • 03
    White acrylic yarn - small amount for shaggy ear fluff
  • 04
    Black felt fabric - small scrap for nose
  • 05
    Fiberfill for stuffing (small amount)

β€” Tools Required

  • 01
    Crochet hook 2.5 mm (3/0 - 4/0)
  • 02
    5 mm safety eyes (2 pieces)
  • 03
    Scissors
  • 04
    Glue
  • 05
    Sewing needle for finishing
  • 06
    Pins for positioning pieces
  • 07
    Yarn needle for sewing parts
  • 08
    Pet brush or dog brush for teasing acrylic yarn to make fluff
  • 09
    Stitch markers (optional)

Progress Tracker

0% Complete

Info :

The size of finished doll is approximately 7 cm (2.8 ")

Info :

Size of them varies depends on size of yarn and crochet hook. It will still work fine with different size of hook and yarn. Only the the end of finished doll will different slightly.

β€” Head :

Info :

Gray yarn

Round 1 :

6sc in magic ring (6)

Round 2 :

(inc) repeat 6 times (12)

Round 3 :

(sc in next st , inc) repeat 6 times (18)

Round 4 :

(sc in next 2 sts , inc) repeat 6 times (24)

Round 5 :

(sc in next 3 sts , inc) repeat 6 times (30)

Round 6 :

(sc in next 5 sts , inc) repeat 5 times (35)

Round 7-11 :

sc in each st around (35)

Round 12 :

(sc in next 3 sts , dec) repeat 7 times (28)

Round 13 :

(sc in next 2 sts , dec) repeat 7 times (21)

Round 14 :

(sc in next st , dec) repeat 7 times (14) , fasten off and stuff.

Info :

Insert safety eyes between rnd 8 and rnd 9

β€” Body :

Info :

Gray yarn

Round 1 :

6sc in magic ring (6)

Round 2 :

(inc) repeat 6 times (12)

Round 3 :

(sc in next st , inc) repeat 6 times (18)

Round 4 :

(sc in next 5 sts , inc) repeat 3 times (21)

Round 5-10 :

sc in each st around (21)

Round 11 :

(sc in next 2 st, dec) repeat 5 times, sc in next st (16)

Round 12 :

(sc in next st , dec) repeat 5 times, sc in next st (11), fasten off and leaving tail for sewing then stuff.

β€” Hand (make 2) :

Info :

Gray yarn

Round 1 :

6sc in magic ring (6)

Round 2-6 :

sc in each st around (6) fasten off, leave tail and stuff carefully

β€” Leg (make 2) :

Info :

Gray yarn

Round 1 :

8sc in magic ring (8)

Round 2-3 :

sc in each st around (8) fasten off, leave tail and stuff carefully

β€” Ear (make 2) :

Info :

Gray yarn

Round 1 :

6sc in magic ring (6)

Round 2 :

(inc) repeat 6 times (12)

Round 3 :

(sc in next st , inc) repeat 6 times (18)

Round 4 :

(sc in next 2 sts , dec) repeat 4 times, sc in next 2 st (14)

Round 5 :

sc in each st (14) Fasten off, leave tail . (No need stuffing)

β€” Assembly :

Info :

With pink cotton yarn, make small line under the eyes

Info :

Cut felt fabric into a shape like the example for the nose and attach with glue or sew in place

Info :

Set the head and body with pins then sew them together

Info :

Pin the hands and sew again

Info :

Set the ears and sew them

Info :

Prepare white acrylic yarn for shaggy ears and start attaching by knotting through ear edge

Info :

Follow the arrow in photos to add loops, make a knot every 4 ply yarn and repeat up until the top of ears (6-7 knot)

Info :

Brush the white yarn slowly with a pet brush to tease into fluffy shaggy ears then trim any excess to shape

Assembly Instructions

  • Attach safety eyes between rounds 8 and 9 and secure them firmly before proceeding to stuff the head.
  • With pink cotton yarn, embroider a small line under each eye for cheeks; use photos as placement reference.
  • Cut black felt into the nose shape shown in the example and sew or glue it onto the face centered between the eyes.
  • Set the head on top of the body, align with pins, then sew the head to the body securely using the tail left from the body; weave in ends.
  • Pin both hands to the sides of the body at appropriate spacing and sew them in place with matching yarn for stability.
  • Position ears on either side of the head, pin them symmetrically and sew through the ear base to attach them firmly.
  • Add white acrylic yarn to ear edges by making loops and knots (every 4 ply), brush to fluff, then trim to shape for shaggy ear effect.

Important Notes

  • πŸ’‘Use stitch markers or a safety pin to mark the beginning of each round to avoid losing track when working in continuous rounds.
  • πŸ’‘Insert and secure safety eyes before final stuffing and closing the head to ensure correct placement and stability.
  • πŸ’‘Stuff the pieces gradually and evenly to achieve the intended shape; overstuffing can distort the amigurumi.
  • πŸ’‘Pin all parts in place and check symmetry before sewing to achieve a neat, balanced finished toy.
  • πŸ’‘When teasing acrylic yarn for shaggy ears, brush slowly and gently to avoid pulling stitches or damaging the fabric.

This little koala was designed to be a tiny, lovable companion you can finish in an afternoon. It combines simple amigurumi shaping with a special fluffy ear finish for charming detail. Whether you make one for yourself or gift it to someone special, this koala will bring smiles and handmade warmth. 🐨🧢

You ask,

we answer.

FAQs

What size will the finished piece be?

The finished amigurumi measures approximately 7 cm (2.8") tall when using the recommended yarn and 2.5 mm hook.

Can I use different yarn weights for this pattern?

Yes, you can use different yarn weights but the final size will change; choose an appropriate hook and expect variations in texture and scale.

Do I need prior crochet experience for this pattern?

This pattern is rated intermediate; basic knowledge of single crochet, increases, decreases and working in the round is recommended.

How long does this project typically take to complete?

Most crocheters finish this small koala in about 2-3 hours, though time may vary depending on experience and detail work like the shaggy ears.