🧶 Beautiful ✨ Detailed 💝 Adorable

Kirbi Amigurumi Pattern

Kirbi Amigurumi Pattern
4.6★ Rating
5-7 Hours Time Needed
2.1K Made This
✂️

Intermediate Level

Ideal for those with basic crochet experience, featuring slightly more advanced stitches and techniques to expand your skills.

⏱️

Weekend Treat

Takes 5-7 hours, making it an enjoyable project to finish over a couple of days.

🧸

Cute Companion

An adorable friend to cherish, handcrafted with love to bring comfort and joy for years to come.

About This Kirbi Amigurumi Pattern

This pattern creates a round, Kirby-like amigurumi named Kirbi with rosy cheeks, tiny arms and red feet. It uses light/light worsted cotton yarn and a small hook for a neat, dense fabric. Step-by-step rounds and photos guide you through crocheting and assembling each piece. Perfect for gifting or keeping as a cute decorative companion.

Kirbi Amigurumi Pattern crochet pattern - detailed view of completed project

You will crochet the cheeks, arms, legs and a single head/body piece worked in rounds. The pattern includes assembly tips, finishing notes and photo references to help you place eyes, mouth and cheeks accurately.

Why You'll Love This Kirbi Amigurumi Pattern

I absolutely love this pattern because it transforms simple rounds into an irresistibly cute character with very little yarn. I enjoy how quick the parts work up and how satisfying the finishing touches are when the cheeks and eyes bring the face to life. I designed it to be approachable yet rewarding, so you get a polished toy without complicated shaping. Making Kirbi always brightens my day and I hope it brings you the same joy.

Kirbi Amigurumi Pattern step 1 - construction progress Kirbi Amigurumi Pattern step 2 - assembly progress Kirbi Amigurumi Pattern step 3 - details and accessories Kirbi Amigurumi Pattern step 4 - final assembly and finishing

Switch Things Up

I love customizing this pattern by changing colors to create new personalities for Kirbi—try mint green or lavender for a fresh look.

I sometimes use a sport weight yarn and a slightly smaller hook to make a tighter, smaller mini version for keychains.

I also add tiny embroidered eyelashes or felt accessories to change the expression and character of each Kirbi I make.

Try different placement of the eyes and mouth to alter the mood; a lower mouth gives a surprised look while a higher mouth makes it smile more shyly.

For a plush, cuddlier result use a slightly bulkier yarn and larger hook and adjust stuffing to keep the shape round.

I enjoy making small outfits or hats for Kirbi—simple crocheted caps or scarves add personality and are quick to make.

If you want posable arms, consider inserting a short wire armature inside the arm before stuffing and closing.

I sometimes mix yarn textures for cheeks or feet to add a subtle tactile contrast that is fun to touch.

To personalize gifts, embroider initials or tiny motifs on the back or bottom of the body with contrasting yarn.

Don't be afraid to experiment with eye types—safety eyes, embroidered eyes or felt appliques all create different looks and suit different ages.

Common Mistakes & How to Fix Them

✗ Skipping stitch counts during increases or decreases can produce odd shaping; count your stitches each round to ensure accuracy and correct mistakes immediately. ✗ Using a loose tension will create gaps where stuffing shows through; use a smaller hook or tighten your tension for a denser fabric. ✗ Forgetting to stuff gradually can make oddly shaped limbs or head; add filling in small amounts while checking the shape frequently. ✗ Not leaving a long tail when closing holes makes sewing difficult later; leave a generous tail for sewing and finishing seams securely. ✗ Placing safety eyes too early or asymmetrically causes misalignment; mark placement first and double-check spacing before attaching safety eyes.

Kirbi Amigurumi Pattern

Make an adorable Kirbi amigurumi with this clear, photo-supported crochet pattern. You will create a squishy round character with cute cheeks, arms and little red feet. The pattern includes full round-by-round instructions, materials list and assembly notes so you can finish a charming handmade toy for gifting or display.

Intermediate 5-7 Hours

Materials Needed for Kirbi Amigurumi Pattern

— Main Fabric

  • 01
    Light (US) / Light Worsted (UK) / 125m~50g (EU) yarn
  • 02
    Suggested yarn: gründl Cotton Quick uni or GB Wolle Carina
  • 03
    Colors: 1x pink (main body)
  • 04
    1x red (legs/feet)
  • 05
    1x dark pink (cheeks)
  • 06
    A little bit of black yarn for mouth detail

— Tools Required

  • 01
    Crochet hook C (US) / 12 (UK) / 2,5mm (EU)
  • 02
    Scissors
  • 03
    Sewing needle
  • 04
    Stitch marker
  • 05
    Safety eyes e.g. black 0.7 x 0.3 inch
  • 06
    Filler cotton / polyester stuffing

Progress Tracker

0% Complete

— Cheeks :

Info :

it is crocheted in rounds

Info :

in dark pink cast on 4+1ch (Picture 1), begin from the 2st from the needle and crochet:

Round 1 :

in the first 3stitches each 1sc, in the last stitch 3sc (Picture 2), now we continue on the other side: in the next 2stitches each 1sc, in the last stitch 2sc, sl in the first sc (=10sc) (Picture 3)

Info :

Lasst einen Faden zum annäh en.

— Arms :

Info :

it is crocheted in rounds

Info :

in pink cast on 6sc in a magic ring (Picture 4)

Round 1 :

increase every stitch (=12sc)

Round 2 :

increase every 2. stitch (=18sc)

Round 3 :

increase every 3. stitch (=24sc)

Round 4-9 :

crochet in every stitch 1sc (=24sc)

Round 10 :

decrease every 3. and 4. stitch together (=18sc)

Round 11 :

decrease every 2. and 3. stitch together (=12sc)

Info :

Fills the Arm (Picture 5).

Round 12 :

decrease each two stitches together (=6sc)

Info :

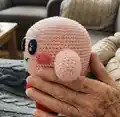
Sew up the rest hole and leaving long tail for sewing (Picture 6).

— Legs :

Info :

it is crocheted in rounds

Info :

in red cast on 6sc in a magic ring (Picture 7)

Round 1 :

increase every stitch (=12sc)

Round 2 :

increase every 2. stitch (=18sc)

Round 3 :

increase every 3. stitch (=24sc)

Round 4-13 :

crochet in every stitch 1sc (=24sc)

Round 14 :

decrease every 3. and 4. stitch together (=18sc)

Round 15 :

decrease every 2. and 3. stitch together (=12sc)

Info :

Fills the leg (Picture 8).

Round 16 :

decrease each two stitches together (=6sc) (Picture 9)

Info :

Sew up the rest hole and pull the thread through to the top, so that the leg can sew on later (Picture 10).

— Head/body :

Info :

it is crocheted in rounds

Info :

in grey cast on 6sc in a magic ring (Picture 11)

Round 1 :

increase every stitch (=12sc)

Round 2 :

increase every 2. stitch (=18sc)

Round 3 :

increase every 3. stitch (=24sc)

Round 4 :

increase every 4. stitch (=30sc)

Round 5 :

increase every 5. stitch (=36sc)

Round 6 :

increase every 6. stitch (=42sc)

Round 7 :

increase every 7. stitch (=48sc)

Round 8 :

increase every 8. stitch (=54sc)

Round 9 :

increase every9. stitch (=60sc)

Round 10 :

increase every 10. stitch (=66sc)

Round 11 :

increase every 11. stitch (=72sc)

Round 12-26 :

crochet in every stitch 1sc (=72sc)

Round 27 :

decrease every 11. and 12. stitch together (=66sc)

Round 28 :

decrease every 10. and 11. stitch together (=60sc)

Round 29 :

decrease every 9. and 10. stitch together (=54sc)

Round 30 :

decrease every 8. and 9. stitch together (=48sc)

Round 31 :

decrease every 7. and 8. stitch together (=42sc)

Round 32 :

decrease every 6. and 7. stitch together (=36sc)

Round 33 :

decrease every 5. and 6. stitch together (=30sc)

Round 34 :

decrease every 4. and 5. stitch together (=24sc)

Info :

-continue on page 5-

— Head/body - Continuation :

Info :

Now attach the safety eyes, embroider a mouth with black on (Picture12/13)

Info :

and fills the head/body (Picture 14).

Info :

Take the cheeks and sew them on (Picture 15).

Round 35 :

decrease every 3. and 4. stitch together (=18sc)

Round 36 :

decrease every 2. and 3. stitch together (=12sc)

Info :

Refill if necessary.

Round 37 :

decrease each two stitches together (=6sc)

Info :

Sew up the rest hole and fasten off (Picture 16).
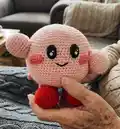
— Completion :

Info :

Sew the legs and arms to the body/head (Picture 17/18).

Assembly Instructions

  • Attach safety eyes to the head at the placement shown in the photos (Pictures 12/13) before fully closing the head, then embroider a mouth with black yarn.
  • Sew the cheeks (dark pink pieces) onto the face using the long tail, positioning them symmetrically at the same level as the safety eyes (Picture 15).
  • Fill the head/body firmly before closing: add stuffing gradually and shape the body as you work up to closing rounds 35-37.
  • Sew legs and arms to the body/head using the long tails left from closing; position legs evenly on the bottom and arms on the sides at pictured height (Pictures 17/18).
  • When finishing small openings (arms/legs), leave a long tail and use ladder stitch or whipstitch to close securely and hide ends inside the body.

Important Notes

  • 💡Use a stitch marker to mark the beginning of each round to maintain correct stitch counts and shaping.
  • 💡Stuff parts gradually and evenly so the shape remains smooth; avoid overstuffing which can distort stitches.
  • 💡Attach safety eyes before final stuffing and closing to ensure stable placement and secure fastening.
  • 💡Leave long tails when closing holes to make sewing parts together easier and more secure.

This Kirbi amigurumi pattern was created to be fun, quick and satisfying to crochet. 🧶 Follow the step-by-step rounds and photos to build a cute friend you can gift or keep. 😊 Happy crocheting and enjoy bringing Kirbi to life stitch by stitch! 🧵

You ask,

we answer.

FAQs

What size will the finished piece be?

The finished Kirbi is about 4.7 inch high when using the recommended yarn and hook size.

Can I use different yarn weights for this pattern?

Yes, you can, but changing yarn weight and hook size will affect the final size; adjust accordingly and consider using a smaller hook for denser fabric.

Do I need prior crochet experience for this pattern?

This pattern is rated intermediate; basic knowledge of single crochet, increases and decreases is recommended for the best result.

How long does this project typically take to complete?

Most crocheters finish Kirbi in about 5-7 hours, though time may vary based on experience and how quickly you work.