🧶 Beautiful ✨ Detailed 💝 Adorable

Dew Drop Handbag M Size Amigurumi Pattern

Dew Drop Handbag M Size Amigurumi Pattern
4.4★ Rating
5-7 Hours Time Needed
3.0K Made This
✂️

Intermediate Level

Ideal for those with basic crochet experience, featuring slightly more advanced stitches and techniques to expand your skills.

⏱️

Weekend Treat

Takes 5-7 hours, making it an enjoyable project to finish over a couple of days.

Stylish Touch

An elegant detail to elevate any look, combining traditional techniques with contemporary design sensibilities.

About This Dew Drop Handbag M Size Amigurumi Pattern

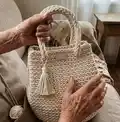
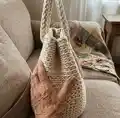
This pattern creates the Dew Drop handbag in M size, a drop-shaped crochet bag with a round bottom and tall sides. It uses polyester rope worked in single crochet back loops to produce a durable, structured fabric. You will also learn to make I-cord handles and how to weave and join them for a professional finish.

Dew Drop Handbag M Size Amigurumi Pattern crochet pattern - detailed view of completed project

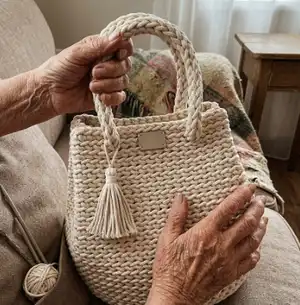
The bag measures about 25 cm in diameter and 25 cm tall with handles ~45 cm. Perfect as a casual shopping bag, beach bag or everyday handbag with a neat tassel and sewn label.

Why You'll Love This Dew Drop Handbag M Size Amigurumi Pattern

I absolutely love this pattern because it turns simple polyester rope into a refined, sturdy handbag that looks and feels handmade but professional. I enjoy how the back-loop construction creates a textured fabric that holds shape beautifully. Making the I-cord handles gives you a chance to practice a versatile technique that works for many projects. I also appreciate that the yarn is washable and hides ends neatly when finished with a lighter — practical and pretty.

Dew Drop Handbag M Size Amigurumi Pattern step 1 - construction progress Dew Drop Handbag M Size Amigurumi Pattern step 2 - assembly progress Dew Drop Handbag M Size Amigurumi Pattern step 3 - details and accessories Dew Drop Handbag M Size Amigurumi Pattern step 4 - final assembly and finishing

Switch Things Up

I love how easy it is to customize this bag: change the rope color to create stripes or ombre effects for a modern twist.

To change the size, vary the rope thickness and hook size; bulky rope with a larger hook gives a chunky market bag, while thinner rope makes a compact purse.

I often add a fabric lining to make the bag more structured and to protect small items; sew a simple round-bottom lining that matches the interior dimensions.

You can replace I-Cord handles with wooden or leather handles for a different aesthetic and easier joining if you prefer non-crocheted handles.

Try adding decorative details like crocheted flowers, leather patches, or a contrasting top row of color to personalize each piece.

If you want a closure, sew in a magnetic snap or create a loop-and-button fastening at the top edge before joining the I-Cord ends.

I sometimes braid three thin ropes together instead of crocheting an I-Cord for a rustic handle option that still works well woven through the top.

For a beach-ready bag, use bright colors and enlarged tassels; for a chic everyday bag, keep neutral tones and a small sewn label.

I recommend experimenting with different stitch heights on the sides — for example alternating rows of hdc for texture — but keep in mind this will change the bag height and feel.

Don’t be afraid to combine techniques: a lined interior pocket sewn in after completing the sides makes the bag more functional for everyday use.

Common Mistakes & How to Fix Them

✗ Not marking the last base stitch; place a scrap yarn marker to easily count the first side row and keep your stitch placement accurate. ✗ Skipping the back loop instruction; always work single crochet in the BLO for rounds 2 onward to create the correct texture and bag shape. ✗ Pulling the rope too tightly while crocheting the sides; maintain even medium tension to avoid a distorted or too-rigid fabric and to keep consistent row height. ✗ Forgetting to leave a long tail when making I-Cord ends; leave ~30 cm to allow joining and weaving inside the I-Cord for a clean finish. ✗ Weaving the I-Cord unevenly around the top causes gaps; weave the cord in and out at the same depth (about two rows down) and adjust tension as you go to avoid stretching.

Dew Drop Handbag M Size Amigurumi Pattern

Make a stylish Dew Drop handbag using sturdy polyester rope and simple single crochet techniques. This pattern guides you through a round base, tall sides worked in back loops, an I-cord handle tutorial and a neat joining method for a polished finish. You will create a machine-washable, long-lasting bag perfect for everyday use or as a gift. Clear step-by-step instructions and many photos help you along the way.

Intermediate 5-7 Hours

Materials Needed for Dew Drop Handbag M Size Amigurumi Pattern

— Main Fabric

  • 01
    Polyester rope (rope/tubular knit polyester) 5-6 mm, approximately 160 meters (color used: light beige)
  • 02
    Additional polyester rope for handles - total approx. 100 m for two I-cords (each ~90 cm plus joining tails)
  • 03
    Small amount of polyester yarn or scrap yarn for stitch marker
  • 04
    Tassel for decoration (optional)
  • 05
    Label for sewing (optional)

— Tools Required

  • 01
    Crochet hook size 7.0 mm
  • 02
    Scissors
  • 03
    Lighter (for hiding ends by melting polyester)
  • 04
    Yarn needle for sewing and weaving ends
  • 05
    Stitch marker or scrap yarn to mark rounds
  • 06
    Measuring tape or ruler
  • 07
    Pins for assembly (optional)

Progress Tracker

0% Complete

— Bag Body :

Info :

Pattern is worked as one piece in the round, so there’s no turning. Work in a spiral and use a stitch marker (or a scrap yarn) to help keep your place. Start by making a magic loop. Make a loop, catch the top yarn and pull it under and through the loop, and then chain 1. Now work round 1 single crochet over the loop and the strand of yarn behind the loop together. When all the single crochets are done, pull the loose strand of yarn. The opening will be nice and tight.

Round 1 :

6 sc into the magic loop, 1 sl, 1 ch (6)

Round 2 :

*2 sc blo into next stitch*, repeat * * 6 times (12)

Round 3 :

*1 sc blo, 2 sc blo into next stitch *, repeat * * 7 times (21)

Round 4 :

*2 sc blo, 2 sc blo into next stitch *, repeat * * 7 times (28)

Round 5 :

*3 sc blo, 2 sc blo into next stitch *, repeat * * 7 times (35)

Round 6 :

*4 sc blo, 2 sc blo into next stitch *, repeat * * 7 times (42)

Round 7 :

*5 sc blo, 2 sc blo into next stitch *, repeat * * 7 times (49)

Round 8 :

*6 sc blo, 2 sc blo into next stitch *, repeat * * 7 times (56)

Round 9 :

*7 sc blo, 2 sc blo into next stitch *, repeat * * 4 times (60)

Info :

Base is done. I use scrap yarn to mark the last single stitch of the base – it will let you easy count rows for the further crocheting.

— Sides :

Round 10 - 29 :

sc blo all stitches for 19 row (or till side is ~25 cm tall). Slip 2 last stitches and weave in end*

Info :

The sides are super easy to make, just crochet all the stitches until the bag is as tall as you like. *I always try to hide ends, that it would not be noticeable. I will show you an easy way to finish this end nicely. But you can skip this tip, if you feel you don’t need it.

Info :

Perfect ending: First, insert hook, catch the yarn end and pull it under and through the stitch as it’s shown in pictures. Second, put the hook in the same crochet stitch back loop, catch the yarn and pull it through the loop as it’s shown in pictures. This yarn is 100% polyester, so it’s perfect for hiding ends with a lighter, because it can melt. Hide the yarn end a little bit further on your crocheting and cut the rest of the yarn, leaving only very short ending. Then heat this short ending for a few seconds with a lighter and quickly hide it by pushing it under the nearest yarn with a hook.

Info :

That’s it! The sides are done.

— Handles :

Info :

Handles are made by crocheting I-Cord. Knowing how to make I-Cord is helpful in so many ways! It can be used as a lanyard, drawstrings or any other rope or cord. Follow the tutorial below to make I-Cord.

Row 1 :

Chain 3. Insert hook into 2nd chain, pull up a loop. Insert hook into 3rd chain, pull up a loop (3 loops on hook). Follow 1 - 5 pictures below.

Row 2 :

Desired length: catch the yarn and pull up a loop, then remove it from hook, being careful not to lose it (pictures). Pinch the cord with thumb and finger to hold loops. Then yarn over and pull a loop through the second loop, carefully remove it from the hook too. Yarn over and pull up a loop catch the yarn and pull a loop. To start next row - insert hook into two next (empty) loops (3 loops on a hook). Continue crocheting rows in this manner until the cord is ~90 cm length. Then pull off the hook, cut the yarn (leaving ~30 cm ending) and leave it all. Later we will join the ends.

Info :

Continue crocheting rows in this manner until the cord is ~90 cm length. Then pull off the hook, cut the yarn (leaving ~30 cm ending) and leave it all. Later we will join the ends.

— Assembling the Bag :

Info :

The crochet fabric is very strong, so there is not chance the bag will tears away or brake. You may get a little stretching in the stitch gap like this and pull the I-Cord throughout it.

Info :

Weave the I-Cord you’ve just crocheted in and out of stitches, about two rows down (follow pictures). Pull the I-Cord throughout any stitch gaps to even tension.

Item Name (P1) :

Join the ends: After you waved the I-Cord, you need to join its endings. This part you can do by ending I-cord (yarn over and pull through all three loops on hook) and tie up both endings together. But the pattern suggests you join the ends nicely using the pictured step-by-step method: take the I-Cord end, insert hook into the first loop, catch the yarn and pull it all throughout; take the other I-Cord end and do the same. Continue joining loose loops in this manner until the joint is neat.

Info :

When finished joining, simply make a double knot and hide the ends into the I-Cord and cut the leftovers, leaving very short ends. Then melt it with a lighter and hide into the I-Cord, pushing with fingers. That’s it! Now pull handle 1 and handle 2 into place, put your favorite tassel, sew on a label and it’s ready to wear.

Assembly Instructions

  • Weave each I-Cord handle in and out of the stitches around the bag top about two rows down, keeping the cord tension even and adjusting any stretched stitch gaps by pulling the cord through.
  • Join I-Cord endings by inserting the hook into the first loop, pulling the yarn through all loops, and repeating with the opposite end; continue joining the loose loops until the joint is neat, then tie a double knot.
  • Hide the remaining yarn tails inside the I-Cord, cut very short ends and carefully melt with a lighter to seal polyester fibers before pushing the melted end into the cord.
  • Position handles so one lays along the front top edge (handle 1) and the other along the back top edge (handle 2), then adjust and tighten the I-Cord joins so both handles are even and secure.
  • Sew on a label and attach a favorite tassel to the handle connection for decoration once handles are joined and ends are concealed.

Important Notes

  • 💡Work in continuous spiral rounds and use a stitch marker to mark the first stitch of each round for accurate stitch counts.
  • 💡Always work the side rounds in the back loop only (BLO) to produce the correct texture and shape for the bag.
  • 💡Leave approximately 30 cm tail on each I-Cord end for joining, and leave extra length when cutting so you can hide ends inside the cord.
  • 💡When hiding polyester ends with a lighter, do so carefully and briefly to avoid burning; press melted end into the cord with a hook or fingers to conceal it.

This Dew Drop handbag pattern creates a durable and stylish round-bottom bag you will love to carry everywhere. It combines simple single crochet techniques with a satisfying I-cord handle finish for a polished result. Perfect for gifts, markets, or everyday use—washable and made to last. 🧶✨

You ask,

we answer.

FAQs

What size will the finished bag be?

The finished bag measures approximately 25 cm in diameter at the round bottom and about 25 cm in height with handles approximately 45 cm long.

What yarn and hook should I use?

Use polyester rope 5-6 mm (approx. 160 meters) and a 7.0 mm crochet hook for the same gauge and structure as the sample.

Can I make the bag larger or smaller?

Yes, changing rope thickness and hook size will modify the finished size; bulkier rope and a larger hook produce a chunkier, larger bag, while thinner rope and a smaller hook yield a smaller bag.

Is this pattern suitable for beginners?

The pattern is rated intermediate because it requires working in the round, back-loop-only rounds, making I-cord handles, and a detailed joining technique. Basic crochet experience is recommended.