About This Kirbi Amigurumi Pattern
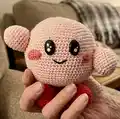
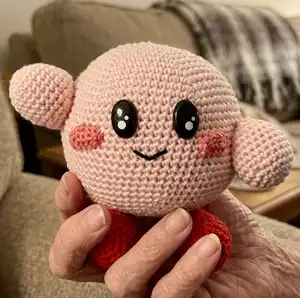
This pattern creates a small, round Kirbi-style amigurumi with rosy cheeks and bright red feet. You will crochet separate cheeks, arms, legs and a round head/body then assemble them into a compact toy. The instructions include exact stitch counts for every round and helpful picture references to guide you.
Techniques used include magic ring, increases, decreases and sewing pieces together. Suitable for crocheters comfortable with working in rounds and basic shaping.
Why You'll Love This Kirbi Amigurumi Pattern
I absolutely love this pattern because it captures a charming, round character with simple techniques that produce a professional finish. I enjoy how the small details like embroidered mouth and sewn-on cheeks bring so much personality to the piece. I love that it is a compact project you can complete in a weekend, making it perfect for gifts. I am proud of the clear step-by-step rounds and photos which make assembly straightforward and satisfying.
Switch Things Up
I love how easy it is to customize this Kirbi by swapping yarn colors; try pastel shades for a softer look or bright neons for a playful version.
I often change the size by altering yarn weight and hook size — bulky yarn with a larger hook makes a cuddly, chunky Kirbi while thinner yarn creates a tiny keychain friend.
I sometimes embroider different expressions to give each toy a unique personality; moving the mouth or changing cheek placement can make it happy, sleepy, or surprised.
I also add felt or crochet accessories like tiny hats, bows, or scarves to match seasons or holidays and make the toy gift-ready.
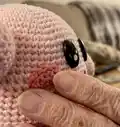
For a secure toy for children, I swap plastic safety eyes for embroidered eyes to avoid loose parts and ensure durability.
I like to experiment with texture by using a fuzzy or boucle yarn for a fluffy version that looks very different but is still simple to make.
Try adding a small bell or a sachet with dried lavender inside the stuffing for a scented, calming toy perfect for nurseries.
I sometimes incorporate contrasting soles on the feet by crocheting in a different color for the last few rounds to make the legs pop.
To make a posable version, I add a thin wire armature inside the limbs before stuffing to allow gentle posing while keeping it safe and soft.
I recommend testing eye and cheek placement with pins before final sewing to get the expression just right — small adjustments make a big difference.
Common Mistakes & How to Fix Them
✗ Skipping stitch counts when increasing or decreasing leads to uneven shaping; count after every round and mark the start with a stitch marker.
✗ Not stuffing as you go causes lumps or an irregular silhouette; stuff gradually and evenly while shaping each section.
✗ Placing safety eyes too late can distort placement; attach the eyes after the 26th round (or as instructed) and before heavy stuffing to ensure correct alignment.
✗ Leaving tails too short when finishing pieces makes sewing difficult; leave a long tail for sewing and use it to anchor parts securely during assembly.