🧢 Beautiful ✨ Detailed πŸ’ Adorable

Jessy and Woody The Toy Story Amigurumi Pattern

Jessy and Woody The Toy Story Amigurumi Pattern
4.8β˜… Rating
5-7 Hours Time Needed
2.4K Made This
βœ‚οΈ

Intermediate Level

Ideal for those with basic crochet experience, featuring slightly more advanced stitches and techniques to expand your skills.

⏱️

Weekend Treat

Takes 5-7 hours, making it an enjoyable project to finish over a couple of days.

🧸

Cute Companion

An adorable friend to cherish, handcrafted with love to bring comfort and joy for years to come.

About This Jessy and Woody The Toy Story Amigurumi Pattern

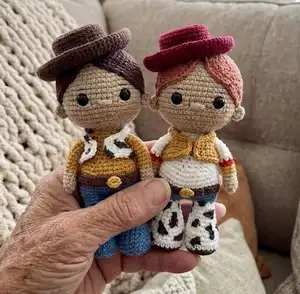
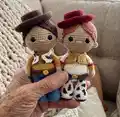
This pattern teaches you how to crochet Jessy and Woody amigurumi dolls inspired by Toy Story. It includes full round-by-round instructions for head, hair, ears, legs, body, hands, waistcoats, belts and hats. Clear shaping notes and photo references help you place eyes, assemble parts, and finish details.

Jessy and Woody The Toy Story Amigurumi Pattern crochet pattern - detailed view of completed project

Suitable for intermediate crocheters comfortable with increases, decreases and working in rounds and turning rows. The pattern lists yarn colors, tools and simple sewing guidance so you can create a neatly finished pair.

Why You'll Love This Jessy and Woody The Toy Story Amigurumi Pattern

I absolutely love this pattern because it captures the tiny details that make Jessy and Woody recognisable while staying simple enough to complete in a weekend. I designed the pieces to be sewn together cleanly so the finished dolls are sturdy and cuddly. I enjoy the colorwork for the boots and waistcoats β€” it adds personality to each character. Every step is written to help you finish with confidence and joy.

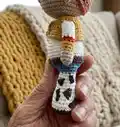
Jessy and Woody The Toy Story Amigurumi Pattern step 1 - construction progress Jessy and Woody The Toy Story Amigurumi Pattern step 2 - assembly progress Jessy and Woody The Toy Story Amigurumi Pattern step 3 - details and accessories Jessy and Woody The Toy Story Amigurumi Pattern step 4 - final assembly and finishing

Switch Things Up

I love how easy it is to customise these dolls β€” you can swap colors to make new characters or stylised versions with just a yarn change.

I often change yarn weight and hook size to create a mini keychain version or a larger cuddly doll; use thinner yarn for tiny charms and thicker yarn for bigger plushies.

Try embroidering different facial expressions by moving the eyes or changing the nose position; a small shift in eye placement changes the whole personality.

For cow spots on Jessy's legs you can use a tiny hook and crocheted appliques or simply mark them with an indelible marker for a faster finish.

I sometimes add felt or tiny crocheted accessories like a lasso, scarf or mini badge to personalise each friend even more.

If you want posable limbs, add thin craft wire inside the arms and legs before stuffing for subtle movement options.

I recommend experimenting with textured yarns for the waistcoat or hat to add a tactile contrast that photographs beautifully.

Try swapping safety eyes for embroidered eyes if the toy is for a very young child to keep it fully soft and safer.

You can also create matching outfits by crocheting additional removable waistcoats, hats or tiny boots to mix and match between Jessy and Woody.

Finally, I enjoy creating a whole set by making other Toy Story characters using the same head and body base, changing hair, colours and small costume details to capture each character's look.

Common Mistakes & How to Fix Them

βœ— Placing safety eyes too low on the head makes the face look off; insert safety eyes between rows 15-16 and space them according to the pattern guidance (5-6 stitches from ears). βœ— Skipping stitch counts during increases and decreases will distort shaping; count your stitches at the end of every round and mark the round start with a stitch marker. βœ— Not stuffing gradually causes uneven lumps in the head or body; stuff in small amounts while shaping and add more as you close the opening. βœ— Cutting tails too short before sewing prevents a secure join; leave long tails where instructed to make sewing parts together easier and stronger. βœ— Changing colors without securing yarn ends can cause unraveling later; carry colors where possible or weave in ends neatly as you go.

Jessy and Woody The Toy Story Amigurumi Pattern

Create adorable mini versions of Jessy and Woody from Toy Story with this complete crochet amigurumi pattern. You will find step-by-step rounds, yarn and tool lists, assembly tips, and shaping instructions. Perfect for making a charming pair to display or gift. Follow the detailed stitches and photos to build each part from head to hat.

Intermediate 5-7 Hours

Materials Needed for Jessy and Woody The Toy Story Amigurumi Pattern

β€” Main Fabric

  • 01
    Drops Safran - 20 (bordeaux)
  • 02
    Drops Safran - 59 (red clay)
  • 03
    Drops Safran - 23 (brown)
  • 04
    Drops Safran - 11 (strong yellow)
  • 05
    Drops I Love You 7 - 04 (dark grey)
  • 06
    Drops I Love You 9 - 115 (jeans blue)
  • 07
    Alize Cotton Gold - 55 (white)
  • 08
    Alize Cotton Gold - 493 (brown)
  • 09
    Alize Cotton Gold - 56 (red)
  • 10
    Alize Cotton Gold - 02 (mustard)
  • 11
    Alize Cotton Gold - 152 (beige)

β€” Tools Required

  • 01
    Hook size β„–2
  • 02
    Hook size β„–3
  • 03
    Scissors
  • 04
    The plastic eyes diameter 7-8 mm (2 pieces each character)
  • 05
    Fiber filling (polyester stuffing)
  • 06
    Tapestry needle for sewing

Progress Tracker

0% Complete

β€” Head :

Info :

Start working with main color:

Round 1 :

6 sc in mr

Round 2 :

6 inc (12)

Round 3 :

(1 sc, inc) x 6 (18)

Round 4 :

(2 sc, inc) x 6 (24)

Round 5 :

(3 sc, inc) x 6 (30)

Round 6 :

(4 sc, inc) x 6 (36)

Round 7 :

(5 sc, inc) x 6 (42)

Round 8 :

(6 sc, inc) x 6 (48)

Round 9 :

(7 sc, inc) x 6 (54)

Round 10-19 :

54 sc

Info :

Between the 15-16 rows insert safety eyes, 7-8 mm in diameter.

Round 20 :

(7 sc, dec) x 6 (48)

Round 21 :

(6 sc, dec) x 6 (42)

Round 22 :

(5 sc, dec) x 6 (36)

Round 23 :

(4 sc, dec) x 6 (30)

Round 24 :

(3 sc, dec) x 6 (24)

Round 25 :

(2 sc, dec) x 6 (18)

Info :

Stuff

Info :

Leave a long tail for sewing

β€” Hair (Jessy) :

Info :

Start working with terracotta color:

Round 1 :

6 sc in mr

Round 2 :

6 inc (12)

Round 3 :

(1 sc, inc) x 6 (18)

Round 4 :

(2 sc, inc) x 6 (24)

Round 5 :

(3 sc, inc) x 6 (30)

Info :

Expand crochet and continue work in turning rows:

Round 6 :

(4 sc, inc) x 6, ch (36)

Round 7 :

(5 sc, inc) x 6, ch (42)

Round 8 :

(6 sc, inc) x 6, ch (48)

Round 9 :

(7 sc, inc) x 6, ch (54)

Round 10 :

(8 sc, inc) x 6, ch (60)

Round 11 :

Dec, 56 sc, dec, ch (58)

Round 12 :

2 dec, 50 sc, 2 dec, ch (54)

Round 13 :

2 dec, 46 sc, 2 dec, ch (50)

Round 14 :

2 dec, 42 sc, 2 dec, ch (46)

Round 15 :

2 dec, 38 sc, 2 dec, ch (42)

Round 16 :

2 dec, 34 sc, 2 dec, ch (38)

Round 17 :

38 sc

Round 18 :

Continue crochet round "bangs hair": 24 sc

Round 19 :

38 sc

Info :

Leave a long tail for sewing

β€” Hair (Woody) :

Info :

Start working with brown color:

Round 1 :

6 sc in mr

Round 2 :

6 inc (12)

Round 3 :

(1 sc, inc) x 6 (18)

Round 4 :

(2 sc, inc) x 6 (24)

Round 5 :

(3 sc, inc) x 6 (30)

Info :

Expand crochet and continue work in turning rows:

Round 6 :

(4 sc, inc) x 6, ch (36)

Round 7 :

(5 sc, inc) x 6, ch (42)

Round 8 :

(6 sc, inc) x 6, ch (48)

Round 9 :

(7 sc, inc) x 6, ch (54)

Round 10 :

(8 sc, inc) x 6, ch (60)

Round 11 :

Dec, 56 sc, dec, ch (58)

Round 12 :

2 dec, 50 sc, 2 dec, ch (54)

Round 13 :

2 dec, 46 sc, 2 dec, ch (50)

Round 14 :

2 dec, 42 sc, 2 dec, ch (46)

Round 15 :

2 dec, 38 sc, 2 dec, ch (42)

Round 16 :

2 dec, 34 sc, 2 dec, ch (38)

Round 17 :

38 sc

Round 18 :

Continue crochet round "bangs hair": 24 sc

Round 19 :

38 sc

Info :

Leave a long tail for sewing

β€” Ears (x2) :

Item Name (Ears x2) :

Start working with main color: 1. 6 sc in mr. Leave a long tail for sewing

β€” Start forming head Jessy :

Info :

1. Between the 16-17 rows sew on ears. Distance from ears to eyes 5-6 sc.

Step 2 :

Sew the hair to the head.

Step 3 :

Embroider nose.

Step 4 :

Start forming eyes: Embroider eyes: insert the white threaded needle on bottom of the eye and thread it to the bottom as shown in the picture. Bring the thread out near the second eye and repeat the same steps.

Step 5 :

Toned cheeks.

β€” Start forming head Woody :

Info :

1. Between the 16-17 rows sew on ears. Distance from ears to eyes 5-6 sc.

Step 2 :

Sew the hair to the head.

Step 3 :

Embroider nose.

Step 4 :

Start forming eyes: Embroider eyes: insert the white threaded needle on bottom of the eye and thread it to the bottom as shown in the picture. Bring the thread out near the second eye and repeat the same steps.

Step 5 :

Toned cheeks.

β€” Legs (Jessy) :

Info :

Start working with dark-grey color:

Round 1 :

6 sc in mr

Round 2 :

6 inc (12)

Round 3 :

(1 sc, inc) x 6 (18)

Round 4 :

(2 sc, inc) x 6 (24)

Round 5 :

Change yarn color to the white color: BLO 24 sc

Round 6-7 :

24 sc

Round 8 :

(6 sc, dec) x 3 (21)

Round 9-10 :

21 sc

Round 11 :

(5 sc, dec) x 3 (18)

Round 12 :

18 sc

Round 13 :

(4 sc, dec) x 3 (15)

Round 14-15 :

15 sc

Round 16 :

(3 sc, dec) x 3 (12)

Round 17 :

12 sc

Info :

Stuff

Info :

Crochet second leg the same way and continue crocheting the body.

β€” Legs (Woody) :

Info :

Start working with blue color:

Round 1 :

6 sc in mr

Round 2 :

6 inc (12)

Round 3 :

(1 sc, inc) x 6 (18)

Round 4 :

(2 sc, inc) x 6 (24)

Round 5 :

BLO 24 sc

Round 6-7 :

24 sc

Round 8 :

(6 sc, dec) x 3 (21)

Round 9-10 :

21 sc

Round 11 :

(5 sc, dec) x 3 (18)

Round 12 :

18 sc

Round 13 :

(4 sc, dec) x 3 (15)

Round 14-15 :

15 sc

Round 16 :

(3 sc, dec) x 3 (12)

Round 17 :

12 sc

Info :

Stuff. Crochet second leg the same way and continue crocheting the body.

β€” Body (Jessy) :

Info :

On the second leg change yarn color to the blue color. The gap between the legs should be 3 ch:

Round 1 :

12 sc on the leg, 3 sc on the chain, 12 sc on the leg, 3 sc on the chain (30)

Round 2 :

(4 sc, inc) x 6 (36)

Round 3 :

(5 sc, inc) x 6 (42)

Round 4-5 :

Change yarn color to the brown color: 42 sc

Round 6-7 :

Change yarn color to the white color: 42 sc

Round 8 :

(12 sc, dec) x 3 (39)

Round 9 :

(11 sc, dec) x 3 (36)

Round 10 :

(10 sc, dec) x 3 (33)

Round 11 :

(9 sc, dec) x 3 (30)

Round 12 :

(8 sc, dec) x 3 (27)

Round 13 :

(7 sc, dec) x 3 (24)

Info :

Stuff

Round 14 :

(6 sc, dec) x 3 (21)

Round 15-16 :

21 sc

Round 17 :

(5 sc, dec) x 3 (18)

Round 18 :

18 sc

Info :

Stuff

β€” Belt (yellow detail) :

Item Name (Belt yellow detail) :

Start working with yellow color: 1. 6 sc in mr. Leave a long tail for sewing

Info :

Sew the yellow detail to the body (belt)

β€” Body (Woody) :

Info :

Do not cut off the thread on the second leg and continue crocheting the body. The gap between the legs should be 3 ch:

Round 1 :

12 sc on the leg, 3 sc on the chain, 12 sc on the leg, 3 sc on the chain (30)

Round 2 :

(4 sc, inc) x 6 (36)

Round 3 :

(5 sc, inc) x 6 (42)

Round 4-6 :

42 sc

Round 7 :

Change yarn color to the mustard color: BLO 42 sc

Round 8 :

(12 sc, dec) x 3 (39)

Round 9 :

(11 sc, dec) x 3 (36)

Round 10 :

(10 sc, dec) x 3 (33)

Round 11 :

(9 sc, dec) x 3 (30)

Round 12 :

(8 sc, dec) x 3 (27)

Round 13 :

(7 sc, dec) x 3 (24)

Info :

Stuff

Round 14 :

(6 sc, dec) x 3 (21)

Round 15-16 :

21 sc

Round 17 :

(5 sc, dec) x 3 (18)

Round 18 :

18 sc

Info :

Stuff

β€” Belt (Woody) :

Info :

Start working with brown color "Alize cotton gold" (hook size 1,3 mm). Split the white color yarn in half, and crochet. Work in turning rows:

Round 1 :

4 ch

Round 2-61 :

3 sc, ch (60 rounds)

Info :

Sew the belt to the body

β€” Hands (Jessy) :

Info :

Start working with main color:

Round 1 :

6 sc in mr

Round 2 :

(1 sc, inc) x 3 (9)

Round 3-5 :

9 sc

Round 6-7 :

Change yarn color to the yellow color: 9 sc

Round 8 :

Change yarn color to the red color: 9 sc

Round 9-16 :

Change yarn color to the white color: 9 sc

Info :

Stuff. Leave a long tail for sewing

β€” Hands (Woody) :

Info :

Start working with main color:

Round 1 :

6 sc in mr

Round 2 :

(1 sc, inc) x 3 (9)

Round 3-5 :

9 sc

Round 6 :

Change yarn color to the mustard color: 9 sc

Round 7-16 :

9 sc

Info :

Stuff. Leave a long tail for sewing

β€” Assembly :

Step 1 :

Sew the head to the body

Step 2 :

Sew the hands to the body

Step 3 :

Sew the yellow belt detail to the body and the belt around the waist, position as shown in photos

Step 4 :

Sew the hat onto the head and arrange hair and waistcoat as desired

β€” Waistcoat (Jessy) :

Info :

Start working with mustard color and work in turning rows:

Row 1 :

43 ch

Row 2 :

5 sc, sleeves: 9 ch, skip 9 sc, 14 sc on the back, sleeves: 9 ch, skip 9 sc, 5 sc, ch (42)

Row 3-5 :

42 sc

Info :

Crochet round: 3 sc side view, 42 sc from above, 3 sc side view, 42 sc from below

β€” Waistcoat (Woody) :

Info :

Start working with white color and work in turning rows:

Row 1 :

43 ch

Row 2 :

5 sc, sleeves: 9 ch, skip 9 sc, 14 sc on the back, sleeves: 9 ch, skip 9 sc, 5 sc, ch (42)

Row 3-5 :

42 sc

Info :

With indelible marker, mark the spots on Woody's waistcoat, if you do not want to draw, you can take a hook β„– 0.9-1.3 and crochet them with a suitable yarn

β€” Hat (Jessy) :

Info :

Start working with burgundy color:

Round 1 :

6 sc in mr

Round 2 :

6 inc (12)

Round 3 :

(1 sc, inc) x 6 (18)

Round 4 :

(2 sc, inc) x 6 (24)

Round 5 :

(3 sc, inc) x 6 (30)

Round 6 :

(4 sc, inc) x 6 (36)

Round 7 :

BLO 36 sc

Round 8-11 :

36 sc

Round 12 :

BLO (5 sc, inc) x 6 (42)

Round 13 :

3 sc, inc, (6 sc, inc) x 5, 3 sc (48)

Round 14 :

(7 sc, inc) x 6 (54)

Round 15 :

4 sc, inc, (8 sc, inc) x 5, 4 sc (60)

Round 16 :

(9 sc, inc) x 6 (66)

Round 17 :

5 sc, inc, (10 sc, inc) x 5, 5 sc (72)

Round 18 :

(11 sc, inc) x 6 (78)

Round 19 :

78 sc

Info :

Sew the hat on to the head

β€” Hat (Woody) :

Info :

Start working with brown color:

Round 1 :

6 sc in mr

Round 2 :

6 inc (12)

Round 3 :

(1 sc, inc) x 6 (18)

Round 4 :

(2 sc, inc) x 6 (24)

Round 5 :

(3 sc, inc) x 6 (30)

Round 6 :

(4 sc, inc) x 6 (36)

Round 7 :

BLO 36 sc

Round 8-11 :

36 sc

Round 12 :

BLO (5 sc, inc) x 6 (42)

Round 13 :

3 sc, inc, (6 sc, inc) x 5, 3 sc (48)

Round 14 :

(7 sc, inc) x 6 (54)

Round 15 :

4 sc, inc, (8 sc, inc) x 5, 4 sc (60)

Round 16 :

(9 sc, inc) x 6 (66)

Round 17 :

5 sc, inc, (10 sc, inc) x 5, 5 sc (72)

Round 18 :

(11 sc, inc) x 6 (78)

Round 19 :

78 sc

Info :

Sew the hat on to the head

Assembly Instructions

  • Between the 16-17 rows sew on ears; position the ears so the distance from ears to eyes is 5-6 stitches for correct placement.
  • Sew the hair pieces onto the head following the photo guides, then embroider the nose and finish the eye embroidery as instructed.
  • Attach the head to the body securely using the long tail left after finishing the head; weave and knot to secure.
  • Sew hands to the sides of the body at the arm openings, position the sleeves and yellow/red details to match photos.
  • Sew the belt around the waist and attach the yellow belt detail; sew the hat onto the head last to finish the character.
  • Pin pieces in place first to check symmetry, then sew with small whipstitches for a neat finish and weave in tails.

Important Notes

  • πŸ’‘Insert safety eyes between rows 15-16 and space them evenly; measure 5-6 stitches from each ear to centre the eyes.
  • πŸ’‘Leave long tails where instructed for sewing; these make assembly stronger and easier to manage when attaching parts.
  • πŸ’‘Stuff gradually and evenly while shaping heads and bodies; overstuffing or uneven stuffing will distort the shape.
  • πŸ’‘Use stitch markers to mark the beginning of rounds, especially during increases and decreases to keep track.
  • πŸ’‘Work with consistent tension and check stitch counts after each round to ensure correct shaping and sizing.

Bring Toy Story to life with these sweet Jessy and Woody amigurumi dolls crafted in cheerful colors and tiny details. They make heartwarming gifts and adorable shelf companions you will be proud to display. Follow the step-by-step rounds and enjoy a satisfying weekend project. 🧢✨

You ask,

we answer.

FAQs

What size will the finished piece be?

The finished amigurumi dolls measure approximately 18-22 cm tall depending on yarn tension and hook size; using the recommended yarn and hook sizes will give the proportions shown in the photos.

Can I use different yarn weights for this pattern?

Yes, you can use different yarn weights but this will change the final size; adjust the hook size accordingly and expect to modify eye size and stuffing amounts.

Do I need prior crochet experience for this pattern?

This pattern is rated intermediate, so basic knowledge of single crochet, increases, decreases, working in rounds, and basic color changes is recommended.

How long does this project typically take to complete?

Most crocheters complete one doll in approximately 5-7 hours; creating both Jessy and Woody may take a weekend depending on your pace and assembly time.