🧢 Beautiful ✨ Detailed πŸ’ Adorable

Jellyfish Amigurumi Pattern

Jellyfish Amigurumi Pattern
4.0β˜… Rating
5-7 Hours Time Needed
2.0K Made This
βœ‚οΈ

Intermediate Level

Ideal for those with basic crochet experience, featuring slightly more advanced stitches and techniques to expand your skills.

⏱️

Weekend Treat

Takes 5-7 hours, making it an enjoyable project to finish over a couple of days.

🧸

Cute Companion

An adorable friend to cherish, handcrafted with love to bring comfort and joy for years to come.

About This Jellyfish Amigurumi Pattern

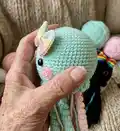
This pattern creates a sweet amigurumi jellyfish with a ruffled ridge and two types of tentacles for playful texture. Youll crochet the head from the top down, add chain and curly tentacles, and finish with embroidered features and felt or yarn cheeks. The design is fun to customize with color choices and different yarn weights.

Jellyfish Amigurumi Pattern crochet pattern - detailed view of completed project

The instructions include full round-by-round details, materials, abbreviations, and assembly photos to guide you. Perfect for making a gift-ready toy or a bright decorative accent for a nursery.

Why You'll Love This Jellyfish Amigurumi Pattern

I absolutely love this pattern because it balances simplicity with delightful detail, producing a cuddly, characterful jellyfish each time. I enjoy how the ruffled ridge and curly tentacles create a playful, tactile finish that kids adore. Making the tentacles in different colors always feels like decorating β€” it brightens the whole piece. The head shaping is satisfying and teaches useful amigurumi increases and decreases.

Jellyfish Amigurumi Pattern step 1 - construction progress Jellyfish Amigurumi Pattern step 2 - assembly progress Jellyfish Amigurumi Pattern step 3 - details and accessories Jellyfish Amigurumi Pattern step 4 - final assembly and finishing

Switch Things Up

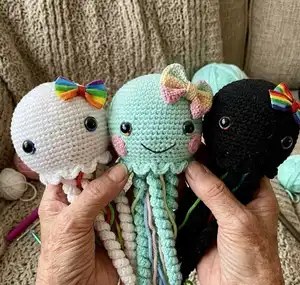
I love how easily you can personalize this jellyfish by changing colors β€” try soft pastels for a baby-friendly look or neon brights for a playful display.

I often switch the yarn weight and hook size to create smaller keychain versions or chunky cuddle sizes; adjust eye placement accordingly when sizing changes.

I like to alternate tentacle colors to create an ombre effect; simply change color every few chain or curl repeats for a blended look.

Try adding a small loop at the top of the head so your jellyfish can hang as a mobile or ornament β€” just leave a longer tail and create a chain loop before finishing.

I sometimes substitute safety eyes with embroidered eyes for a fully baby-safe toy; use the same placement but embroider a simple oval instead.

For a more textured ridge, experiment with different stitches in the ridge repeat (for example, replace hdc with puff or bobble stitches) to create unique edges.

I recommend testing one curly tentacle first to set your desired tightness; adjusting the number of chains or tension changes the curl diameter noticeably.

Want a beachy theme? Add tiny crocheted stars or shells sewn to the head or tentacles for thematic decoration.

I like to embroider small freckles or smile variations to give each jellyfish its own personality β€” try moving the smile placement slightly up or down to change expression.

For a keepsake, stuff a small rattle or dried lavender pouch into the head before closing to make a sensory or scented friend.

Common Mistakes & How to Fix Them

βœ— Skipping the stitch marker and joining rounds; this causes miscounted rounds and uneven shaping, so use a marker and work in a continuous spiral as instructed. βœ— Not stuffing gradually while shaping the head; this leads to lumps or a misshapen head, so stuff a little at a time and adjust as you decrease to keep a smooth shape. βœ— Placing the safety eyes too low or too close together; this changes the look of the face, so follow the placement note (between rounds 17 and 18 with 11 holes between) and pin before securing. βœ— Leaving long tails unweaved after finishing; loose tails can come undone and look messy, so weave in ends securely and trim excess. βœ— Pulling yarn too tight or inconsistent tension when making tentacles; this creates uneven curl and length, so keep consistent tension and match tentacles before sewing in place.

Jellyfish Amigurumi Pattern

Make an adorable handmade jellyfish with clear, step-by-step instructions. This pattern guides you through crocheting the head, adding a decorative ridge, making curly and chain tentacles, and assembling the finished amigurumi. Youll get full materials, abbreviations, and helpful assembly tips so you can finish a charming toy to gift or display. Perfect for intermediate crocheters who enjoy shaping and playful texture.

Intermediate 5-7 Hours

Materials Needed for Jellyfish Amigurumi Pattern

β€” Main Fabric

  • 01
    Worsted weight yarn (#4), approximately 100g of main color (Color A)
  • 02
    Accent colors: 50-75g total for tentacles and details (Color B and others)
  • 03
    Color A - Main Color (used for head and ridge) approx 100g
  • 04
    Color B - Tentacle Color(s) approx 50-75g
  • 05
    Color C - Pink (cheeks) small amount for two cheeks

β€” Tools Required

  • 01
    Crochet hook size D / 3.25 mm (D hook)
  • 02
    18 mm safety eyes (2 pieces)
  • 03
    Scissors
  • 04
    Sewing needle / yarn needle for sewing and embroidery
  • 05
    Stitch markers
  • 06
    Polyester fiberfill stuffing (fiberfill)
  • 07
    Black embroidery thread for smile
  • 08
    Pins for positioning cheeks and tentacles

Progress Tracker

0% Complete

β€” Head :

Round 1 :

Make 6 sc into a magic ring=6

Round 2 :

Increase in each st around= 12

Round 3 :

(sc, inc) x 6= 18

Round 4 :

(2 sc, inc) x 6= 24

Round 5 :

(3 sc, inc) x 6= 30

Round 6 :

(4 sc, inc) x 6= 36

Round 7 :

(5 sc, inc) x 6= 42

Round 8 :

(6 sc, inc) x 6= 48

Round 9 :

(7 sc, inc) x 6= 54

Round 10 :

(8 sc, inc) x 6= 60

Round 11-21 :

sc in each st around

Info :

Place the eyes between rounds 17 and 18, leaving 11 holes in between them.

Round 22 :

(8 sc, dec) x 6= 54

Round 23 :

(7 sc, dec) x 6= 48

Round 24 :

(6 sc, dec) x 6= 42

Round 25 :

(5 sc, dec) x 6= 36

Round 26 :

BLO (4 sc, dec) x 6= 30

Info :

Start stuffing the head

Round 27 :

(3 sc, dec) x 6= 24

Round 28 :

(2 sc, dec) x 6= 18

Round 29 :

(sc, dec) x 6= 12

Round 30 :

dec x 6= 6

Info :

F/O and sew the hole closed

β€” Ridge on Head :

Ridge on Head (P1) :

With Color A: Attach the yarn to round 26 of the head. *Follow pictures below for help* 1. *(hdc, dc, tr, dc, hdc) in one st, sl st in the 2 stitches* Repeat from * to * around the head. F/O and weave in the tail ends.

β€” Curly Tentacles :

Curly Tentacles (P1) :

With Color A: CH 71. 1. sc in 2nd ch from hook, inc in next st, (sc, inc) across the chain. F/O and leave a long tail for sewing. Make 7.

β€” Chain Tentacles :

Chain Tentacles (P1) :

With Color of Choice: CH 75. 1. Sl st in 2nd ch from hook and across. F/O and leave a long tail for sewing. Make 5.

β€” Cheeks :

Cheeks (P1) :

With Color C: 1. Make 6 sc into a magic ring= 6. 2. Increase in each st around= 12. F/O and leave a long tail for sewing. Make 2.

β€” Assembly :

Head and Body :

1. Mark 2 spots on the head with pins approximately between rounds 21 and 22. Cut a long strand of black embroidery thread. Thread your needle and insert the needle into a hole on the side of the head. Bring your needle up to the first pin and then bring the needle to the 2nd pin. Make a line and be easy and wrap the thread around the middle of the smile to hold it in place. Weave in the tail ends. 2. Pin the cheeks next to the eyes and sew into place.

Chain Tentacles (P1) :

Pin the chain tentacles in the middle of the jellyfish in a circle. Sew them onto the jellyfish.

Curly Tentacles (P1) :

Pin the curly tentacles around the chain tentacles. Sew the curly tentacles onto the jellyfish.

Assembly Instructions

  • Place safety eyes between rounds 17 and 18, counting 11 stitches between eyes before securing them.
  • Mark 2 spots on the head between rounds 21 and 22 for the smile, then use black embroidery thread to stitch the smile by bringing the needle up to the first pin and then to the second pin, wrapping gently and weaving in tails.
  • Pin the cheeks next to the eyes and sew them into place using the long tail left from the cheeks pieces.
  • Pin the chain tentacles in the middle of the jellyfish in a circle, then sew each chain tentacle securely to the head base.
  • Arrange the curly tentacles around the chain tentacles and sew them in place, trimming and weaving tails neatly for a tidy finish.

Important Notes

  • πŸ’‘Do not join rounds unless stated; work in a continuous spiral for smooth shaping.
  • πŸ’‘Use a stitch marker to mark the beginning of each round to keep accurate counts and avoid mistakes.
  • πŸ’‘All stitches are worked in both loops unless stated otherwise (BLO or FLO will be noted explicitly).
  • πŸ’‘Start stuffing gradually when instructed (start stuffing the head at round 26) to achieve a smooth, even shape.
  • πŸ’‘Weave in tails and secure embroidered details well so features remain durable through handling.

This adorable jellyfish amigurumi pattern was created to bring color and charm to your handmade collection. It combines textured ruffles and playful tentacles for a whimsical finish that makes great gifts. Whether you choose pastel tones or bold brights, your jellyfish will brighten any room. 🧢🌟

You ask,

we answer.

FAQs

What size will the finished piece be?

The finished jellyfish measures approximately 16 inches from the top of the head to the bottom of the tentacles when using worsted weight (#4) yarn and a 3.25 mm hook.

Can I use different yarn weights for this pattern?

Yes, you can use different yarn weights, but this will change the final size; if you use a thicker yarn and larger hook, the jellyfish will be larger and you may need to adjust eye placement and tentacle lengths.

Do I need prior crochet experience for this pattern?

This pattern is rated intermediate; basic knowledge of single crochet, increases, decreases, chains, and working in continuous rounds is recommended for best results.

How long does this project typically take to complete?

Most crocheters complete this project in about 5-7 hours depending on experience, decorative choices, and how many tentacles you make.