🧢 Beautiful ✨ Detailed πŸ’ Adorable

Infinity Cube Amigurumi Pattern

Infinity Cube Amigurumi Pattern
4.6β˜… Rating
5-7 Hours Time Needed
3.8K Made This
βœ‚οΈ

Intermediate Level

Ideal for those with basic crochet experience, featuring slightly more advanced stitches and techniques to expand your skills.

⏱️

Weekend Treat

Takes 5-7 hours, making it an enjoyable project to finish over a couple of days.

🎁

Tiny Treasure

Small, sweet, and gift-worthy creations that fit perfectly in the palm of your hand with detailed charm.

About This Infinity Cube Amigurumi Pattern

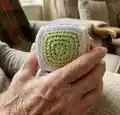
This pattern creates a soft, twistable Infinity Cube made from crocheted squares joined into small cubes, then assembled into a functioning fidget toy. It features colorful central faces with a crisp white border and simple corner increases for neat edges. The finished toy measures approximately 10 cm using the recommended yarn and a 2 mm hook.

Infinity Cube Amigurumi Pattern crochet pattern - detailed view of completed project

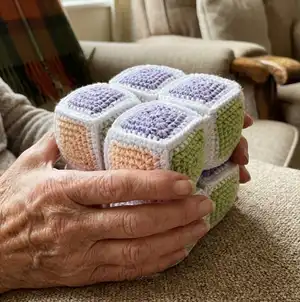
Instructions are written in US crochet terms and include all rounds, edging, assembly, and finishing notes. The pattern is ideal for making a set in calming pastel colors or bright hues for a playful look.

Why You'll Love This Infinity Cube Amigurumi Pattern

I absolutely love this pattern because it transforms basic crochet squares into a clever, interactive toy that keeps hands busy. I enjoyed choosing soft pastel color combinations that look charming together while still being practical for play. I appreciate that the design uses simple stitches so you can focus on assembly and shaping rather than complicated motifs. I also love how satisfying it is to steam and shape the finished cube β€” it makes each face crisp and tactile. Seeing the final toy twist and fold made from my own crochet always feels like a small triumph.

Infinity Cube Amigurumi Pattern step 1 - construction progress Infinity Cube Amigurumi Pattern step 2 - assembly progress Infinity Cube Amigurumi Pattern step 3 - details and accessories Infinity Cube Amigurumi Pattern step 4 - final assembly and finishing

Switch Things Up

I love how easy it is to customize this pattern by changing color palettes; try monochrome shades for a modern look or rainbow hues for a playful feel.

You can make the cube larger or smaller by choosing a different yarn weight and adjusting the hook size β€” bulky yarn gives you a chunky cube while fingering weight makes a tiny keychain-sized version.

I often swap the white edging for a contrast color to make the faces pop; a darker border changes the whole personality of the toy.

For a baby-safe version, use soft, natural cotton yarn and securely weave in ends, avoiding any small detachable parts.

I sometimes embroider small symbols or numbers onto the center of the squares to create an educational version for color and number learning.

If you want a sturdier toy, insert small cardboard discs inside the faces before closing (make sure edges are well covered and safe for children).

To make a quieter version, use a denser stuffing or add a layer of felt inside faces to mute the sound during twisting and turning.

I like to create sets of cubes in themed colors (pastel nursery, bright primary, earthy neutral) and display them as decor as well as playthings.

Try adding a small loop of ribbon to one cube face as a handle or attachment point for hanging the toy on a stroller or bag.

Finally, experiment with decorative stitches on the white border like reverse single crochet or picot for a scalloped edge β€” small changes like these make each cube uniquely yours.

Common Mistakes & How to Fix Them

βœ— Skipping the count of stitches after each round will cause your square to become misshapen; count stitches at the end of every round to ensure you have the correct number. βœ— Filling the cube too tightly will deform the shape and make it hard to twist; stuff lightly with holofiber and shape with your hands after assembly. βœ— Not hiding thread tails when joining edges can make seams bulky and visible; fasten off and weave ends into the inside of the cube before closing seams. βœ— Neglecting to make inc3 increases in the corners will result in rounded corners instead of square edges; follow the inc3 corner instruction carefully in the last round and edging. βœ— Using inconsistent tension across different colored squares will make some cubes larger than others; keep tension consistent and use the same hook for all squares.

Infinity Cube Amigurumi Pattern

Create a tactile, twistable Infinity Cube with this clear crochet pattern. You will make 48 small squares, join them into 8 cubes and assemble a fun fidget toy about 10 cm in size. The pattern uses simple stitches and a white border to define each cube face, making it a lovely handmade gift or sensory toy. Follow the step-by-step instructions and photos to complete your playful Infinity Cube.

Intermediate 5-7 Hours

Materials Needed for Infinity Cube Amigurumi Pattern

β€” Main Fabric

  • 01
    YarnArt Jeans 75 (blue) - small amount for multiple squares
  • 02
    YarnArt Jeans 72 (purple) - small amount for multiple squares
  • 03
    YarnArt Jeans 53 (light green) - small amount for multiple squares
  • 04
    YarnArt Jeans 23 (carrot) - small amount for multiple squares
  • 05
    YarnArt Jeans 88 (yellow) - small amount for multiple squares
  • 06
    YarnArt Jeans 73 (peach) - small amount for multiple squares
  • 07
    Alize Cotton Gold 55 (white) - used for border/edging around squares

β€” Tools Required

  • 01
    Crochet hook No. 2 (2 mm)
  • 02
    Holofiber filler (polyester stuffing)
  • 03
    Sewing needle for finishing and joining
  • 04
    Scissors
  • 05
    Iron (for steaming and shaping the finished cube, use with caution)

Progress Tracker

0% Complete

β€” Square :

Info :

Note! Inc3 - (1 sc, 1 hdc, 1 sc)*in one stitch. All inc3 are in the corners of the square. In the last row (when you work along the edge of the square with white yarn): inc3 - 3 sc in one stitch. Make 8 squares of each color. In total, you should have 48 squares.

Round 1 :

7 sc in ar, sl st, ch (8)

Round 2 :

inc3 in the next stitch (count ch as sc when you count stitches in the rows), (sc, inc3)*3, sl st in ch of the beginning of the row, ch (16)

Round 3 :

inc3 in the next stitch, (3 sc, inc3)*3, 2 sc, sl st in ch of the beginning of the row, ch (24)

Round 4 :

inc3 in the next stitch, (5 sc, inc3)*3, 4 sc, sl st in ch of the beginning of the row (32)

Info :

Fasten off, cut the thread. Hide the end of the thread when you work along the edge of the square with white yarn.

Round 5 :

Attach a white thread to any of the sides of the square and work along the edge of the square with sc, make inc3 in the corners of the square (3 sc (!) in one stitch). Finish with a needle (see photo) and fasten the thread from the inside. As a result - on the sides of the square you should have (7 sc + 3sc (on the tops))*4 (40)

β€” Making Cubes :

Info :

Now you need to make 8 cubes. Work with sc to connect two squares. When you work in the corners that have already been connected, make addition sl st through sc in the corner to "sharp" the corner. Fasten the thread tails and hide them inside of the cube.

Item Name (P1) :

Work pairs of squares together using sc along the white edging to create faces of a cube. Join three or four squares as shown in the cube scheme so each cube has six faces. Continue joining edges until the cube form is complete, leaving one side open for stuffing.

β€” Filling & Finishing :

Info :

When you have one side left open, fill the cube with holofiber. Do not fill tightly (this is important!!!) in order not to deform the cube. After the cube is assembled, give the part the correct shape with your hands.

Info :

Finish by closing the last side with sc stitches along the edging, fasten off and hide all thread tails inside the cube.

β€” Cube Assembly (Cubes connection) :

Info :

Make 2 parts, each of them has 4 cubes.

Part 1 :

Assemble 4 cubes as shown in the photo. The faces of the same color of all the cubes are directed in the same direction (the photo is signed in which direction and which color). The places where the cubes are sewed together are shown by dashes and arrows. Sew with simple seam "stitch to stitch" in sc of the white yarn row.

Info :

*purple - from above *blue - from below

Part 2 :

Assemble second group of 4 cubes in the same orientation so the side faces of the same color are directed in the same way. At this stage, we do not sew anything between part 1 and part 2.

Info :

Now, assemble part 1 and part 2, as in the photo below. The side faces of the same color of all the cubes are directed in the same direction (in the photo it is signed, in which direction which color). The color of the upper and lower faces is the same.

Info :

At the final stage, we need to turn the toy 180Β° (two parts at the same time) so that the upper faces are at the bottom. Check the photo below. Sew in places marked with a stroke.

β€” Shaping & Steaming :

Info :

To make your cube more dynamic, steam it with an iron. Pass the iron along all the faces, giving the cube the correct shape (do not press the iron too much, it can deform the side faces). Pay special attention to the seams between the cubes, apply steam to them several times to make them soft, to make easy to play with the cube.

β€” Final :

Info :

Done! Now you can twist it, fold it, turn it! The toy helps develop imagination, fine motor skills, and color/shape recognition. Happy crocheting!

Assembly Instructions

  • Make 48 squares (8 of each color) and add the white edging; join squares together with single crochet along the white edging to form cube faces before closing each cube.
  • When joining two squares, use single crochet across the white border; where corners meet that have already been connected, add a slip stitch through the corner single crochet to sharpen the corner.
  • Leave one side of each cube open for stuffing, fill lightly with holofiber filler (do not overstuff) and sew the final side closed, hiding thread tails inside the cube.
  • Assemble cubes into two parts of four cubes each, aligning faces of the same color in the same direction, then turn the two parts 180Β° together and sew where indicated to complete the Infinity Cube.
  • Sew cubes together using a simple 'stitch to stitch' seam into the white single crochet row so seams are neat and consistent.

Important Notes

  • πŸ’‘You can use any yarn and a suitable hook; if you change colors, write down which color you use and which you replace to keep consistency.
  • πŸ’‘The size of the finished toy with the indicated materials is approximately 10 cm, and the pattern is written in US crochet terms.
  • πŸ’‘Do not fill the cubes too tightly with holofiber filler to avoid deforming the cube; stuff lightly and shape with your hands after assembly.
  • πŸ’‘Hide and fasten off thread tails inside the cube before finishing to maintain neat edges and seams.
  • πŸ’‘When steaming with an iron, do not press too hard; apply steam gently and pay attention to seams between the cubes.

This Infinity Cube pattern is a playful, palm-sized fidget toy that doubles as a charming handmade gift. It combines simple rounds with careful assembly to produce a twistable cube full of color and texture. Have fun creating, assembling, and shaping your cube β€” it is soothing, tactile, and delightful to play with! 🧢✨

You ask,

we answer.

FAQs

What size will the finished piece be?

The finished toy measures approximately 10 cm tall when using the recommended yarn (YarnArt Jeans) and a 2 mm crochet hook.

Can I use different yarn weights for this pattern?

Yes, you can use different yarn weights, but the final size and number of stitches will change; use an appropriate hook for your chosen yarn and make a gauge swatch so squares match in size.

Do I need prior crochet experience for this pattern?

This pattern is rated intermediate, so basic knowledge of single crochet, half double crochet, increases, and working in rounds is recommended for best results.

How long does this project typically take to complete?

Most crocheters complete this project in 5-7 hours, depending on experience, speed, and whether you work continuously through the assembly steps.