🧢 Beautiful ✨ Detailed πŸ’ Adorable

Hufflepuff Knit Hat Pattern

Hufflepuff Knit Hat Pattern
4.7β˜… Rating
5-7 Hours Time Needed
1.1K Made This
βœ‚οΈ

Intermediate Level

Ideal for those with basic crochet experience, featuring slightly more advanced stitches and techniques to expand your skills.

⏱️

Weekend Treat

Takes 5-7 hours, making it an enjoyable project to finish over a couple of days.

πŸ‘•

Casual Chic

Relaxed style with a modern twist, perfect for everyday wear while maintaining that handcrafted uniqueness.

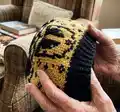
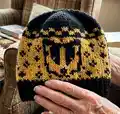
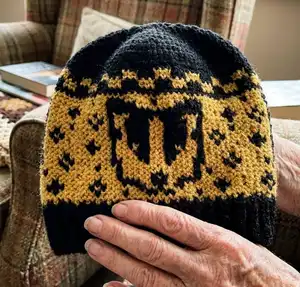
About This Hufflepuff Knit Hat Pattern

This pattern creates a worsted-weight knit beanie featuring a full colourwork band with the Hufflepuff crest. Youll work a ribbed brim, follow a 30x27 stitch chart for the body, then complete shaped crown decreases. The design uses stranded knitting for bold two-colour motifs and finishes with a tidy top closure.

Hufflepuff Knit Hat Pattern crochet pattern - detailed view of completed project

The pattern includes a full chart and explicit row-by-row crown decrease instructions. Materials and needle suggestions are provided so you can start knitting right away.

Why You'll Love This Hufflepuff Knit Hat Pattern

I absolutely love this pattern because the bold crest and repeating motifs give the hat a timeless, handcrafted look. I enjoy stranded colourwork and this design balances detail with a manageable chart size so it feels rewarding without being overwhelming. The ribbed brim gives a snug, comfortable fit and the stepwise crown decreases create a clean top finish. Knitting this hat is a satisfying weekend project that results in a wearable piece of fandom-crafted warmth.

Hufflepuff Knit Hat Pattern step 1 - construction progress Hufflepuff Knit Hat Pattern step 2 - assembly progress Hufflepuff Knit Hat Pattern step 3 - details and accessories Hufflepuff Knit Hat Pattern step 4 - final assembly and finishing

Switch Things Up

I love how easy it is to customise the colours in this chart β€” try Ravenclaw blues, Gryffindor red and gold, or a subtle monochrome version.

You can make the hat larger or smaller by changing yarn weight and selecting a different needle size; a bulkier yarn will give you a cosy chunky hat.

I often add a faux fur or yarn pom-pom in the contrast colour for a playful finish that makes the hat pop.

For a subtler version, work the crest in duplicate stitch after knitting a single-colour hat instead of full stranded colourwork.

I sometimes shorten the brim by two rows for a slouchier silhouette, or lengthen it for a folded cuff and extra ear coverage.

Try using a smaller needle for the brim rib to tighten the edge and switch to the recommended needle for the body to keep the fabric balanced.

If you want a lined hat, knit a separate simple beanie in a soft yarn and sew it into the inside for extra warmth.

I recommend experimenting with different float-catching methods: every 3rd or 4th stitch helps with long floats and keeps the inside tidy.

To personalise, add an initial or small motif next to the crest in the chart area using a modified chart or duplicate stitch.

Sometimes I add earflaps and braided ties for a more rustic, playful look β€” simply pick up stitches at the brim edge and work triangular earflaps to your preferred size.

Common Mistakes & How to Fix Them

βœ— Not checking gauge before starting will change the finished size; knit a 4 inch by 4 inch stockinette swatch (16 sts x 24 rows) and adjust needles if needed. βœ— Neglecting to carry floats neatly during colourwork causes puckering; catch floats at regular intervals and keep them loose across the wrong side. βœ— Forgetting to increase to 90 stitches before starting the chart will distort the pattern; m1 every 12 stitches on Row 1 until you have exactly 90 stitches. βœ— Pulling decreases too tightly at the crown makes a pucker at the top; work SSK and leave the stitch loops relaxed so the closure sits flat and neat.

Hufflepuff Knit Hat Pattern

Create a cozy Hufflepuff house hat featuring bold colourwork and a clear charted crest. Youll knit this beanie in worsted weight yarn with a classic rib brim and stranded colourwork for the body. Perfect for gifting or showing house pride, this pattern walks you through the brim, charted body, and crown decreases so you get a polished finished hat.

Intermediate 5-7 Hours

Materials Needed for Hufflepuff Knit Hat Pattern

β€” Main Fabric

  • 01
    Worsted weight yarn (#4) - 1 skein black (main colour)
  • 02
    Worsted weight yarn (#4) - 1 skein yellow/orange (contrast colour for crest and motifs)

β€” Tools Required

  • 01
    Size 7 needles (US 7) - DPNs or 9" round needles as preferred
  • 02
    Yarn needle for weaving in ends
  • 03
    Scissors for cutting yarn
  • 04
    Tapestry needle or blunt needle for finishing

Progress Tracker

0% Complete

β€” Gauge :

Info :

16 stitches and 24 rows = 4 inches in stockinette stitch

β€” Brim :

Round 1 :

Cast 84 stitches of black yarn onto needle

Round 2 :

k1p1 until brim reaches preferred length (or 8 rows)

β€” Body (Chart) :

Row 1 :

work chart, m1 every 12 stitches to hit 90 stitches total

Rows 2-27 :

work chart

Info :

Follow the provided 30x27 stitch colourwork chart for the crest and surrounding motifs; carry floats neatly and maintain consistent tension during stranded knitting

β€” Crown :

Info :

Rows 28-43: black yarn

Row 28 :

k8, SSK *repeat until end of round*

Row 29 :

knit across

Row 30 :

k7, SSK *repeat until end of round*

Row 31 :

knit across

Row 32 :

k6, SSK *repeat until end of round*

Row 33 :

knit across

Row 34 :

k5, SSK *repeat until end of round*

Row 35 :

knit across

Row 36 :

k4, SSK *repeat until end of round*

Row 37 :

knit across

Row 38 :

k3, SSK *repeat until end of round*

Row 39 :

knit across

Row 40 :

k2, SSK *repeat until end of round*

Row 41 :

knit across

Row 42 :

k1, SSK *repeat until end of round*

Info :

Cut yarn, pull through the remaining loops, and tie in all your loose ends!

Assembly Instructions

  • After completing the crown decreases, cut the yarn and pull it through the remaining loops to close the top securely, then knot and trim.
  • Weave in all loose ends on the wrong side using a yarn needle, hiding tails along the inside rib or colourwork floats.
  • Gently block the hat by wetting and shaping it on a rounded form or towel to even the stranded colourwork and set the stitches.
  • If using DPNs, ensure joins are neat and distribute stitches evenly across needles to avoid loose ladders; adjust tension at joins before finishing.
  • Check the colourwork floats around the inside and catch long floats every 4-5 stitches to prevent snagging and to maintain elasticity.

Important Notes

  • πŸ’‘Work a gauge swatch in stockinette to match 16 sts x 24 rows = 4 inches before starting to ensure correct hat size.
  • πŸ’‘When carrying the contrast colour across the wrong side, keep floats loose to preserve elasticity and avoid puckering.
  • πŸ’‘Place a marker at the beginning of the round when working the chart and crown decreases to keep track of repeats.

This Hufflepuff knit hat pattern gives you a bold house crest and classic colourwork band, perfect for wearing to matches or gifting to a fellow fan. The charted body and clear crown decreases make it accessible yet satisfying to knit. Grab your worsted yarn, pick your needles, and knit a cozy piece of house pride! 🧢✨

You ask,

we answer.

FAQs

What size will the finished piece be?

The finished hat will fit an average adult head when worked to gauge using worsted yarn and size 7 needles; gauge is 16 sts and 24 rows = 4 inches.

Can I use different yarn weights for this pattern?

Yes, you can use different yarn weights but this will change the finished size; adjust needle size to maintain correct gauge or rework stitch counts accordingly.

Do I need prior knitting experience for this pattern?

This pattern is rated intermediate due to stranded colourwork and working decreases with DPNs or circular needles, so basic knitting and chart-reading skills are recommended.

How long does this project typically take to complete?

Most knitters complete this hat in 5-7 hours, depending on experience with colourwork and how quickly you work the crown decreases.