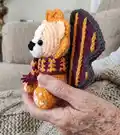
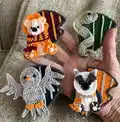
Create four charming house-themed appliques — Raven, Badger, Lion and Snake — with this detailed crochet pattern pack. Youll get step-by-step stitch instructions, color notes and assembly tips to make each applique 6"-7" tall. The patterns are perfect for mixing and matching colors and finishing with a charcoal outline for a polished look. Ideal for crafters who enjoy playful, collectible appliques to decorate bags, jackets, or gifts.
Progress Tracker
0% Complete
— Supplies :
Info :
Applique Size: 6"-7" tall. Hook Size: F (3.75mm). Skill Level: Beginner/Intermediate. Language: English Standard Terms.
Infos :
Yarn - I love Caron One Pound and use that for nearly ALL of my patterns. For this pattern I used Raven: Navy, Light Blue, Light Grey, Charcoal, Gold. Badger: Gold, Light Grey, Charcoal, White, Black. Snake: Hunter Green, Light Green, Light Grey, Red, Charcoal. Lion: Gold, Light Yellow, White, Burgundy, Charcoal, Black. Also: Scissors. Hook. Yarn Needle. Buttons - shank buttons (13mm and 6mm). Glue Gun - optional for assembly.
— Stitch Abbreviations :
Info :
CH - Chain. SS - Slip Stitch. MC - Magic Circle. SC - Single Crochet. HDC - Half Double Crochet. DC - Double Crochet. TC - Triple Crochet. SC2TG - Single Crochet 2 Together (decrease). HDC2TG - Half Double Crochet 2 Together (decrease). DC2TG - Double Crochet 2 Together (decrease).
— Crests :
Round 1 :
CH 18. DC in 3rd from hook and across (16). CH 2, turn.
Round 2 :
DC2TG. DC in next 12. DC2TG. (14). CH 2, turn.
Round 3 :
DC2TG. DC in next 10. DC2TG. (12). CH 2, turn.
Round 4 :
DC2TG. DC in next 8. DC2TG. (10). CH 2, turn.
Round 5 :
DC2TG. DC in next 6. DC2TG. (8). CH 2, turn.
Round 6 :
DC2TG. DC in next 4. DC2TG. (6). CH 2, turn.
Round 7 :
DC2TG. DC in next 2. DC2TG. (4). CH 2, turn.
Round 8 :
DC2TG twice. (2). Tie off.
Info :
Reattach yarn at bottom of original chain as shown here, skipping 3 stitches in.
Round 9 :
DC in 10. CH 2. turn.
Round 10 :
2DC in first. DC in next 12. 2DC in last. (16). CH 1, turn.
Round 11 :
SC in first 2, HDC in next 2, DC in next 3, TC in next 2.
Round 12 :
DC in next 3, HDC in next 2, SC in last 2. SS in same stitch. Tie off.
Round 13 :
CH 21. Tie off.
Round 14 :
CH 16. Tie off.
Info :
Arrange them on Crest as shown in picture. Using Charcoal, make a chain of 85. Tie off. Attach it all the way around the crest as shown.
Info :
Using whatever color stripes youll be making, make the following chains and tie off. CH 15. Tie off.
— Badger :
Eyes - Make 2 :
Using charcoal, CH 5. HDC in 2nd from hook and across (4). CH 1, turn.
Round :
HDC2TG twice. (2). CH 1, turn.
Round :
HDC across (2). CH 1, turn.
Round :
HDC across (2). Tie off.
Nose :
Using black, make a magic circle. CH 1 and SC 4. SS to join. Tie off.
Nose Outline :
Using charcoal, make a CH of 10. This is the outline on the bottom of the nose.
Head :
Using white, make a magic circle. CH 2 and then DC 12. SS to join. CH 2, do not turn.
Round :
2DC in each stitch around. SS to join. CH 2, do not turn.
Round :
*2HDC in first. 1HDC in next. Repeat from * all the way around. SS to join. Tie off.
Head - Alternate :
Using white, make a magic circle. CH 1, and HDC 10. SS to join. CH 1, do not turn.
Arms - Make 2 :
Using charcoal, CH 12. DC in 3rd from hook and in next 3. 2DC in next. DC in remaining 5. Tie off.
Scarf :
This will be the same pattern for all 4 animals. Using Color #1, CH 4. HDC in 2nd from hook and across (3).
Scarf Row :
*Attach Color 2. HDC across (3). Switch to Color 1. HDC across (3). Repeat from * 3 more times or until you have 7 rows total. Tie off.
Scarf Fringe :
For fringe make 6 cuts of yarn about 4 in long. Using 2 pieces at a time tie them around bottom of scarf and then cut to desired length.
Ears - Make 2 :
Using white, CH 5. SC in 2nd from hook. HDC in next. DC in next. TC in last. Tie off.
Ears - Alternate :
Using light grey, CH 3. SC in 2nd from hook and HDC in last. Tie off.
Feet - Make 2 :
Using charcoal, make a magic circle. CH 2 and DC 12. SS to join. Tie off.
Foot Detail :
Using white, CH 2. SC 3 times in last CH from hook and pull tight. Tie off.
Body :
Using white, make a magic circle. CH 1 and HDC 10. SS to join. CH 1, do not turn.
Body :
HDC in first 2. CH 1, turn. HDC across (2). CH 1, turn. HDC across. Tie off.
— Lion :
Head :
Using gold, make a magic circle. CH 2 and DC 14. SS to join. CH 2, do not turn.
Round :
2DC in each stitch around. SS to join. CH 1, do not turn.
Round :
*4HDC in next stitch. SS in next. Skip next. Repeat from * 7 more times. The last 2 stitches will be skipped. SS to join. Tie off.
Using Light Yellow :
Make a magic circle. CH 2 and DC 12. SS to join. CH 2, do not turn. 2DC in each stitch around. SS to join. Tie off.
Ears - Make 2 :
Using light yellow CH 3. 5HDC in last CH from hook. SS in same CH. Tie off.
Feet - Make 2 :
Using gold make a magic circle. CH 2 and DC 12. SS to join. Tie off.
Foot Detail :
Using white CH 2. SC 3 times in last CH from hook and pull tight. Tie off. Using white make 3 CHs of 1. Tie off.
Tail - Make 4 :
Using light grey CH 9. SS in 2nd from hook. SC in next and HDC the rest of the way down. Tie off.
Belly :
Using light yellow, make a magic circle. CH 2 and DC 12. SS to join. CH 2, do not turn. 2DC around. SS to join. Tie off.
— Snake :
Info :
Use the same crest pattern for all 4 crests. All have the charcoal outline. Snake colors: Hunter Green/Light Green.
Body :
Using light grey, CH 40. SS in the 2nd from hook and in next 2. SC in next 3. HDC in next 3.
Round :
3DC in next. DC in next 5. SKIP next. DC in next 5.
Round :
TC in next 4. HDC in next. SS in last. Tie off.
Attach :
Attach light green yarn to the end where you started with the SS (skinniest end of snake).
Round :
SS in the first 4. SC in the next 2. HDC in next. DC in next 10. SKIP next.
Round :
DC in next 12. SKIP next. DC in next 5. DC2TG. DC in next 6. DC2TG. CH 2. turn.
Round :
DC2TG. DC in next 4. DC2TG. (Tie off) - DC2TG twice. Tie off.
Info :
You can see how the snake has some natural wave to it, but when you assemble it on the crest, you can manually twist and bend it to make the shape that you want. Using red, cut a small piece of string and attach it to the back of the head, so it sticks out like a tongue.
— Raven :
Head :
Using light grey, make a magic circle. CH 2 and DC 16. SS to join. CH 2, do not turn.
Round :
2DC in each stitch around. SS to join. Tie off.
Wings :
Using light grey, CH 35. SS in 2nd from hook. SC in next. HDC in next. DC in next 28. HDC in next. SC in next. SS in last. Tie off.
Attach Yarn :
Re-attach yarn as shown on pictures - skip 13 stitches in from the left when attaching wings to main wing part. Skip 7 stitches on main wing part and re-attach yarn (as shown in picture) then repeat wing instructions.
Wing Edging :
CH 5. SS in 2nd from hook. SC in next. HDC in next. DC in last and then skip one stitch on the main wing part and SS to join. *CH 7. SS in 2nd from hook. SC in next. HDC in next. DC in next 3. Skip one stitch on the main wing part and SS to join. Repeat from * one more time.
— Assembly :
Info :
I assemble all of my appliques using a glue gun and regular glue sticks; you can choose to stitch them together if you prefer. Pin parts in place, then glue or stitch. Attach eyes/buttons and scarf pieces as shown in photos. Attach charcoal chain around crest to finish.
These house-themed appliques are a playful craft to collect and display — mix and match colors to create a full set for gifts or decor. Whether you sew or glue them down, each piece finishes with a charcoal outline for a crisp look. Happy crocheting and enjoy making magic with yarn! 🧶✨