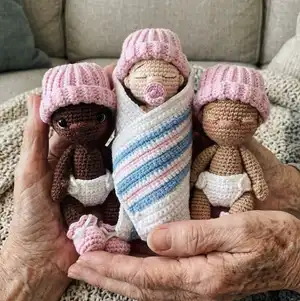
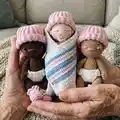
Create an adorable hospital set for mini baby dolls with this complete crochet pattern. You will make a ribbed hat, tiny booties, a secure diaper, a striped receiving blanket for swaddling, an optional decorative pacifier, and a printable hospital bracelet. The pattern uses fine fingering yarn and small hooks for precise detail, and includes clear row-by-row instructions and helpful finishing tips to get a neat, professional result.
Progress Tracker
0% Complete
— Hat :
Info :
Using Yarn Over (v-stitch)
Row 1 :
Starting in 2nd ch from hook, 16 sc, 4 slst, ch 1, turn (20)
Row 2 :
BLO - (4 slst, 16 sc), ch 1, turn (20)
Row 3 :
BLO - (16 sc, 4 slst), ch 1, turn (20)
Rows 4-35 :
Repeat (Row 2, Row 3) x16 (32 rows)
Info :
(Note: You will have a total of 36 rows, or you can count 18 ridges.)
Info :
Fold piece over, and slst through beginning chain and both loops of Row 36. (20 slst)
Info :
You will continue across the top of the hat with surface slsts (10-12 slst), keeping them tight and a little below the top edge.
Info :
Turn the hat right side out and fold up the brim. Place on your doll!
— Booties :
Info :
Using Yarn Under or Yarn Over - your preference
Starting :
Starting with Ch 5
Rnd 1 :
Starting in 2nd ch from hook, 3 sc, 3 sc in next ch (across end of row of chains), (now working opposite side) 2 sc, INC (10)
Rnd 2 :
INC, 2 sc, (INC) x3, 2 sc, (INC) x2 (Fig. 1) (16)
Rnd 3 :
1 sc, INC, 3 sc, (INC, 1 sc) x2, INC, 3 sc, INC, 1 sc, INC (22)
Rnd 4-5 :
22 sc (2 rounds) (22)
Rnd 6 :
6 sc, (inv DEC) x4, 6 sc, inv DEC (17)
Rnd 7 :
5 sc, (inv DEC) x3, 6 sc (Fig. 2) (14)
Rnd 8 :
ch 4, (sk next sc, 1 dc, ch 1) x6, join to 3rd ch with slst (Fig. 3) (7 spaces)
Rnd 9 :
(in each space) (1 sc, 2 dc, 1 sc) x7 (28)
Info :
Finish off, sew in ends, and weave 1/8" white ribbon through openings in Rnd 8. Use hook if necessary to help pull ribbon in and out of the spaces. The two ends should come through together in the middle opening at the front of the bootie. Tie ribbon, making sure it fits on baby\'s foot, and not too tight. Put a dot of craft glue on the knot of the bow to make sure it stays put and trim the ends. Booties should slip on and off quite easily!
— Diaper :
Info :
Using Yarn Under or Yarn Over - your preference
Info :
Note: Turning chain not included in stitch count
Starting :
Starting with Ch 23
Row 1 :
starting 2nd ch from hook, 22 sc, ch 1, turn (22)
Row 2 :
5 slst, 12 sc, (sk last 5 sc), ch 1, turn (17)
Row 3 :
DEC, 8 sc, DEC, ch 1, turn (10)
Row 4 :
10 sc, ch 1, turn (10)
Row 5 :
DEC, 6 sc, DEC, ch 1, turn (8)
Row 6 :
8 sc, ch 1, turn (8)
Row 7 :
DEC, 4 sc, DEC, ch 1, turn (6)
Row 8 :
DEC, 2 sc, DEC, ch 1, turn (4)
Row 9-12 :
4 sc, ch 1, turn (4 rows) (4)
Row 13 :
INC, 2 sc, INC, ch 1, turn (6)
Row 14 :
INC, 4 sc, INC, ch 1, turn (8)
Row 15 :
INC, 6 sc, INC, ch 1, turn (10)
Row 16 :
INC, 8 sc, INC, ch 1 (do not turn) (Fig. 4) (12)
Info :
(Border around Diaper)
Border :
20 sc across row ends and skipped sts (Fig. 5), ch 3 (or number of chains needed for the size of button you are using), 22 sc across original chains, ch 3 (or number of chains needed for the size of button you are using) (Fig. 6), 20 sc across slsts and row ends, INC (in corner - first stitch of Row 16), 10 sc across Row 16, INC (in corner - last stitch of Row 16.)
Finish :
Finish off the border, sew in ends. Placing diaper on doll, determine where to best place the buttons for a firm fit, then sew on buttons.
— Receiving Blanket (for swaddling baby) :
Info :
Using Yarn Over (v-stitch)
Info :
2.0mm hook (0.5mm larger than the hook used for the doll)
Info :
Note: All ends can be hidden as you crochet so you don\'t have to sew them in!! (Fig. 7)
Starting :
Using white yarn, start with ch 51 (Start Row 1 in 2nd ch from hook)
Row 1-3 :
50 sc, ch 1, turn (3 rows: white)
Change :
Change to light blue yarn
Row 4-5 :
50 sc, ch 1, turn (2 rows: light blue)
Change :
Change to white yarn
Row 6 :
50 sc, ch 1, turn (1 row: white)
Change :
Change to pink yarn
Row 7 :
50 sc, ch 1, turn (1 row: pink)
Change :
Change to white yarn
Row 8 :
50 sc, ch 1, turn (1 row: white)
Change :
Change to light blue yarn
Row 9-11 :
50 sc, ch 1, turn (3 rows: light blue)
Change :
Change to white yarn
Row 12 :
50 sc, ch 1, turn (1 row: white)
Change :
Change to pink yarn
Row 13 :
50 sc, ch 1, turn (1 row: pink)
Change :
Change to white yarn
Row 14 :
50 sc, ch 1, turn (1 row: white)
Change :
Change to light blue yarn
Row 15-16 :
50 sc, ch 1, turn (2 rows: light blue)
Change :
Change to white yarn
Row 17-35 :
50 sc, ch 1, turn (19 rows: white)
Change :
Change to light blue yarn
Row 36-37 :
50 sc, ch 1, turn (2 rows: light blue)
Change :
Change to white yarn
Row 38 :
50 sc, ch 1, turn (1 row: white)
Change :
Change to pink yarn
Row 39 :
50 sc, ch 1, turn (1 row: pink)
Change :
Change to white yarn
Row 40 :
50 sc, ch 1, turn (1 row: white)
Change :
Change to light blue yarn
Row 41-43 :
50 sc, ch 1, turn (3 rows: light blue)
Change :
Change to white yarn
Row 44 :
50 sc, ch 1, turn (1 row: white)
Change :
Change to pink yarn
Row 45 :
50 sc, ch 1, turn (1 row: pink)
Change :
Change to white yarn
Row 46 :
50 sc, ch 1, turn (1 row: white)
Change :
Change to light blue yarn
Row 47-48 :
50 sc, ch 1, turn (2 rows: light blue)
Change :
Change to white yarn
Row 49-51 :
50 sc, ch 1, do not turn (3 rows: white) (border)
Border :
50 sc across row ends, 3 sc in corner, 48 sc across beginning chains, 3 sc in corner, 50 sc across row ends, 3 sc in corner, 48 sc across Row 51, ch 7 (or amount needed for the size of button you are using), 2 sc in corner, join with invisible join. (Fig. 8 and 9)
Info :
Use guide below to swaddle your doll and determine where to sew the button, (or use Fig. 8 as a guide.)
— How to Swaddle Your Doll :
Step 1 :
Blanket lying diagonally, button underneath (Step 1)
Step 2 :
Doll lying with head in top corner (Step 2)
Step 3 :
Fold over left corner, (wrap tightly around doll) (Step 3)
Step 4 :
Fold up bottom corner, lining up diagonally with left corner (Step 4)
Step 5 :
Fold over right corner (Step 5)
Step 6 :
Secure button (Step 6)
— Hospital Bracelet :
Step :
Cut bracelet from printout, put clear packing tape or similar on both sides, trim packing tape, measure length to baby\'s wrist, trim ends if needed, tape bracelet together, put hospital bracelet on baby\'s wrist!
— Pacifier (optional) :
Info :
The pacifier is a sweet decoration for your doll, but not a sturdy toy for small children!! It is NOT recommended for young children.
Step 1 :
Cut a small piece of (15-guage or similar) aluminum wire (1.5 – 2 inches long)
Step 2 :
Coat one end tip of the wire with 1 base coat, 2 or more color coats, and 1 topcoat of resin nail polish, and cure under UV/LED light for each layer (or find some way to coat the tip of one end, so that it will not tear the yarn when pushed into a hole in the crochet stitches in the mouth area of the doll.)
Step 3 :
With pink or light blue yarn, and leaving a long starting tail - 6 sc in mr, then (INC) x6 (12)
Step 4 :
Finish off with an invisible join and sew in the finishing tail.
Step 5 :
Gently poke the covered tip of wire through the center hole in the crocheted circle, from back side to front (the back side will show when the pacifier is in the baby\'s mouth, cupping the circle toward the baby.)
Step 6 :
Form the wire into a circle shape (the handle) and trim the end if necessary to make it the right length. Don\'t close the circle completely though - keep it open.
Step 7 :
Apply a small amount of craft glue along the edge of the wire circle.
Step 8 :
Wrap the long starting tail carefully from the top of the wire around the circle until you reach the end of the wire.
Step 9 :
Bend the circle closed, and using a small tapestry needle, thread the leftover yarn through the pacifier. Pass it back and forth a couple times, securing the wire, and finish off.
Step 10 :
Loosen one of the holes where the baby\'s mouth would be, using a thick tapestry needle or a crochet hook. Carefully push the coated tip of the pacifier into the hole!
This Hospital Set is a tiny, heartfelt collection perfect for mini baby dolls — complete with hat, booties, diaper, swaddle blanket, bracelet, and an optional decorative pacifier. Each piece is designed for small-scale detail using fingering cotton and tiny hooks to create a professional finish. Make a set in classic hospital stripes or customize colors for a personal gift that delivers big smiles in a little package. 🧶👶✨