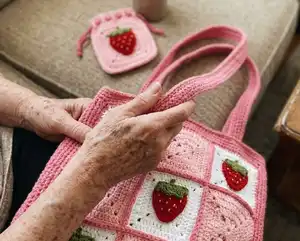
Make a charming strawberry-themed tote bag and matching drawstring pouch with detailed step-by-step instructions. This pattern walks you through granny squares, strawberry appliques, stems, sewing, and finishing so you can create a cute set perfect for gifts or everyday use. You will learn simple repeats and assembly techniques while customizing colors and details to suit your style.
Progress Tracker
0% Complete
— How to Make the Drawstring Pouch :
Round 1 :
Using the background color of your choice, here I will be using pink, make a MR but do not crochet any stitches just yet. We will start by CH 3, then DC 3, then CH 2, DC 4, CH 2, DC 4, CH 2, DC 4, CH 2, and SC in the original CH 3 space – 16 Stitches and 4 CH 2 Spaces
Round 2 :
Start by CH 2, then DC in the CH 3 space, then DC in the SC stitch, then DC 3, DC 2 in the CH 2 space, CH 2, DC 2 in the CH 2 space, DC 4, DC 2 in the CH 2 space, CH 2, DC 2 in the CH 2 space, DC 4, DC 2 in the CH 2 space, CH 2, DC 2 in the CH 2 space, DC 4, DC 2 in the CH 2 space, CH 2, SC in the original CH 2 space – 32 Stitches and 4 CH 2 Spaces
Round 3 :
CH 2, then DC in the CH 2 space, then DC in the SC stitch, then DC 7, DC 2 in the CH 2 space, CH 2, DC 2 in the CH 2 space, DC 8, DC 2 in the CH 2 space, CH 2, DC 2 in the CH 2 space, DC 8, DC 2 in the CH 2 space, CH 2, DC 2 in the CH 2 space, DC 8, DC 2 in the CH 2 space, CH 2, SC in the original CH 2 space – 48 Stitches and 4 CH 2 Spaces
Round 4 :
CH 2, then DC in the CH 2 space, then DC in the SC stitch, then DC 11, DC 2 in the CH 2 space, CH 2, DC 2 in the CH 2 space, DC 12, DC 2 in the CH 2 space, CH 2, DC 2 in the CH 2 space, DC 12, DC 2 in the CH 2 space, CH 2, DC 2 in the CH 2 space, DC 12, DC 2 in the CH 2 space, CH 2, SLST in the original CH 2 space – 64 Stitches and 4 CH 2 Spaces
Info :
After this round we will fasten off, leaving a tail that measures around 5 – 10 inches long. We will then hide any remaining tails and we’re done with the granny square! We will now repeat the process, from round 1, to create the second granny square for the back of the pouch.
— How to Make the Base of the Strawberry Applique (Make 5) :
Row 1 :
With the red colored yarn, CH 9
Row 2 :
Starting from the second CH from the hook, SC in each of the 8 CHs – 8 SC
Row 3 :
CH 1 and turn, then SC in each of the 8 stitches – 8 SC
Row 4 :
CH 1 and turn, then DEC using the first 2 stitches, SC in the next 4 stitches, and DEC using the last 2 stitches – 6 SC
Row 5 :
CH 1 and turn, then SC in each of the 6 stitches – 6 SC
Row 6 :
CH 1 and turn, then DEC using the first 2 stitches, SC in the next 2 stitches, and DEC using the last 2 stitches – 4 SC
Row 7 :
CH 1 and turn, then SC in each of the 4 stitches – 4 SC
Row 8 :
CH 1 and turn, then DEC using the first 2 stitches and DEC using the last 2 stitches – 2 SC
Row 9 :
CH 1 and turn, then DEC using the next 2 stitches – 1 SC
Info :
At this point we will SC a border around the entire strawberry, making sure to SC twice in each of the edge stitches. There should be 3 edges, one on each of the top 2 corners, and the bottom of the strawberry.
Info :
After this step we will fasten off, leaving a long tail that measures around 5 – 10 inches long. Then we just have to hide the tails and done! We have completed making the strawberry base!
— Seeds :
Info :
You can leave your strawberry as is, or you have the option to add seeds. To add seeds- cut a 20” piece of the yellow colored yarn. (I am using thinner yarn here- so I like to double the strands to make the seeds a bit thicker). Then, use this to sew on lines all around the strawberry. I did mine in a pattern, but you could also arrange them at random- or however you like. I also like to start my seeds on row 4 of the strawberry, as the stem will cover up most of the top portion later on.
— Stem of the Strawberry (Make 5) :
Row 1 :
Using the green colored yarn, CH 9
Row 2 :
Starting from the third CH from the hook, *DC, TR, and DC all into the same CH, then SC in the next – we will repeat the pattern starting from *, until we reach the end of our row (we should end on a leaf instead of a SC) – 4 Leaves and 3 SC
Info :
We will then turn the piece so we should now be working on the underside of the foundation CH – We will then SC in the next 4 CHs, then CH 4 and starting from the second CH we will SLST 3, we will then SC in the remaining 4 CHs. We will end the row with a SLST – 8 SC
Info :
After this round we will fasten off, leaving a tail that measures around 15 – 20 inches long. We will then use this tail to sew the strawberry and stem pieces together. To do this insert your needle into the tail we had left from the stem and secure the stem to the strawberry, making sure it is centered.
Info :
Now after we are finished sewing the two pieces together- we can hide any remaining tails.
— How to Sew the Strawberry Applique to the Granny Square :
Step 1 :
We will start by placing the strawberry applique on the right side of the granny square. Make sure to place your strawberry so that the right side is facing upwards as well and is centered. We will then pin the strawberry applique in place.
Step 2 :
Now cut a 15 – 20-inch piece of our red colored yarn and insert our needle. Use this piece to sew the red strawberry part to the square, making sure to get under both the strawberry and square stitches to secure them together.
Step 3 :
Now cut a 15 – 20-inch piece of our green colored yarn and insert our needle. Use this piece to sew the green strawberry stem to the square, making sure to get under both the stem and square stitches to secure them together.
Step 4 :
Now hide the remaining tails and done!
— Assembly (Pouch) :
Step 1 :
For this part of the pattern- you will need a granny square with the applique sewn onto it, and a plain granny square- both ready to go. We will start by placing the two granny squares on top of one another, so that the wrong sides are facing each other. We will then make a slip knot out of the same-colored yarn as the granny squares. Then pull the slip knot through the upper left corner CH 2 space of both squares (working with them as if they were one) and make a SC. We will now SC around both our squares, making sure to go into both stitches of the squares to SC them together. I like to SC twice in the two bottom CH 2 spaces only. (This makes it so that we do not have a big gap where that CH 2 space is) We will stop SCing the two squares together when we reach the upper right corner CH 2 space. There, we will end by placing a SC into.
Step 2 :
Now we will be making the top of our pouch - where the strings will be placed into later on. To begin we will CH 2, and DC into the upper right corner CH 2 space of the front granny square. (Here we will be working with each granny square separately again to ensure the pouch can remain open... we do not want to sew the tops together here- so, instead of stitching them together like we had done in step 1 – we will be working in the front square- and then will move onto the back square- working in a round.) Next, we will DC one stitch into each of the stitches of the top edges of both granny squares separately, working in a round. Make sure to DC once into each of the remaining 3 CH 2 spaces as well. When we reach the CH 2 we had started with, we will then SLST to end the round - 34 Stitches
Step 3 :
We will start with a CH 2, then HDC into the same stitch as the SLST. We will then CH 2, skip 1 stitch, and HDC into the next. We will repeat this pattern starting with a CH 2 until we reach the original CH 2 space we started with. When we reach this point- we will then SLST to end the round - 18 Stitches and 17 CH 2 Spaces
Step 4 :
CH 2, then DC into the same stitch as the SLST. We will then DC one stitch into each of the HDC stitches, and DC one stitch into each of the CH 2 spaces as well. Continue on again with this repeating pattern- until you reach the original CH 2 space. When we reach that CH 2 space - we will SLST to finish it off – 35 Stitches
Step 5 :
We will then fasten off, leaving a 5 – 10-inch tail. Then hide the remaining tails and done! All that is left is to crochet the strings and insert them into the pouch!
— How to Make our Drawstrings for the Pouch :
Step 1 :
We will start by taking our drawstring color of choice, here I will be using dark pink, and make a slip knot. We will then CH 80 and fasten off leaving a 5 – 10 inch tail. We will then repeat this step to make a second string, for a total of two strings.
Step 2 :
Now we will weave our strings through the spaces we had left on the top of the bag. You have the option here to go ahead -and weave your string however you would like to finish off the bags. If you need a more detailed explanation, I have included it here for you as well! We should have 17 CH 2 spaces in total, but I like to count the space where the HDC and CH 2 meet from step 3 as a space as well.
Step 3 :
So, we will begin by taking one of our strings and pulling it through, with our hook or hand, into the first space on the left side of the pouch. Make sure to leave about half the string dangling- as we will use this half of the string later on.
Step 4 :
We will then continue weaving the string through the front of the pouch, in and out of the spaces, for the next 9 spaces.
Step 5 :
At this point, we will go back to the left side of the bag- and repeat the weaving process for the back of the pouch- using the tail we had left in step 2 of this process. Continue weaving in the next 8 spaces- until we reach the right side again.
Step 6 :
We will then tie a knot using the ends of the string to ensure they won’t come undone – here you can add a bead to the ends of the drawstrings if you wish instead of tying a knot. The last step is to hide any remaining tails and done!
— How to Make the Granny Square (Make 18) :
Round 1 :
Using the background color of your choice, here I will be using pink, make a MR but do not crochet any stitches just yet. We will start by CH 3, then DC 3, then CH 2, DC 4, CH 2, DC 4, CH 2, DC 4, CH 2, and SC in the original CH 3 space – 16 Stitches and 4 CH 2 Spaces
Round 2 :
Start by CH 2, then DC in the CH 3 space, then DC in the SC stitch, then DC 3, DC 2 in the CH 2 space, CH 2, DC 2 in the CH 2 space, DC 4, DC 2 in the CH 2 space, CH 2, DC 2 in the CH 2 space, DC 4, DC 2 in the CH 2 space, CH 2, DC 2 in the CH 2 space, DC 4, DC 2 in the CH 2 space, CH 2, SC in the original CH 2 space – 32 Stitches and 4 CH 2 Spaces
Round 3 :
CH 2, then DC in the CH 2 space, then DC in the SC stitch, then DC 7, DC 2 in the CH 2 space, CH 2, DC 2 in the CH 2 space, DC 8, DC 2 in the CH 2 space, CH 2, DC 2 in the CH 2 space, DC 8, DC 2 in the CH 2 space, CH 2, DC 2 in the CH 2 space, DC 8, DC 2 in the CH 2 space, CH 2, SC in the original CH 2 space – 48 Stitches and 4 CH 2 Spaces
Round 4 :
CH 2, then DC in the CH 2 space, then DC in the SC stitch, then DC 11, DC 2 in the CH 2 space, CH 2, DC 2 in the CH 2 space, DC 12, DC 2 in the CH 2 space, CH 2, DC 2 in the CH 2 space, DC 12, DC 2 in the CH 2 space, CH 2, DC 2 in the CH 2 space, DC 12, DC 2 in the CH 2 space, CH 2, SLST in the original CH 2 space – 64 Stitches and 4 CH 2 Spaces
Info :
After this round we will fasten off, leaving a tail that measures about 5 – 10 inches long. We will then hide any remaining tails and we’re done with the granny square! We will now repeat the process, from round 1, to create the remaining 17 granny squares needed. If you are following along with the same bag design as I offer here, you will need granny squares in 3 different colors. I chose to do 9 in dark pink, 4 in light pink, and 5 in white.
— How to Sew the Strawberry Appliques to the Granny Squares :
Step 1 :
We will start by placing the strawberry applique on the right side of the granny square. Make sure to place your strawberry so the right side is facing upwards as well and is centered. We will then pin the strawberry applique in place. Keep in mind we will sew the 5 appliques to the 5 granny squares we had made of the same color (we will be using the white Granny Squares)
Step 2 :
Now cut a 15 – 20-inch piece of our red colored yarn and insert our needle. Use this piece to sew the red strawberry part to the square, making sure to get under both strawberry and square stitches to secure them together.
Step 3 :
Now cut a 15 – 20-inch piece of our green colored yarn and insert our needle. Use this piece to sew the green strawberry stem to the square, making sure to get under both the stem and square stitches to secure them together.
Step 4 :
Now hide the remaining tails and done! Repeat this process to attach all 5 appliques to the 5 chosen granny squares.
— How to Make the Tote Bag :
Step 1 :
For this part of the pattern- you will need a granny square with the applique sewn onto it, and a plain granny square- both ready to go. We will start by placing the two granny squares on top of one another, so that the wrong sides are facing each other. We will then make a slip knot out of the same-colored yarn as the granny squares. Then pull the slip knot through the upper left corner CH 2 space of both squares (working with them as if they were one) and make a SC. We will now SC around both our squares, making sure to go into both stitches of the squares to SC them together. I like to SC twice in the two bottom CH 2 spaces only. (This makes it so that we do not have a big gap where that CH 2 space is) We will stop SCing the two squares together when we reach the upper right corner CH 2 space. There, we will end by placing a SC into.
Step 2 :
Now we will be making the top of our pouch/tote - where the strings or top edging will be placed later on. To begin we will CH 2, and DC into the upper right corner CH 2 space of the front granny square. Here we will be working with each granny square separately again to ensure the top can remain open if desired. Next, we will DC one stitch into each of the stitches of the top edges of both granny squares separately, working in a round. Make sure to DC once into each of the remaining 3 CH 2 spaces as well. When we reach the CH 2 we had started with, we will then SLST to end the round - 34 Stitches.
Step 3 :
We will start with a CH 2, then HDC into the same stitch as the SLST. We will then CH 2, skip 1 stitch, and HDC into the next. We will repeat this pattern starting with a CH 2 until we reach the original CH 2 space we started with. When we reach this point- we will then SLST to end the round - 18 Stitches and 17 CH 2 Spaces.
Step 4 :
CH 2, then DC into the same stitch as the SLST. We will then DC one stitch into each of the HDC stitches, and DC one stitch into each of the CH 2 spaces as well. Continue on again with this repeating pattern- until you reach the original CH 2 space. When we reach that CH 2 space - we will SLST to finish it off – 35 Stitches.
Step 5 :
We will then fasten off, leaving a 5 – 10-inch tail. Then hide the remaining tails and done! All that is left is to create straps/handles and finish the tote as desired.
— How to Make our Drawstrings for the Tote/Pouch (Finishings) :
Step 1 :
Make two chain strings CH 80 each and fasten off leaving 5 – 10 inch tails, or make drawstrings and beads as desired.
Step 2 :
Weave strings through the CH 2 spaces on the top edge of the bag or pouch as described for the pouch weaving pattern. Make sure to leave appropriate tail lengths and tie off or bead ends to secure them.
This Strawberry Tote Bag and Drawstring Pouch pattern brings delightful, handmade charm to your accessories collection. Mix colors, stitch seeds, and customize the straps to make each bag uniquely yours. Perfect as a gift or a cheerful personal tote—happy crocheting! 🧶🍓