🧢 Beautiful ✨ Detailed πŸ’ Adorable

Horizon Fingerless Gloves Pattern

Horizon Fingerless Gloves Pattern
4.8β˜… Rating
2-3 Hours Time Needed
1.8K Made This
βœ‚οΈ

Intermediate Level

Ideal for those with basic crochet experience, featuring slightly more advanced stitches and techniques to expand your skills.

⏱️

Bite-Sized Project

Finishes in 2-4 hoursβ€”perfect for an afternoon of creative relaxation.

🧣

Snug Essential

Everyday comfort with practical charm, designed for both functionality and style through changing seasons.

About This Horizon Fingerless Gloves Pattern

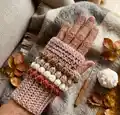
This pattern creates a single-size pair of Horizon Fingerless Gloves featuring a ribbed cuff and colorful bobble stitch accents. The gloves are worked from the cuff up, with an easy thumb hole and finishing instructions included. You'll learn a contrast-colour bobble technique for a playful textured band.

Horizon Fingerless Gloves Pattern crochet pattern - detailed view of completed project

Written in US terms, the pattern uses aran weight yarn and a 5mm hook for a cozy fit. Clear row-by-row instructions make it easy to follow and adapt.

Why You'll Love This Horizon Fingerless Gloves Pattern

I absolutely love this pattern because it combines simple construction with a fun, textured bobble detail that really elevates the look. I enjoy that the cuff is worked flat and joined, which makes it accessible and neat to finish. The thumb hole method is practical and creates a comfortable wearable glove that still leaves fingers free. Making contrasting bobbles adds a pop of color and personality, and I always enjoy seeing different color choices come to life.

Horizon Fingerless Gloves Pattern step 1 - construction progress Horizon Fingerless Gloves Pattern step 2 - assembly progress Horizon Fingerless Gloves Pattern step 3 - details and accessories Horizon Fingerless Gloves Pattern step 4 - final assembly and finishing

Switch Things Up

I love experimenting with color for these gloves; try swapping the contrast bobble colours for bright neons or soft pastels to change the mood.

If you want a larger, chunkier glove, use a bulkier yarn and a larger hook for a cozy, quick make.

For a mini keychain or tiny version, use fingering weight yarn and a smaller hook to create tiny pocket-sized mitts.

I sometimes add a small button or crocheted loop over the thumb opening for closure or decorative interest.

Try lengthening the cuff by working more rows before joining to create extra wrist coverage for colder days.

Embroider simple motifs over the main color band for a personalized touchβ€”initials or tiny hearts work well.

I like to line the gloves with a thin fleece for serious cold-weather wear; sew it in carefully before weaving in ends.

Change the stitch pattern on the bodyβ€”swap bobbles for popcorns, or replace hdc rounds with sc rounds to vary texture.

For a masculine look, choose tonal contrast colors and a firmer 4 or 4.5mm hook for a tighter cuff and cleaner silhouette.

Make a matching set by crocheting a scarf or headband using the same bobble sequence and color palette for a coordinated gift.

Common Mistakes & How to Fix Them

βœ— Skipping the back loop only rib rows will make the cuff lose its ribbed texture; work scblo as instructed to get the rib effect. βœ— Joining the cuff incorrectly by slip stitching through both loops will make the seam bulky; slip stitch through front loop only of final row and adjacent loop of starting chain as directed. βœ— Not turning the wrist cuff inside out after joining can make the right side face the wrong way; turn the cuff inside out and use the same loop to start the first round so the right side faces out. βœ— Forgetting to leave ends when cutting contrast colors will make weaving in difficult later; leave a bit of tail for each CC colour to weave in neatly.

Horizon Fingerless Gloves Pattern

Make a cozy pair of Horizon Fingerless Gloves with textured bobble details and a comfortable ribbed cuff. This pattern walks you through a snug wrist cuff, bobble stitch accents, and an easy thumb hole for practical wear. Perfect for gifting or keeping your hands warm while leaving fingers free for everyday tasks.

Intermediate 2-3 Hours

Materials Needed for Horizon Fingerless Gloves Pattern

β€” Main Fabric

  • 01
    Approximately 100 meters Aran weight/10-12ply yarn for main color (MC)
  • 02
    Contrast colors (CC): 4 colours, approximately 10 meters each (similar weight)

β€” Tools Required

  • 01
    Crochet hook size 5mm
  • 02
    Optional crochet hook size 4mm or 4.5mm for a firmer cuff
  • 03
    Tapestry needle

Progress Tracker

0% Complete

β€” Materials :

Info :

Approximately 100 meters Aran weight/10-12ply yarn for main color. 10 meters each of 4 contrast colors (similar weight). 5mm hook. Tapestry needle.

β€” Notes :

Info :

Thank you for downloading my pattern. The pattern is one size only and is written in US terms. Please feel free to share your finished creations on Instagram, tagging @littlegoldennook. Please don’t sell, change or claim this pattern as your own.

β€” Stitches :

Infos :

Ch sp: chain space. Ss: slip stitch. Sc: single crochet. HDC: Half double crochet. Scblo: single crochet in back loop of stitch only. Bobble stitch or dc4tog- yarn over, insert into stitch, yarn over and pull up a loop, yarn over and pull through two loops, repeat 4 times until you have 5 loops on the hook, then yarn over and pull through all 5 loops. Bobble stitch in contrast color- With MC still on your hook, YO with CC, insert hook into stitch, draw up a loop of CC, YO and pull through 2 loops, repeat 3 times until you have 4 CC loops and one MC loop on your hook, YO with MC and pull through all 5 loops. See Horizon video on my instagram.

β€” Cuff :

Info :

Optional: use a smaller 4 or 4.5mm hook for the cuff if you like (I didn't). With MC (main color) chain 11.

Row 1 :

Sc in 2nd chain from the hook and in each chain to end, ch 1, turn (10)

Row 2 :

scblo in first stitch, scblo in each stitch to end, ch 1, turn (10)

Row 3-25 :

repeat row 2 (10)

Info :

Join ends of your wrist cuff by slip stitching through front loop only of row 25 and adjacent loop of starting chain row. Once joined, turn wrist cuff inside out to what is now the outside of the glove, using same loop insert hook (with right side facing) and chain 1. You are now ready to crochet your first row around the top of the cuff.

β€” Body :

Right hand glove :

Row 1: sc in same place as you last chained 1 from, sc in the top of each rib row around the cuff (sc in protruding rib and in inverted rib), sc in base of starting chain, join to 1st sc with ss, ch 1 do not turn (26)

Row 2 :

sc with MC, bobble with CC, *sc with MC, bobble with CC*, repeat ** around finishing with bobble w CC, join to top of 1st sc with ss, ch 1 (26)

Row 3 :

(with MC) 1 sc in each stitch around, join to top of 1st sc with ss, ch 1, (26)

Row 4 :

start with a *bobble stitch with CC, sc with MC*, repeat ** around finishing with sc w MC, join to top of 1st bobble stitch with ss, ch 1 (26)

Row 5 :

repeat row 3

Row 6 :

repeat row 2

Row 7 :

repeat row 3

Row 8 :

repeat row 4

Info :

Cut each CC when you are finished with it, leaving an end for weaving in later

Row 9 :

thumb hole row 1 hdc in each stitch around to last 4 stitches, chain 4, join to top of 1st hdc with ss, ch 1 (26)

Row 10 :

1 hdc in each stitch around including 1 in each chain space, join to top of 1st hdc with ss, ch 1 (26)

Row 11-12 :

1 hdc in each stitch around, join to top of 1st hdc with ss, ch 1 (26)

Row 13 :

ss in each stitch around, fasten off

Left hand glove :

Make cuff the same as right hand. Repeat rows 1-8 from above. Row 9: thumb hole row 1 hdc, chain 4, skip 4 stitches, 1 hdc in next stitch and in remaining stitches, join to top of 1st hdc with ss, ch 1 (26). Repeat rows 10-13 from above.

β€” Finishing Off :

Info :

Weave in all MC and CC ends securely... ..and voila, enjoy wearing your fun cosy gloves!

Assembly Instructions

  • Join the ends of the cuff by slip stitching through the front loop only of row 25 and the adjacent loop of the starting chain row to form a neat cuff tube.
  • Turn the joined cuff inside out so the right side faces out, then insert your hook into the same loop and chain 1 to begin the first round around the cuff.
  • When adding bobbles, cut each contrast color after you finish using it, leaving a tail to weave in securely later for a clean finish.
  • Form the thumb hole by chaining 4 in the designated thumb row (Row 9) and then continue to join and work around, ensuring the chain 4 creates a comfortable opening.
  • Weave in all ends securely with a tapestry needle and trim excess, then block lightly if desired to even out stitches and improve drape.

Important Notes

  • πŸ’‘The pattern is one size only and is written in US terms, so check gauge and fit before making modifications.
  • πŸ’‘Optional: use a smaller 4mm or 4.5mm hook for a firmer cuff if you prefer a tighter ribbed fit.
  • πŸ’‘Cut each contrast color when you finish with it, leaving an end for weaving in later to keep your work tidy.
  • πŸ’‘Turn the cuff inside out after joining so the correct right side is on the outside before you begin the rounds.

Create these Horizon Fingerless Gloves to keep your hands cosy while you stay nimble and stylish. The bobble band adds charming texture and a pop of color to a classic ribbed cuff. Share your make with @littlegoldennook and enjoy handmade warmth! 🧢✨

You ask,

we answer.

FAQs

What size will the finished piece be?

The finished gloves are one-size and fit an average adult hand; sizing may vary based on yarn and tension.

Can I use different yarn weights for this pattern?

Yes, you can substitute yarn weights, but the final size and drape will change; adjust your hook size accordingly.

Do I need prior crochet experience for this pattern?

This pattern is rated intermediate, so basic knowledge of single crochet, half double crochet, and bobble stitches is recommended.

How long does this project typically take to complete?

Most crocheters finish a pair in approximately 2-3 hours, though time can vary depending on experience and pace.