🧢 Beautiful ✨ Detailed πŸ’ Adorable

Hopeful Owls Amigurumi Pattern

Hopeful Owls Amigurumi Pattern
4.0β˜… Rating
2-3 Hours Time Needed
1.3K Made This
βœ‚οΈ

Intermediate Level

Ideal for those with basic crochet experience, featuring slightly more advanced stitches and techniques to expand your skills.

⏱️

Bite-Sized Project

Finishes in 2-4 hoursβ€”perfect for an afternoon of creative relaxation.

🧸

Cute Companion

An adorable friend to cherish, handcrafted with love to bring comfort and joy for years to come.

About This Hopeful Owls Amigurumi Pattern

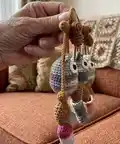
This pattern creates a tiny crocheted owl ornament (or bag charm) complete with ear tufts, felt-like eyes, a stitched beak, tiny feet and a tiny stocking. It is written in UK terminology and uses DK weight yarn and a 3.5mm hook. The instructions include optional wings and directions to attach a lobster clip or a loop so you can display or gift your owl.

Hopeful Owls Amigurumi Pattern crochet pattern - detailed view of completed project

The owls are quick to work up and perfect for using leftover DK yarn in pretty colour mixes. Clear step-by-step rounds and finishing notes are included for a neat, professional-looking finish.

Why You'll Love This Hopeful Owls Amigurumi Pattern

I absolutely love this pattern because it takes simple stitches and turns them into a charming little character that is perfect for gifting. I enjoy how each owl becomes unique when using variegated DK yarn and small personal touches like eye placement or beak shape. The design is satisfying to stitch quickly, yet rewarding because of the neat finish and small details like the tiny stocking. Making a few in different colours becomes addictive and they make lovely little keepsakes or decorations.

Hopeful Owls Amigurumi Pattern step 1 - construction progress Hopeful Owls Amigurumi Pattern step 2 - assembly progress Hopeful Owls Amigurumi Pattern step 3 - details and accessories Hopeful Owls Amigurumi Pattern step 4 - final assembly and finishing

Switch Things Up

I love how easily this pattern adapts to different colourways; try variegated DK for a rustic feel or bright solids for a playful look.

You can change the size by switching yarn weight and hook: bulky yarn with a larger hook gives a chunky owl, while fingering yarn with a smaller hook makes a tiny keyring charm.

I often add embroidered eyebrows or a tiny stitched mouth to give each owl a different expression and personality.

Experiment with different eye types: buttons, safety eyes, or small black French knots will each give a unique character to the face.

For a festive twist, make the tiny stocking in seasonal colours and stuff with a small candy or charm for a handcrafted gift.

If you want a weighted base for a freestanding ornament, add a small plastic pellet bag into the stuffing at the base so it sits neatly on a shelf.

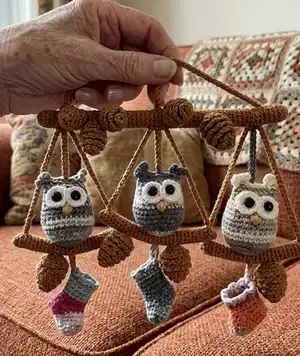
Make a set of three in coordinating hues and hang them on a small driftwood stick or a cinnamon stick for a charming natural display.

Instead of a lobster clip, use a decorative ribbon loop to hang on a tree branch or attach to a wrapped gift as a keepsake tag.

Swap the ear tufts for small crocheted horns or longer ears to create different characters like bunnies or fantasy creatures using the same basic body.

I also like to add tiny crocheted scarves or embroidered details like stars on the belly to personalise each owl for the recipient.

Common Mistakes & How to Fix Them

βœ— Skipping the stitch marker when working continuous rounds can cause you to lose track of the start; always place a marker at the beginning of each round to keep your stitch counts accurate. βœ— Not stuffing gradually leads to lumpy or misshapen owls; stuff a little at a time, shaping as you go to achieve a smooth finish. βœ— Fastening off too early before finishing ear tufts will leave you with short tails to tidy; leave enough yarn when fastening off to sew and tidy neatly afterwards. βœ— Sewing the eyes or buttons on without checking placement can unbalance the face; pin or hold the eyes in place and check symmetry before stitching permanently.

Hopeful Owls Amigurumi Pattern

Make a charming little Hopeful Owl ornament or bag charm with this detailed crochet pattern by Alison Livesey. You will love how quickly each owl comes together using DK yarn and a 3.5mm hook. The pattern includes full instructions for the body, ear tufts, eyes, beak, tiny stocking, optional wings and bag charm details so you can create sweet handmade gifts or festive decorations.

Intermediate 2-3 Hours

Materials Needed for Hopeful Owls Amigurumi Pattern

β€” Main Fabric

  • 01
    Sirdar Crofter DK yarn (50g balls) - main body colour, one ball will make several owls
  • 02
    DK weight yarn - small amount soft yellow/beige for beak and feet (approx 5-10g)
  • 03
    Cream DK yarn - small amount for eye discs (approx 5g)
  • 04
    Leftover DK yarn scraps for stockings and optional wings (small amounts, 5-20g each)
  • 05
    Dark buttons 1cm for eyes (2 per owl)

β€” Tools Required

  • 01
    Crochet hook size 3.5mm
  • 02
    Stitch marker
  • 03
    Dark buttons 1cm (2 pieces per owl) for eyes
  • 04
    Stick, cinnamon stick or lobster clip for mounting/attachment
  • 05
    Ribbon (optional) for hanging
  • 06
    Polyester stuffing
  • 07
    Yarn needle for sewing and tidying ends
  • 08
    Needle and thread to attach buttons
  • 09
    Scissors

Progress Tracker

0% Complete

β€” Owl body :

Round 1 :

make a Magic Circle of 6dc

Round 2 :

2dc in each stitch (12sts)

Round 3 :

(1dc, 2dc in the next st) x 6 (18sts)

Round 4 :

(2dc, 2dc in the next st) x 6 (24sts)

Round 5 :

(3dc, 2dc in the next st) x 6 (30sts)

Round 6-11 :

30dc around

Round 12 :

(3dc, dc2tog) x 6 (24sts)

Round 13 :

24dc around

Round 14 :

(6dc, dc2tog) x 3 (21sts)

Round 15 :

(5dc, dc2tog) x 3 (18sts)

Round 16 :

18dc around

Round 17 :

(7dc, dc2tog) x 2 (16sts)

Info :

Do not fasten off yet. Stuff your owl, not too firmly.

Info :

To make the ear tufts, slst into the next stitch and make 6ch, now press the top of your owl flat and slst into the same stitch and through into the one behind. Make another 6ch and slst in the same place. Now double crochet along the top of your owl joining the back and front together (this is 6dc for me) until you have only one stitch left (front and back). Slip stitch into the last stitch and make 6 ch, slst into the same place and make another 6ch, slst into the same place again. Fasten off and leave enough yarn to tidy up neatly.

β€” Stocking :

Round 1 :

Make a Magic Circle of 6dc

Round 2 :

2dc in every stitch (12sts)

Round 3-5 :

12dc around

Round 6 :

12dc around (mark the next stitch with a stitch marker) 1ch turn

Info :

You are now making the heal and will work in rows from R1 to 3.

Row 1 :

6dc, 1ch turn

Row 2 :

6dc , 1ch turn

Row 3 :

6dc and fasten off leaving a 15cm length of yarn.

Info :

Press together the back of heal and sew up the seam with the yarn, tidy away all the ends.

Info :

Begin a new round from the marked stitch

Round 1 :

With a knot on your hook and a 15cm yarn tail, make 1dc in the marked stitch and then 5dc (6sts). Continue with 7 more dc around the heal, spaced evenly. Start you next round in the first dc of this round. (13sts)

Round 2 :

work 13dc around

Round 3-5 :

work 13dc around

Info :

Now dc about another 10 or 11 stitches until you are at the centre back of your stocking and from here you finish the top edge as follows:

Info :

Slip stitch into the next stitch and make 2ch, slip stitch into the next 2 stitches and make another 2ch, repeating this pattern around the top edge. When you reach the back of stocking again with 2ch on your hook, slst into your first slst and made 16ch. (This is for your loop, but do not create loop yet)

Info :

Fasten off leaving a 15cm length of yarn. Tidy away any loose ends and use the yarn tail to tidy any gapping you may get when re-joining your yarn after sewing up the heel.

β€” Eyes :

Round 1 :

Make a Magic circle of 6dc

Round 2 :

2dc in each stitch, slst into the next st. (12sts) Fasten off leaving 10cm.

Info :

Repeat and make another disc leaving a 25cm length of yarn when you fasten off.

Info :

Use the shorter piece of yarn to stitch the discs together encompassing 3 stitches. Sew a button in the centre of each disc, or offset a little to get you owl to look in different directions. Use the long piece of yarn to stitch the eyes to your owl. I like to catch the stiches at the back of the eye discs so that you cannot see them and this helps them to stand out too.

β€” Beak :

Info :

Use a little yellow/beige yarn to stitch on a beak. I do a V with two stiches and fill in with about another 3 stitches.

β€” Feet :

Info :

Use the same yellow/beige yarn to attach your owl to the stick. Work just offset from the centre bottom of your owl and run stitches right through the owl and around the stick 3 times to make one foot and then wrap the yarn twice around the top of the foot between the owl and the stick and do the same again for the other foot further along the stick. Secure the yarn end.

β€” Attach Stocking :

Info :

Run the chain end of the stocking right between the feet of your owl with a yarn needle and secure to the back of the stocking. Tidy away the end.

β€” Top Loop :

Info :

Make another length of 30 chain for a loop and attach to the top of your owl just below the top stitches at the back. You could use a piece ribbon if you prefer.

β€” Owl Bag Charm :

Info :

For the bag charm you will need to add a lobster clip to the top of your owl. Secure the clip within the two centre dc when closing up the top of your owl. There are 6dc on the top edge so it will be st3 and st4 and include the swivel part of the clip. Or simply stitch on afterwards. Instead of a stick you could make some little feet on the owl itself as in the picture.

β€” Optional Wings :

Round 1 :

Magic circle of 6dc

Round 2 :

make 2dc in each st (12sts)

Round 3 :

Slst into the next 10sts, 3ch, dc in 2nd chain from hook, treble into the next chain, miss the next dc and slst into the one after. Fasten off with 15cm piece of yarn to stitch to your owl.

Info :

The Bag Charm Owl also has the little wings in the picture on the previous page.

Assembly Instructions

  • Stitch the two eye discs together encompassing three stitches, sew a 1cm dark button in the centre of each disc, then use the long yarn tail to stitch the eyes to the front of the owl catching stitches at the back of the discs so the join is neat.
  • Sew the tiny beak onto the face using yellow/beige yarn, making a V of two stitches and filling in with about three more stitches for a neat triangular beak.
  • Press the back of the stocking heel and sew the seam closed, then run the chain end between the owl feet and secure to the back of the stocking with a yarn needle.
  • Attach the feet by running yarn through the base of the owl and around a stick three times for each foot, then wrap twice around the top of each foot between the owl and the stick and secure the yarn end.
  • Make a 30-chain loop and attach to the top-back of the owl for hanging, or stitch a ribbon or lobster clip into the two centre dc at the top to make a bag charm.
  • Pin any optional wings or ear tufts in place and sew securely; tidy away ends and weave them into the body so they are invisible from the outside.

Important Notes

  • πŸ’‘You will be working in continuous rounds; use a stitch marker to mark the start of each round for accurate stitch counts.
  • πŸ’‘Stuff your owl gradually and not too firmly for a soft, nicely shaped finish; overstuffing will distort the shaping.
  • πŸ’‘Leave sufficient yarn tails when fastening off so you can sew parts together neatly and tidy any gaps after sewing.

These Hopeful Owls are delightful little handmade gifts that brighten any tree, bag or home display. They are perfect for using up DK yarn scraps and make charming presents for friends and family. Create a set in different colours for a truly memorable seasonal collection. 🧢🎁

You ask,

we answer.

FAQs

What size will the finished piece be?

The finished owl measures approximately 6-8 cm tall (not including loop) when made with DK yarn and a 3.5mm hook; size will vary with yarn and tension.

Can I use different yarn weights for this pattern?

Yes, you can use different yarn weights but this will change the finished size; adjust your hook accordingly and note thicker yarn gives a chunkier owl while thinner yarn makes a smaller mini.

Do I need prior crochet experience for this pattern?

This pattern is rated intermediate and assumes familiarity with working in continuous rounds, basic increases and decreases and simple sewing techniques; beginners comfortable with UK DC and SLST can follow with care.

How long does this project typically take to complete?

Most crocheters complete a single owl in 2-3 hours depending on experience and whether you make the optional wings or a stocking and finish the assembly.