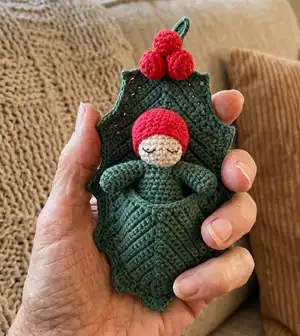
Make a tiny, festive Holly Baby tucked into a leafy cradle — perfect for holiday decorations or a sweet handmade gift. This pattern walks you through crocheting the baby, cap, body, tiny berries, and detailed holly leaves step by step. You will enjoy the mix of amigurumi rounds and worked-back-and-forth leaf shaping to create a charming seasonal keepsake.
Progress Tracker
0% Complete
— Head :
Round 1 :
6 sc into magic ring (6 sts)
Round 2 :
(inc) X 6 (12 sts)
Round 3 :
(1 sc, inc) X 6 (18 sts)
Round 4 :
(2 sc, inc) X 6 (24 sts)
Round 5-9 :
(5 rounds): sc around (24 sts)
Round 10 :
(2 sc, dec) X 6 (18 sts)
Round 11 :
(1 sc, dec) X 6 (12 sts)
Info :
After R11 stuff the head tightly.
Round 12 :
(dec) X 6 (6 sts)
Info :
In remaining 6 sc sew 6 stitches from inside to outside in sequence, pull the yarn, secure and hide it.
— Cap :
Round 1 :
6 sc into magic ring (6 sts)
Round 2 :
(inc) X 6 (12 sts)
Round 3 :
(1 sc, inc) X 6 (18 sts)
Round 4 :
(2 sc, inc) X 6 (24 sts)
Round 5-9 :
(5 rounds): sc around (24 sts)
Round 10 :
(2 sc, dec) X 6 (18 sts)
Info :
Leave a tail and make clean fastening off.
Info :
How to do clean fastening off: insert the yarn into the first stitch after your last stitch. Insert the yarn back into this last stitch and repeat. Secure the yarn and hide inside.
— Body&Arms :
Info :
First make 2 arms: (dark green yarn)
Round 1 :
6 sc into magic ring (6 sts)
Round 2 :
(inc, 2 sc) X 2 (8sts)
Round 3 :
(inc, 3 sc) X 2 (10 sts)
Round 4-5 :
(2 rounds): sc around (10 sts)
Round 6 :
(dec, 3 sc) X 2 (8 sts)
Round 7-8 :
(2 rounds): sc around (8 sts)
Info :
Make 1 sl st more and leave short tail.
Info :
Body: (dark green yarn)
Round 1 :
6 sc into magic ring (6 sts)
Round 2 :
(inc) X 6 (12 sts)
Round 3 :
(1 sc, inc) X 6 (18 sts)
Round 4 :
(2 sc, inc) X 6 (24 sts)
Round 5 :
(inc, 11 sc) X 2 (26 sts)
Round 6 :
sc around (26 sts)
Round 7 :
(inc, 12 sc) X 2 (28 sts)
Round 8-11 :
(4 rounds): sc around (28 sts)
Round 12 :
(dec, 12 sc) X 2 (26 sts)
Round 13 :
(dec, 11 sc) X 2 (24 sts)
Round 14 :
(2 sc, dec) X 6 (18 sts)
Round 15-16 :
(2 rounds): sc around (18 sts)
Info :
Now place the one arm closely the body and join them together with 2 sc *. For the arm use its last stitch and the next following stitch. Work 7 sc and join the second arm with 2 sc, when 7 sc again. Now you have round 17.
Round 17 :
(6 sc of the arm, 7 sc of the body) X 2 (26 sts)
Info :
*These inner connecting sc will not be used in the next rounds.
Round 18 :
(2 sc, dec, 2 sc; (1 sc, dec) X 2, 1 sc) X 2 (20 sts)
Round 19 :
(dec) X 10 (10 sts)
— Doll Assembly :
Info :
Stuff the body and arms is not very tight, it should be a little flat. Fasten and hide the tail.
Info :
Place the head onto the body, pin it. Note - the initial, neater part of the head will be at the bottom, where the neck is (the less neat part of the head will be covered by the cap). Carefully sew on the head with fine stitches with thin beige thread.
Info :
Put the cap on the head of the doll (it is not so easy) and sew it with thin red thread.
— Face :
Info :
Embroider the eyes a few stitches with thin black thread, as shown further in the pictures.
Info :
It is difficult to embroider eyes, it is better to practice beforehand on a piece of cloth.
— LEAF-CRADLE :
Info :
consist of 2 leaves - big and small worked back-and-forth in rows. (dark green yarn)
— Big leaf :
Info :
Be sure to check the chart as you work, as some rows start and end differently.
Row 1 :
2 ch, 1 sc, 1 dc, 2 sc into magic ring (6 sts), turn...
Row 2 :
2 ch, 1 sc, (1 sc,1 dc,1 sc in one loop - hereafter I refer to this set as "sds" for convenience, but it counts as three stitches! ), 2 sc (8 sts)
Row 3 :
2 ch, 2 sc, sds, 3 sc (10 sts)
Row 4 :
2 ch, 3 sc, sds, 4 sc (12 sts)
Row 5 :
2 ch, 4 sc, sds, 5 sc (14 sts)
Row 6 :
2 ch, 5 sc, sds, 6 sc (16 sts)
Row 7 :
2 ch, 6 sc, sds, 7 sc (18 sts)
Row 8 :
2 ch, 7 sc, sds, 8 sc (20 sts)
Row 9 :
2 ch, 8 sc, sds, 9 sc (22 sts)
Row 10 :
2 ch, 9 sc, sds, 10 sc (24 sts)
Row 11 :
2 ch, 10 sc, sds, 10 sc (25 sts)
Row 12 :
2 ch, 10 sc, sds, 11 sc (26 sts)
Row 13 :
2 ch, 11 sc, sds, 11 sc (27 sts)
Row 14 :
2 ch, 11 sc, sds, 12 sc (28 sts)
Row 15 :
2 ch, 12 sc, sds, 12 sc (29 sts)
Row 16 :
2 ch, 12 sc, sds, 13 sc (30 sts)
Row 17 :
2 ch, 13 sc, sds, 13 sc (31 sts)
Row 18-25 :
(8 rows): 2 ch, 13 sc, sds, 12 sc, 1 dec (31 sts)
Row 26 :
2 ch, 13 sc, sds, 10 sc, 2 dec (30 sts)
Row 27 :
2 ch, 12 sc, sds, 10 sc, 2 dec (29 sts)
Row 28 :
2 ch, 12 sc, sds, 7 sc, 3 dec (27 sts)
Row 29 :
2 ch, 10 sc, sds, 7 sc, 3 dec (25 sts)
Row 30 :
2 ch, 10 sc, sds, 3 sc, 4 dec (22 sts)
Row 31 :
2 ch, 7 sc, sds, 3 sc, 4 dec (19 sts)
Info :
Make 1 ch more and leave short tail.
Info :
At the finish sharp end of the leaf (blue arrow in the photo), attach a new yarn and work the leaf in a round with a edging of sc with thorns.
Info :
The thorn is crocheted according to the chart: hdc; in one loop: 2-dc cluster, ch-3 picot, 2-dc cluster; hdc.
Info :
I got: 5 sc, thorn, 5 sc, thorn, 7 sc, thorn, 7 sc, thorn, 5 sc, thorn, 3 sc, thorn. And on the other side of the leaf - 3 sc, thorn, 5 sc, thorn, 7 sc, thorn, 7 sc, thorn, 5 sc, thorn, 5 sc. Then work chain of 15, connect the round with sl st and make 2 sl st more. Leave a tail and make clean fastening off, hide the tail inside.
— Small leaf :
Row 1 :
2 ch, 2 sc, 1 dc, 3 sc into magic ring (8 sts), turn...
Row 2 :
2 ch, 2 sc, sds, 3 sc (10 sts)
Row 3 :
2 ch, 3 sc, sds, 4 sc (12 sts)
Row 4 :
2 ch, 4 sc, sds, 5 sc (14 sts)
Row 5 :
2 ch, 5 sc, sds, 6 sc (16 sts)
Row 6 :
2 ch, 6 sc, sds, 7 sc (18 sts)
Row 7 :
2 ch, 7 sc, sds, 8 sc (20 sts)
Row 8 :
2 ch, 8 sc, sds, 9 sc (22 sts)
Row 9 :
2 ch, 9 sc, sds, 10 sc (24 sts)
Row 10 :
2 ch, 10 sc, sds, 11 sc (26 sts)
Row 11-12 :
(2 rows): 2 ch, 11 sc (13 sts)
Row 13 :
2 ch, 10 sc (12 sts)
Row 14 :
2 ch, 9 sc (11 sts)
Row 15 :
2 ch, 8 sc (10 sts)
Row 16 :
2 ch, 7 sc (9 sts)
Row 17 :
2 ch, 6 sc (8 sts)
Row 18 :
2 ch, 5 sc (7 sts)
Row 19 :
2 ch, 4 sc (6 sts)
Row 20 :
2 ch, sc3tog (3 sts).
Info :
Make 1 ch more and leave short tail.
Info :
Now attach a new yarn according to the chart and work second side:
Row 11 :
2 ch, 11 sc (13 sts)
Row 12-13 :
(2 rows): 2 ch, 10 sc (12 sts)
Row 14 :
2 ch, 9 sc (11 sts)
Row 15 :
2 ch, 8 sc (10 sts)
Row 16 :
2 ch, 7 sc (9 sts)
Row 17 :
2 ch, 6 sc (8 sts)
Row 18 :
2 ch, 5 sc (7 sts)
Row 19 :
2 ch, 4 sc (6 sts)
Row 20 :
2 ch, sc3tog (3 sts).
Info :
Make 2 ch, don’t cut the yarn!
Info :
Turn the leaf left and work it in a round with a edging of sc. (I got 74 sc)
Info :
Leave long tail for stitching.
— BERRIES (make 3) :
Round 1 :
6 sc into magic ring (6 sts)
Round 2 :
(inc) X 6 (12 sts)
Round 3-4 :
(2 rounds): sc around (12 sts)
Round 5 :
(dec) X 6 (6 sts)
Info :
Stuff the berry tightly.
Info :
In remaining 6 sc sew 6 stitches from inside to outside in sequence, pull the yarn and secure it. Don’t cut the tail.
— Cradly Assembly :
Info :
Iron the leaves gently through a damp cloth.
Info :
Put a smaller leaf on top of a large, pin five pins. Carefully sew them together with small stitches over the sc. At the very beginning and finish, sew firmly, making several stitches on top of each other.
Info :
Tie the berries tightly together with a few knots. Stick the tails into a tapestry needle and hide them inside the berries, trim the ends. Use a thin red thread to sew the berries tightly together.
Info :
Stitch the finished berries neatly with a thin green thread on a cradle leaf at the base of a large loop.
This tiny Holly Baby brings holiday charm in a pocket-sized amigurumi form, perfect for ornaments or a sweet gift. The pattern blends simple rounds for the doll with charted leaf work to create a striking leaf cradle. Make a set for loved ones or keep one on your tree for a handmade touch. 🧶🎁