🧢 Beautiful ✨ Detailed πŸ’ Adorable

Hermione Granger Amigurumi Pattern

Hermione Granger Amigurumi Pattern
4.1β˜… Rating
5-7 Hours Time Needed
2.1K Made This
βœ‚οΈ

Intermediate Level

Ideal for those with basic crochet experience, featuring slightly more advanced stitches and techniques to expand your skills.

⏱️

Weekend Treat

Takes 5-7 hours, making it an enjoyable project to finish over a couple of days.

🧸

Cute Companion

An adorable friend to cherish, handcrafted with love to bring comfort and joy for years to come.

About This Hermione Granger Amigurumi Pattern

This pattern creates a charming Hermione Granger amigurumi complete with hair strands, a removable jacket, scarf and a tiny book. It uses cotton thread and fine hookwork to create small, sculpted pieces and layered hair. The instructions include rounds for every piece and placement notes for eyes and facial details. You'll assemble all parts with clear sewing and finishing tips.

Hermione Granger Amigurumi Pattern crochet pattern - detailed view of completed project

The pattern includes head, body, arms, legs, jacket, skirt, scarf, book and small accessories. Both crocheting and simple embroidery steps are covered to complete the look.

Why You'll Love This Hermione Granger Amigurumi Pattern

I absolutely love this pattern because it captures the character's charm with small, thoughtful details like the striped scarf and layered hair strands. I enjoyed designing the hair placement and tiny book because they add personality and storytelling to the doll. I love that the jacket and scarf can be made separately and adjusted for different color combinations. Making this pattern feels rewarding β€” each finished piece looks like a little handmade treasure.

Hermione Granger Amigurumi Pattern step 1 - construction progress Hermione Granger Amigurumi Pattern step 2 - assembly progress Hermione Granger Amigurumi Pattern step 3 - details and accessories Hermione Granger Amigurumi Pattern step 4 - final assembly and finishing

Switch Things Up

I love customizing this pattern by changing colors to make variations: try pastel shades for a softer, friendly Hermione or bright colors for a playful twist.

I often switch yarn weight and hook size to make different sizes β€” bulky yarn with a larger hook gives a chunky, cuddle-friendly doll, while fine thread makes a tiny collectible version.

I sometimes replace safety eyes with embroidered eyes for a fully textile look, which is great for baby-safe toys.

You can alter the hairstyle by adding fewer or more strands, braiding the hair or adding tiny bows for variety.

Experiment with the scarf width and color sequence: make shorter scarves for toddlers or longer ones with extra stripes for more impact.

Change the clothing details: add buttons to the jacket, embroider a house crest, or create removable pieces like a hat or cloak.

Make the book larger or smaller, or embroider tiny initials on the cover to personalize the doll as a gift.

Add a keychain loop to the head or jacket to turn this into a portable charm or ornament.

I also like to add wire inside the limbs for posability so the doll can sit or hold the book more naturally.

Try mixing yarn types such as cotton for the body and a fuzzy yarn for the hair to create interesting textures and a unique finished look.

Common Mistakes & How to Fix Them

βœ— Skipping stitch markers during assembly can make placement difficult; use markers to align limbs and features before sewing. βœ— Stuffing too firmly will distort shaping and seams; stuff gradually and evenly to maintain natural curves and proportions. βœ— Not counting stitches after increases or decreases causes mismatched rounds; count stitches at the end of each round particularly after shaping. βœ— Changing color by cutting yarn leads to many ends to weave; carry yarn when possible or plan color breaks and weave in ends neatly as you go. βœ— Sewing parts without pinning can make placements uneven; pin or baste pieces in place and check symmetry before permanently stitching.

Hermione Granger Amigurumi Pattern

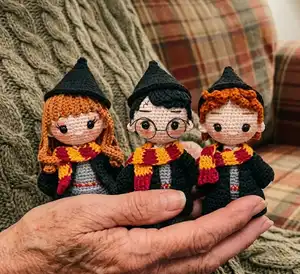
Crochet your own Hermione Granger amigurumi with this detailed pattern that walks you through each piece step by step. You will make the body, head, hair strands, jacket, scarf, skirt, and accessories with clear round counts and finishing notes. Perfect for gifting or adding to a handmade Harry Potter collection, this pattern highlights charming details like the scarf and book. Follow the instructions and enjoy bringing this magical character to life.

Intermediate 5-7 Hours

Materials Needed for Hermione Granger Amigurumi Pattern

β€” Main Fabric

  • 01
    Cotton thread - peach (for skin)
  • 02
    Cotton thread - black (for jacket and shoes)
  • 03
    Cotton thread - yellow (for scarf stripes and embroidery)
  • 04
    Cotton thread - red (for scarf stripes and embroidery)
  • 05
    Cotton thread - dark gray (for jacket and skirt accents)
  • 06
    Cotton thread - gray (for skirt and socks)
  • 07
    Cotton thread - white (for neck and book pages)
  • 08
    Cotton thread - brown (for hair and book cover)
  • 09
    Embroidery threads - red and yellow (for tie and details)
  • 10
    Fiberfill stuffing for amigurumi

β€” Tools Required

  • 01
    Crochet hook size 1.10 mm
  • 02
    Fiberfill stuffing
  • 03
    Safety eyes (size as preferred)
  • 04
    Tapestry needle for sewing
  • 05
    A small button (for book closure or decoration)
  • 06
    Embroidery threads red and yellow
  • 07
    Scissors
  • 08
    Stitch markers
  • 09
    Pins for assembly (optional)

Progress Tracker

0% Complete

β€” Arms :

Info :

Arms x 2. Start with peach color.

Round 1 :

5 sc in a MR (5)

Round 2 :

5 sc (5)

Info :

Change to gray color

Round 3 to 8 :

5 sc (5)

Info :

Do not stuff. Close with 2 sc.

β€” Legs :

Info :

Legs x 2. With black color.

Round 1 :

6 sc in a MR (6)

Round 2 :

6 sc (6)

Info :

Change to gray color.

Round 3 to 4 :

6 sc (6)

Info :

Change to peach color.

Round 5 to 6 :

6 sc (6)

Info :

Stuff lightly. Make 2. Do not cut the thread of second leg. Continue with the body.

β€” Body :

Round 1 :

Continue with peach color: Ch 4, 6 sc (first leg), 4 sc over the ch, 6 sc (second leg) (20)

Round 2 :

20 sc (20)

Round 3 :

7 sc, 1 dec, 8 sc, 1 dec, 1 sc (18)

Info :

Change to gray color.

Round 4 :

6 sc, 1 dec, 8 sc, 1 dec (16)

Round 5 :

BLO; 6 sc (6)

Round 6 to 7 :

6 sc (6)

Round 8 :

Attaching the arms: 1 sc (body and arm), 5 sc in body only, 2 sc (body and arm), 7 sc in body only, 1 sc (body and arm) (16). Stuff.

Round 9 :

2 sc, 1 dec, [1 dec, 2 sc] x 3 (12)

Info :

Change to peach color.

β€” Cabeza :

Info :

Continue from the body (head rounds).

Round 1 :

2 sc, 1 dec (8)

Round 2 :

Inc x 9 (18)

Round 3 :

1 sc, 1 inc (27)

Round 4 :

2 sc, 1 inc (36)

Round 5 :

3 sc, 1 inc (45)

Round 6 to 10 :

45 sc (45)

Info :

SAFETY EYES: between rounds 8 and 9, separated by 6 or 7 stitches.

Round 11 :

7 sc, 1 dec (40)

Round 12 :

8 sc, 1 dec (36)

Round 13 :

4 sc, 1 dec (30)

Round 14 :

3 sc, 1 dec (24)

Round 15 :

2 sc, 1 dec (18)

Round 16 :

1 sc, 1 dec (12)

Round 17 :

6 dec (6)

Info :

Embroider the eyebrows.

β€” Ears :

Round 1 :

3 sc in a MR (3). Sew them between rounds 7 and 9.

β€” Hair :

Info :

With brown color. We are working strands applied over round 3.

Round 1 :

6 sc in a MR (6)

Round 2 :

6 inc (12)

Round 3 :

BLO: 1 sc, 1 inc (18)

Info :

Now we are working each strand over the stitches of round 3. When you finish each strand move to the next stitch of the round 3 with a slst.

Strands 1 to 5 :

Ch 6: from the third ch: 4 hdc (4)

Strands 6 to 18 :

Ch 18: from the second ch: inc of sc x 4, 8 sc, 5 hdc (21)

Info :

Work now in FLO of round 2, the same way:

Strands :

1 to 12) Ch 12: 12 sc (12)

Info :

Strands 1-5 go on the forehead. The others, covering the head.

β€” Jacket :

Info :

BACK PART x 1: With black color, working in turning rounds, ch1 at the beginning.

Round 1 :

Ch 9: from the second ch, 8 sc (8)

Round 2 to 10 :

8 sc (8)

Info :

FRONT PART x 2: With black color, working in turning rounds, ch1 at the beginning.

Round 1 :

Ch 4: from the second ch, 3 sc (3)

Round 2 to 10 :

3 sc (3)

Info :

Sew the shoulders of the back and the front part (only 3 stitches on each shoulder). Sew the side part only 6 stitches (the rest of stitches are the armhole). Make an edge with sc.

β€” Sleeves :

Info :

Working on the armhole:

Round 1 :

[2 sc, 1 inc] x 3, 1 sc (13)

Round 2 to 3 :

13 sc (13). Cut.

β€” Book :

Info :

Brown part x 2: in turning rounds with ch 1 at the beginning.

Round 1 :

Ch 5: 4 sc (4)

Round 2 to 5 :

4 sc (4). Cut.

Info :

White part: in turning rounds with ch 1 at the beginning.

Round 1 :

Ch 5: 4 sc (4)

Round 2 to 10 :

4 sc (4). Cut.

Info :

Fold in half the white part, put it between both brown parts, sew them finishing the book.

β€” Scarf :

Info :

Start with red color and then change to yellow every other 2 rounds. Working in turning rounds, ch1 at the beginning.

Round 1 :

Ch 3: from the second ch, 2 sc (2)

Round 2 :

2 sc (2). Change to yellow color.

Round 3 to 4 :

2 sc (2). Change to red color.

Info :

Continue to round 42 (finishing with red color).

β€” White neck :

Round 1 :

With white color: Ch 18: from the third ch: 1 inc of hdc, 14 sc, 1 inc of hdc (18).

β€” Tie :

Info :

Work with two strands of embroidery threads yellow and 2 red, together.

Round 1 :

Ch 5: from the second ch, 3 sc, inc of 5 hdc, 3 sc on the other side of the ch. Cut.

β€” Skirt :

Info :

Join dark gray color in FLO of round 4 of the body.

Round 1 :

[3 sc, inc] x 4 (20)

Round 2 :

[4 sc, inc] x 4 (24)

Round 3 to 4 :

24 sc (24). Cut.

β€” Final details :

Info :

Sew or glue the White neck around the neck of the amigurumi. Put her the tie.

Assembly Instructions

  • Sew the ears between rounds 7 and 9 of the head using the 3-sc ear pieces to position them symmetrically.
  • Attach the arms to the body at the attachment points described in round 8 of the body: sew body and arm together where instructed and stuff before closing.
  • Sew the shoulder seams of the jacket: join back and front parts using 3 stitches on each shoulder and sew the side only 6 stitches to form armholes.
  • Fold the white book part in half, sandwich it between the two brown parts and sew around the edges to finish the tiny book.
  • Place safety eyes between rounds 8 and 9 of the head, spaced by 6 or 7 stitches, then embroider eyebrows and mouth as desired.
  • Sew or glue the white neck piece around the neck and attach the embroidered tie in front to finish the outfit.

Important Notes

  • πŸ’‘All pieces are worked in a spiral unless otherwise indicated; follow the notes for turning rounds when stated.
  • πŸ’‘Place safety eyes between rounds 8 and 9, separated by 6 or 7 stitches for correct facial placement.
  • πŸ’‘Use stitch markers when joining limbs and working color changes to keep track of rounds and placement.
  • πŸ’‘Stuff parts lightly and evenly; overstuffing can distort shaping, especially in small pieces like the legs and arms.
  • πŸ’‘Pin and check symmetry before sewing parts permanently to ensure balanced final assembly.

This Hermione Granger amigurumi brings a little bit of Hogwarts magic to your hands with tiny details like her scarf, book and layered hair. Make one as a special gift or to brighten a shelf with handmade charm. Enjoy stitching each thoughtful piece and watching her personality come to life. πŸ§Άβœ¨πŸ“š

You ask,

we answer.

FAQs

What size will the finished piece be?

The finished amigurumi measures approximately 12-18 cm tall depending on yarn tension and exact hook size used.

Can I use different yarn weights for this pattern?

Yes, you can use different yarn weights but the final size will change; use an appropriate hook for your chosen yarn and expect a larger or smaller doll.

Do I need prior crochet experience for this pattern?

This pattern is rated intermediate, so basic knowledge of single crochet, increases, decreases and working in the round is recommended.

How long does this project typically take to complete?

Most crocheters complete this project in 5-7 hours, though time may vary based on experience level, customization and assembly time.

Where should I place the safety eyes?

Place safety eyes between rounds 8 and 9 of the head, separated by 6 or 7 stitches as indicated in the pattern.