This clear, focused pattern teaches you how to crochet a cozy hat, pompom and two scarf variants perfect for dressing amigurumi. You will work with plush yarn and a 4mm hook to create a snug festive look. The instructions are step-by-step and ideal for a quick, satisfying make. Finished pieces are small, charming accessories that add big personality to your toy creations.
Progress Tracker
0% Complete
— Hat :
Info :
All pieces are worked in a spiral continuously. This means that you do not end the rnd with a slip stitch and do not start a rnd with a chain.
Info :
I start working every piece from a magic ring but you can ch2 and work the necessary number of sc in the second st from the hook.
Info :
With red yarn and hook 4mm make a magic ring.
Round 1 :
6 sc in magic ring = 6 sts
Round 2 :
Round 2 (INC): 2 sc in each st around = 12 sts
Round 3 :
Round 3 (INC):(sc in next st, 2 sc in next st)*6 times =18 sts
Round 4 :
Round 4 (INC): (sc in next 2 sts, 2 sc in next st)*6 times = 24 sts
Round 5 :
Round 5 (INC): (sc in next 3 sts, 2 sc in next st)*6 times = 30 sts
Round 6 :
Round 6 (INC): (sc in next 4 sts, 2 sc in next st)*6 times = 36 sts
Round 7 :
Round 7 (INC): (sc in next 5 sts, 2 sc in next st)*6 times = 42 sts
Round 8 :
Round 8 (INC): (sc in next 6 sts, 2 sc in next st)*6 times = 48 sts
Round 9 :
Round 9 (INC): (sc in next 15 sts, 2 sc in next st)*3 times = 51 sts
Round 10 :
Round 10: sc in next 10 sts, chain 7, skip 7 stitches, sc in next 9 sts, chain 7, skip 7 stitches, sc in next 18 sts = 51 sts
Round 11 :
Round 11: sc in next 10 sts, sc in next 7 chains, sc in next 9 sts, sc in next 7 chains, sc in next 18 sts = 51 sts
Round 12 :
Round 12: sc in each st around = 51 sts
Info :
!!! Change yarn to white
Round 13 :
Round 13: dc in each st around = 51 sts
Round 14 :
Round 14: sc in each st around = 51 sts
Info :
Fasten off. Cut yarn and weave in ends.
— Pompom :
Info :
With white yarn and hook 4mm make a magic ring.
Round 1 :
Round 1: 6 sc in magic ring =6 sts
Round 2 :
Round 2 (INC): sc 2 in each st around=12 sts
Round 3 :
Round 3 (INC): (sc in next st, 2 sc in next st)*6 times =18 sts
Round 4 :
Round 4: sc in each st around =18 sts
Round 5 :
Round 5 (DEC): (sc in next st, sc dec)*6 times = 12 sts
Round 6 :
Round 6 (DEC): sc dec*6 times =6 sts
Info :
Fasten off. Leave the long tail for sewing.
— Scarf (Variant 1) :
Info :
Work the scarf back and forth in rows. This means that you need to make a turning chain at the end of each row.
Info :
With red plush yarn and hook 4mm make ch 5.
Row 1 :
Row 1: sc in 2nd chain from hook and in next 3 sts, ch1= 4 sts, turn
Row 2-39 :
Row 2-39: sc in next 4 sts, ch 1= 4 sts, turn
Row 40 :
Row 40: sc in next 4 sts = 4 sts
Info :
Fasten off, cut yarn and weave in ends.
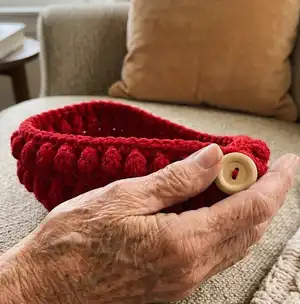
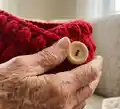
— Scarf (Variant 2) :
Info :
Work the scarf back and forth in rows. This means that you need to make a turning chain at the end of each row.
Info :
With red plush yarn and hook 4mm make ch 5. (leave long tail for sewing botton)
Row 1 :
Row 1: sc in 2nd chain from hook and in next 3 sts, ch1= 4 sts, turn
Row 2-39 :
Row 2-39: sc in next 4 sts, ch 1= 4 sts, turn
Row 25 :
Row 25: sc in next 4 sts = 4 sts
Row 26 :
Row 26: sc in next 2 sts, chain, sc in next 2 sts = 5 sts
Row 27 :
Row 27: sc in next 2 sts, skip 1 chain, sc in next 2 sts = 5 sts
Info :
Fasten off, cut yarn and weave in ends.
Info :
Sew the button between rows 1 and 2.
This hat and scarf pattern brings tiny handmade style to your amigurumi with soft plush yarn and simple stitches. Whether you choose the classic pompom hat or a buttoned scarf, these accessories add instant personality to your toys. Make a set for gifting or decorate your own creations with cozy charm. 🧶✨