🧶 Beautiful ✨ Detailed 💝 Adorable

Christmas Tree Cat Amigurumi Pattern

Christmas Tree Cat Amigurumi Pattern
4.5★ Rating
5-7 Hours Time Needed
3.0K Made This
✂️

Intermediate Level

Ideal for those with basic crochet experience, featuring slightly more advanced stitches and techniques to expand your skills.

⏱️

Weekend Treat

Takes 5-7 hours, making it an enjoyable project to finish over a couple of days.

🧸

Cute Companion

An adorable friend to cherish, handcrafted with love to bring comfort and joy for years to come.

About This Christmas Tree Cat Amigurumi Pattern

This pattern creates a tiny cat dressed like a layered Christmas tree — complete with a ruffled tree skirt body, a striped tree hat, and tiny pompom topper. The construction uses sport weight yarn and small hooks to make a compact, detailed amigurumi. Youll work single crochet shaping, BLO/FLO techniques for ruffles, and simple embroidered facial details.

Christmas Tree Cat Amigurumi Pattern crochet pattern - detailed view of completed project

Step-by-step rounds are provided for every piece and clear assembly directions guide you through finishing. Ideal as a festive gift or cute holiday decoration.

Why You'll Love This Christmas Tree Cat Amigurumi Pattern

I absolutely love this pattern because it combines whimsical holiday design with classic amigurumi shaping that feels both familiar and delightful. I enjoy the ruffled tree skirt technique — it adds charming texture and makes the cat feel like a tiny Christmas tree. The pattern is flexible, so I often tweak colours or add tiny accessories to personalize each doll. Sewing the pieces together and adding the embroidered face is such a satisfying finishing step that brings the character to life.

Christmas Tree Cat Amigurumi Pattern step 1 - construction progress Christmas Tree Cat Amigurumi Pattern step 2 - assembly progress Christmas Tree Cat Amigurumi Pattern step 3 - details and accessories Christmas Tree Cat Amigurumi Pattern step 4 - final assembly and finishing

Switch Things Up

I love how easy it is to customize this cat by swapping colors — try pastel shades for a soft, modern look or bright greens and reds for classic holiday cheer.

I often change the yarn weight and hook to make a mini keychain version or a larger plush to cuddle; a thicker yarn and larger hook gives a chunkier result.

I like adding tiny accessories like a crocheted scarf or felt ornaments glued to the tree body to make each piece unique and gift-ready.

Try embroidering different facial expressions to give each cat its own personality; moving the eyes slightly closer or wider changes the expression dramatically.

For a posable tail, I thread a thin piece of floral wire through the tail before sewing it in place — it lets you adjust the tail position after assembly.

I sometimes replace the yarn pompom with a small bell or bead to add a delicate sound when the toy is handled.

Consider using safety joints for larger versions if you want movable limbs; this pattern adapts well to jointed constructions with slight alterations.

If you want a simpler finish, skip the embroidered eyelids and use slightly smaller eyes for an innocence look that kids will love.

To make a set, adjust color palettes to create a family of tree cats — different hat colors and ear details help tell a story across multiple dolls.

I encourage experimenting with texture by using boucle or fuzzy yarn for the ruffle rows to create a snow-like effect on the tree skirt.

Common Mistakes & How to Fix Them

✗ Skipping stitch markers during rounds can lead to losing track of the beginning of a round; use a marker at the first stitch of every round to keep count. ✗ Forgetting to stuff at the correct time makes shaping difficult; stuff the head and hat before closing and add stuffing gradually so the shape remains smooth. ✗ Changing tension during color changes causes uneven ruffles and stripes; keep your tension consistent and carry yarn neatly when switching colors. ✗ Attaching eyes or ears without measuring spacing results in an off-center face; measure and mark the stitch positions before sewing to ensure symmetry. ✗ Crocheting FLO/BLO rows without checking orientation can misplace ruffle rows; turn your work and verify front/back loop placement before starting each FLO or BLO row.

Christmas Tree Cat Amigurumi Pattern

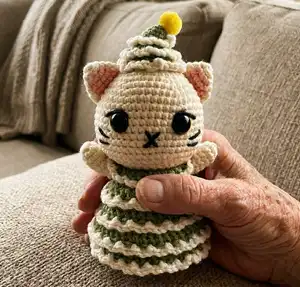
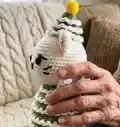
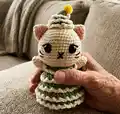
Make a delightful Christmas Tree Cat amigurumi that blends a cute cat with festive tree details. This pattern walks you through every piece — head, ears, hat, body, legs, hands and tail — with clear rounds and assembly notes. Youll enjoy the layered tree skirt effect and simple embroidery for the face. Perfect for gifting or seasonal decor, this pattern helps you create a charming handmade keepsake.

Intermediate 5-7 Hours

Materials Needed for Christmas Tree Cat Amigurumi Pattern

— Main Fabric

  • 01
    Sport weight yarn (Fine 2) - white (main body and ruffles)
  • 02
    Sport weight yarn (Fine 2) - green (body stripes, hat)
  • 03
    Sport weight yarn (Fine 2) - pink (inner ear detail)
  • 04
    Small amount yellow yarn for hat pompom (10mm)
  • 05
    Fiberfill stuffing for head, body, and limbs

— Tools Required

  • 01
    Crochet hook size 2.5mm (C)
  • 02
    Safety eyes 12-15mm (2 pieces)
  • 03
    Small yarn pompom or pompom maker (10mm)
  • 04
    Stitch markers
  • 05
    Sewing needle for finishing
  • 06
    Scissors
  • 07
    Hot glue gun
  • 08
    Polyester stuffing (fiberfill)
  • 09
    Long piece of wire for tail (optional for posability)

Progress Tracker

0% Complete

— Head :

Round 1 :

8 SC in an MR (8)

Round 2 :

8 INC (16)

Round 3 :

(SC, INC) 8 times (24)

Round 4 :

(2 SC, INC) 8 times (32)

Round 5 :

32 SC (32)

Round 6 :

(7 SC, INC) 4 times (36)

Round 7 :

(5 SC, INC) 6 times (42)

Round 8 :

(6 SC, INC) 6 times (48)

Round 9-17 :

48 SC (48)

Round 18 :

(4 SC, DEC) 8 times (40)

Round 19 :

(3 SC, DEC) 8 times (32)

Round 20 :

(2 SC, DEC) 8 times (24)

Info :

Cut the yarn, leaving a long tail for sewing.

Info :

*Stuffing*

— Ears (MAKE 2) :

Info :

Begin with White Yarn. Change to pink yarn color when changing text color.

Round 1 :

6 SC in an MR (6)

Round 2 :

(SC, INC) 3 times (9)

Round 3 :

2 SC, INC, 2 SC, INC, 2 SC, INC (12)

Round 4 :

3 SC, INC, 3 SC, INC, 3 SC, INC (15)

Round 5 :

4 SC, INC, 4 SC, INC, 4 SC, INC (18)

Info :

Cut the yarn, leaving a long tail for sewing.

— Hat :

Info :

Begin with Green yarn

Round 1 :

6 SC in an MR (6)

Round 2 :

(SC, INC) 3 times (9)

Round 3 :

(2 SC, INC) 3 times (12)

Round 4 :

(3 SC, INC) 3 times (15)

Round 5 :

BLO, (4 SC, INC) 3 times (18)

Round 6 :

(5 SC, INC) 3 times (21)

Round 7 :

BLO, (6 SC, INC) 3 times (24)

Round 8 :

(7 SC, INC) 3 times (27)

Info :

Cut the yarn, leaving a long tail for sewing.

Info :

Begin with White yarn for ruffles. Back to round 4 and crochet FLO: (3 CH, Sk, Slst) 7 times, 3 Ch, Slst.

Info :

Crochet FLO in round 6: (3 CH, Sk, Slst) 10 times, 3 Ch, Slst.

Info :

Crochet FLO in round 8: (3 CH, Sk, Slst) 13 times, 3 Ch, Slst.

Info :

Sew BLO of hat between R3 and R4 of the head. Stuff it before sewing it closed.

Info :

Sew the ears onto the head: from R4 to R10 of the head.

Info :

Attach the eyes between R9 and R10, with a distance of 9 stitches between them.

Info :

Use black yarn to embroider the nose, eyelid, and whiskers.

Info :

Use yellow yarn to sew the eyebags.

— Body :

Info :

Begin with Green yarn

Round 1 :

8 SC in an MR (8)

Round 2 :

8 INC (16)

Round 3 :

(SC, INC) 8 times (24)

Round 4 :

(2 SC, INC) 8 times (32)

Round 5 :

(3 SC, INC) 8 times (40)

Round 6 :

(4 SC, INC) 8 times (48)

Round 7 :

BLO, 48 SC (48)

Round 8 :

(10 SC, DEC) 4 times (44)

Round 9 :

44 SC (44)

Round 10 :

BLO, (9 SC, DEC) 4 times (40)

Round 11 :

40 SC (40)

Round 12 :

(8 SC, DEC) 4 times (36)

Round 13 :

BLO, 36 SC (36)

Round 14 :

(7 SC, DEC) 4 times (32)

Round 15 :

32 SC (32)

Round 16 :

BLO, (6 SC, DEC) 4 times (28)

Round 17 :

28 SC (28)

Round 18 :

(5 SC, DEC) 4 times (24)

Round 19 :

BLO, 24 SC (24)

Info :

Cut the yarn, leaving a long tail for sewing.

Infos :

Begin crocheting the outer layers of the body: Row 18 crochet FLO: Row 1: 2 Ch, 24 DC, Slst (green). Row 2: (3 Ch, Sk, Slst) 12 times (white).

Infos :

Row 15 crochet FLO: Row 1: 2 Ch, 32 DC, Slst (green). Row 2: (3 Ch, Sk, Slst) 16 times (white).

Infos :

Row 12 crochet FLO: Row 1: 2 CH, 36 DC, Slst (green). Row 2: (3 Ch, Sk, Slst) 18 times (white).

Infos :

Row 9 crochet FLO: Row 1: 2 CH, 44 DC, Slst (green). Row 2: (3 Ch, Sk, Slst) 22 times (white).

Infos :

Row 6 crochet FLO: Row 1: 2 CH, 48 DC, Slst (green). Row 2: (3 Ch, Sk, Slst) 24 times (white).

Info :

*Stuffing*

— Legs (MAKE 2) :

Info :

Begin with White yarn

Round 1 :

6 SC in an MR (6)

Round 2 :

6 INC (12)

Round 3 :

(3 SC, INC) 3 times (15)

Round 4-5 :

15 SC (15)

Info :

Cut the yarn, leaving a long tail for sewing.

— Hands (MAKE 2) :

Info :

Begin with White yarn

Round 1 :

6 SC in an MR (6)

Round 2 :

(SC, INC) 3 times (9)

Round 3-8 :

9 SC (15)

Info :

Cut the yarn, leaving a long tail for sewing.

— Tail :

Info :

Begin with White yarn

Round 1 :

6 SC in an MR (6)

Round 2-15 :

6 SC (6)

Info :

Cut the yarn, leaving a long tail for sewing.

Info :

Use a long piece of wire, equal to the tail length, and thread it through.

— Assembly :

Info :

Sew BLO of hat between R3 and R4 of the head. Stuff it before sewing it closed.

Info :

Sew the ears onto the head: from R4 to R10 of the head.

Info :

Attach the eyes between R9 and R10, with a distance of 9 stitches between them.

Info :

Use black yarn to embroider the nose, eyelid, and whiskers.

Info :

Use yellow yarn to sew the eyebags.

Info :

Sew the body to the head. Sew the arms to the body, between R19 & R20.

Info :

Sew the legs and tail to the body.

Info :

Attach a yarn pompom to the hat to complete the product.

Assembly Instructions

  • Sew BLO of the hat between R3 and R4 of the head and stuff the hat before closing to preserve shape.
  • Sew the ears onto the head spanning from R4 to R10 to position them correctly and symmetrically.
  • Attach the eyes between R9 and R10 with approximately 9 stitches between them, then embroider nose, eyelids, and whiskers with black yarn.
  • Sew the body to the head securely, then sew the arms to the body between R19 and R20 so they sit evenly.
  • Sew the legs and tail to the bottom/back of the body, and insert a wire in the tail for stability if desired; attach a yarn pompom to the hat.

Important Notes

  • 💡Use stitch markers to mark the beginning of each round, especially when working BLO/FLO rows and outer ruffles.
  • 💡Stuff the head, hat, and body gradually and firmly where needed, but avoid overstuffing which can distort the shape.
  • 💡Pin parts in place and check symmetry before sewing to ensure correct placement of ears, eyes, arms, and legs.
  • 💡Maintain consistent tension when changing colors or working FLO/BLO so the ruffle rows sit evenly around the body.

This Christmas Tree Cat is a sweet, handmade addition to your holiday decor that doubles as a heartfelt gift. The layered ruffle skirt and tiny tree hat make it stand out on a mantel or pile of presents. Have fun customizing colors and adding tiny details to make each cat unique! 🧶🎄

You ask,

we answer.

FAQs

What size will the finished piece be?

The finished amigurumi measures approximately 12 cm tall when using the recommended sport weight yarn and 2.5mm hook, though size may vary with different yarn or hook choices.

Can I use different yarn weights for this pattern?

Yes, you can use different yarn weights but the final size and stitch counts will change; choose an appropriate hook and expect to adjust stitch counts or rounds for proportional shaping.

Do I need prior crochet experience for this pattern?

This pattern is rated intermediate and assumes you know single crochet, increases, decreases, magic ring, BLO/FLO, and basic assembly and embroidery.

How long does this project typically take to complete?

Most crocheters finish this project in 5-7 hours, depending on experience level, customization, and how quickly you sew and embroider the details.

Where should I place the safety eyes?

Place the safety eyes between rounds 9 and 10 of the head with roughly nine stitches between them before securing and adding embroidered details.