🧢 Beautiful ✨ Detailed πŸ’ Adorable

Harry Potter Amigurumi Pattern

Harry Potter Amigurumi Pattern
4.4β˜… Rating
8-10 Hours Time Needed
2.6K Made This
βœ‚οΈ

Intermediate Level

Ideal for those with basic crochet experience, featuring slightly more advanced stitches and techniques to expand your skills.

⏱️

All-Day Adventure

Requires 8-10 hours, ideal for a full day of immersive crocheting.

🧸

Cute Companion

An adorable friend to cherish, handcrafted with love to bring comfort and joy for years to come.

About This Harry Potter Amigurumi Pattern

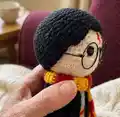
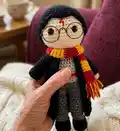
This pattern creates a small Harry Potter amigurumi complete with cloak, scarf, embroidered lightning scar and removable details. You will work the body from the feet up, add hair and a separate cloak and scarf to finish the look. Techniques include colour changes, working in the round, and simple surface embroidery for the scar.

Harry Potter Amigurumi Pattern crochet pattern - detailed view of completed project

Clear round-by-round instructions guide you through arms, legs, body, hair, scarf and cloak. Ideal if you enjoy character work and sewing pieces together for a neat finish.

Why You'll Love This Harry Potter Amigurumi Pattern

I absolutely love this pattern because it brings a tiny, recognizable character to life with simple stitches and small details. I enjoy the way the separate scarf and cloak let you customize the look as you go. I appreciate that the pattern uses common techniques, but combines them in a way that results in a highly detailed finished toy. I also love that embroidering the lightning scar adds a personal, human touch that makes each doll unique.

Harry Potter Amigurumi Pattern step 1 - construction progress Harry Potter Amigurumi Pattern step 2 - assembly progress Harry Potter Amigurumi Pattern step 3 - details and accessories Harry Potter Amigurumi Pattern step 4 - final assembly and finishing

Switch Things Up

I love how easy it is to customize this pattern by swapping colours; try blue and bronze for a Ravenclaw-inspired version or green and silver for Slytherin vibes.

I often change the yarn weight to create different sizes: use thicker yarn and a larger hook for a chunky, cuddly toy, or thinner yarn for a tiny keyring-sized version.

I sometimes replace safety eyes with embroidered eyes for a completely handmade, child-safe toy that is ideal for little ones.

I like to add tiny crocheted props like a miniature wand or book to personalize each character and make it more playful.

You can experiment with hair styles by using loop stitches or surface embroidery to create bangs, curls or a parted lookβ€”this changes the character's personality instantly.

I recommend trying different scarf stripe widths: more rows of one colour will produce a subtler stripe effect while shorter alternations give a bolder look.

For a weathered cloak effect I sometimes add a simple fringe or roughen the edge with a few loose stitches to make the cloak look lived-in.

If I want posable limbs I add thin wire inside the arms and legs before stuffing, making sure to secure ends so they are safely enclosed.

I like to embroider tiny glasses frames with metallic thread instead of using separate glasses, which gives the doll a vintage charm and keeps everything soft.

Dont be afraid to mix yarn fibers: cotton gives a crisp, non-stretch look while acrylic is soft and forgiving; I choose based on the finished texture I want.

Common Mistakes & How to Fix Them

βœ— Skipping the colour change instructions can leave awkward loops and loose carried yarn; change colour at the points specified and secure tails inside the work to keep edges neat. βœ— Not stuffing gradually causes lumps or distorted shaping; stuff small amounts as you go to maintain smooth, even contours and proper shaping. βœ— Forgetting to place safety eyes at the recommended rounds results in misplaced eyes; place safety eyes between the rounds specified and count stitches to ensure they are correctly spaced. βœ— Not joining legs correctly when joining for the body can produce a twisted seam; align feet facing forward, join as instructed and count the total stitches after joining to confirm placement.

Harry Potter Amigurumi Pattern

Create your own charming Harry Potter amigurumi with detailed step-by-step instructions. This pattern guides you through the head, body, hair, scarf and cloak so you can make a recognizable mini wizard. Perfect for crafters who love character toys and small wearable accessories. Follow the clear rounds and assembly notes to sew everything neatly together.

Intermediate 8-10 Hours

Materials Needed for Harry Potter Amigurumi Pattern

β€” Main Fabric

  • 01
    Yarn in flesh (skin tone) - DK/Light Worsted Weight (3) acrylic yarn (amount as needed)
  • 02
    Black coloured yarn - DK/Light Worsted Weight (3) acrylic yarn (amount as needed)
  • 03
    Light grey coloured yarn - DK/Light Worsted Weight (3) acrylic yarn (amount as needed)
  • 04
    Dark grey coloured yarn - DK/Light Worsted Weight (3) acrylic yarn (amount as needed)
  • 05
    Yellow coloured yarn - DK/Light Worsted Weight (3) acrylic yarn (amount as needed)
  • 06
    Red coloured yarn - DK/Light Worsted Weight (3) acrylic yarn (amount as needed)
  • 07
    Worsted weight yarn (#4) may also be used for a slightly larger finished size if desired

β€” Tools Required

  • 01
    Crochet hook size 3 mm
  • 02
    Crochet hook size 2.75 mm
  • 03
    Safety eyes (optional  can be embroidered instead)
  • 04
    Glasses (decorative accessory)
  • 05
    Stuffing

Progress Tracker

0% Complete

β€” Arms :

Info :

Using flesh coloured yarn:

Round 1 :

4 sc into magic ring (4)

Round 2 :

4 inc (8)

Round 3-4 :

8 sc (2 rounds)

Info :

Change to light grey coloured yarn:

Round 5 :

8 sl

Round 6 :

8 sc blo

Round 7-14 :

8 sc (8 rounds)

Info :

Fasten off.

β€” Body Starting At Feet, Stuffing As You Go :

Item Name (P1) :

Legs:

Info :

Using black coloured yarn:

Round 1 :

6 sc into magic ring (6)

Round 2 :

6 inc (12)

Round 3 :

(3 sc, 3 inc) 2 times (18)

Round 4 :

18 sc blo (18)

Round 5 :

18 sc

Round 6 :

2 sc, 7 dec, 2 sc (11)

Info :

Change to dark grey coloured yarn:

Round 7 :

11 sl

Round 8 :

11 sc blo

Round 9-18 :

11 sc (10 rounds)

Info :

Fasten off.

Info :

Make second leg, but do not fasten off.

Info :

If you are not already at the side of leg with foot facing forward, sc until there. Chain 1 stitch.

Info :

Body

Round 1 :

11 sc around leg that you fastened off (so legs are then attached to each other), 1 sc in ch, 11 sc around second leg, 1 sc in ch (24)

Round 2 :

10 sc, dec, 10 sc, dec (22)

Round 3 :

22 sc

Info :

sc until at centre of back

Info :

Change to light grey coloured yarn:

Round 4 :

22 sl

Round 5 :

22 sc blo

Info :

Change to yellow coloured yarn:

Round 6 :

22 sc

Info :

Change to light grey coloured yarn:

Round 7-8 :

22 sc (2 rounds)

Round 9 :

5 sc, 1 dec, 9 sc, 1 dec, 4 sc (20)

Round 10-11 :

20 sc (2 rounds)

Info :

Sc to side of body with feet facing forward if not already there

Round 12 :

8 sc around arm, 10 sc on body, 8 sc around other arm, 10 sc on body (36)

Round 13 :

(1 sc, 1 dec) x 12 (24)

Round 14 :

12 dec (12)

Info :

Change to flesh coloured yarn:

Round 15 :

12 sl

Round 16 :

12 sc blo

Round 17 :

12 inc (24)

Round 18 :

24 inc (48)

Round 19-26 :

48 sc (8 rounds)

Info :

Place safety eyes between rounds 24 and 25, making sure they are centre on face and 8 stitches apart.

Round 27 :

(6 sc, 1 dec) x 6 (42)

Round 28 :

(5 sc, 1 dec) x 6 (36)

Round 29 :

(4 sc, 1 dec) x 6 (30)

Round 30 :

(3 sc, 1 dec) x 6 (24)

Round 31 :

(2 sc, 1 dec) x 6 (18)

Round 32 :

(1 sc, 1 dec) x 6 (12)

Round 33 :

dec x 6 (6)

Info :

Fasten off, gather around fasten off stitches and pull tight to close hole at top of head.

β€” Hair :

Info :

Using black coloured yarn:

Round 1 :

7 sc into magic ring

Round 2 :

7 inc (14)

Round 3 :

(1 sc, 1 inc) (21)

Round 4 :

(2 sc, 1 inc) (28)

Round 5 :

(3 sc, 1 inc) (35)

Round 6 :

(4 sc, 1 inc) (42)

Round 7 :

(5 sc, 1 inc) (49)

Round 8-13 :

49 sc (6 rounds)

Round 14 :

(1 sc, 1 dc, 1 dc, 1 tr, 1 dc, 1 dc, 1 sc) x 7

Info :

Fasten off. Pin hair to head and then sew into place.

Info :

Using red yarn, embroider lightning bolt scar on forehead.

Info :

Working around posts of yellow stitches on jersey, 20 sl stitches in red.

β€” Scarf :

Info :

Using red coloured yarn:

Round 1 :

8 ch and join in a loop

Round 2-5 :

8 sc (4 rounds)

Info :

Using yellow coloured yarn:

Round 6-9 :

8 sc (4 rounds)

Info :

Using red coloured yarn:

Round 10-13 :

8 sc (4 rounds)

Info :

Repeat the previous 8 rounds until you have 13 stripes in total. Fasten off. Fold scarf flat, sew together cast on stitches, sew together cast off stitches. Cut eight 10 cm lengths of yellow yarn and eight 10 cm lengths of red yarn. Using one length of red and one length of yellow, fold lengths in half, draw loop through scarf and then pull cut ends through loop (see photos).

β€” Cloak :

Info :

Sleeves (make two): Using black colour yarn

Round 1 :

12 ch and join in a loop

Round 2-11 :

12 sc (10 rounds)

Info :

Main body of cloak: Using black coloured yarn

Round 1 :

Row 1: 21 ch

Round 2 :

starting in second chain from hook 20 sc

Round 3-24 :

1 ch, starting in second chain from hook 20 sc (22 rows)

Round 25 :

1 ch 5 sc, 12 sc around arm, 10 sc, 12 sc around other arm, 5 sc (44)

Round 26 :

1 ch, 22 dec (22)

Round 27-28 :

1 ch, 22 sc (2 rounds)

Round 29 :

1 ch, 11 dec (11)

Info :

Fasten off.

Info :

Weave in yarn ends.

Assembly Instructions

  • Pin hair to head to check fit, then sew the hair piece securely to the head using small whipstitches so it sits flat and covers the top of the head.
  • Place and secure safety eyes between rounds 24 and 25, centered on the face and spaced 8 stitches apart before stuffing and closing the head.
  • Sew arms into position at the body openings created in round 12 by stitching the arm openings to the body with matching yarn for a tidy finish.
  • Fold and sew the scarf cast-on and cast-off edges together, attach tassels by folding yarn lengths and pulling through loops as described, then position the scarf around the neck.
  • Attach cloak sleeves, align cloak body to shoulders and sew in place; weave in all ends and press seams gently to help cloak sit correctly.

Important Notes

  • πŸ’‘You can use any yarn and crochet hook combination that gives you good tension; typically choose a hook around two sizes smaller than recommended on the yarn label for a neat amigurumi finish.
  • πŸ’‘Place safety eyes between rounds 24 and 25 as instructed and check spacing carefully before securing the backs to avoid misaligned facial features.
  • πŸ’‘Pin parts in place before sewing to ensure symmetry and correct positioning; this helps avoid uneven seam lines when attaching hair, arms and cloak.

This Harry Potter amigurumi pattern brings a tiny wizard to life with fun details like a striped scarf, cloak and embroidered lightning scar. Follow the clear round-by-round instructions to build the feet, join the legs, shape the body and close the head. Make a thoughtful handmade gift or a shelf-ready collectible that shows your crochet skills. 🧢✨

You ask,

we answer.

FAQs

What size will the finished piece be?

The finished amigurumi measures approximately 30 cm (12 inches) tall using worsted weight yarn and a 3 mm crochet hook; size will vary with yarn and hook choice.

Can I use different yarn weights for this pattern?

Yes, you can use different yarn weights, but this will affect final size; adjust your hook accordingly and remember a smaller hook than yarn label recommendation gives firmer fabric for amigurumi.

Do I need prior crochet experience for this pattern?

This pattern is rated intermediate and uses techniques like colour changes, working in back loops only and shaping; basic knowledge of single crochet, increases and decreases is recommended.

How long does this project typically take to complete?

Most crocheters complete this project in 8-10 hours depending on experience and how much time you spend on assembly and finishing details.