🧶 Beautiful ✨ Detailed 💝 Adorable

Bee No Sew Amigurumi Pattern

Bee No Sew Amigurumi Pattern
4.8★ Rating
2-3 Hours Time Needed
3.4K Made This
✂️

Intermediate Level

Ideal for those with basic crochet experience, featuring slightly more advanced stitches and techniques to expand your skills.

⏱️

Bite-Sized Project

Finishes in 2-4 hours—perfect for an afternoon of creative relaxation.

🧸

Cute Companion

An adorable friend to cherish, handcrafted with love to bring comfort and joy for years to come.

About This Bee No Sew Amigurumi Pattern

This no-sew bee amigurumi pattern creates a small, lovable plush with striped body details and bobble accents. Youll work from the body up to the head, changing colors to form the classic bee stripes. The pattern includes clear row-by-row instructions, photo references, and finishing notes for eyes and facial embroidery.

Bee No Sew Amigurumi Pattern crochet pattern - detailed view of completed project

Designed with super bulky yarn for a plush, squishy texture and quick results. Includes beard/feet details, placement notes for safety eyes, and simple embroidery instructions for the face.

Why You'll Love This Bee No Sew Amigurumi Pattern

I absolutely love this pattern because it transforms a few simple stitches into a character full of personality. The no-sew construction makes assembly quick and satisfying, so you see results fast. The bobble and color-change details give the bee a lot of charm without complicated shaping. I enjoy how versatile this design is—you can make it in any color combination and still get an adorable friend.

Bee No Sew Amigurumi Pattern step 1 - construction progress Bee No Sew Amigurumi Pattern step 2 - assembly progress Bee No Sew Amigurumi Pattern step 3 - details and accessories Bee No Sew Amigurumi Pattern step 4 - final assembly and finishing

Switch Things Up

I love how easy it is to customize this pattern—changing the yarn color instantly makes a new character. Try pastel shades for a softer nursery-friendly bee or bright neons for a quirky, playful look.

If you want a larger or smaller version, change your yarn weight and hook size; bulky yarn makes a chunky, huggable bee while thinner yarn creates a tiny keychain-sized friend.

I often add embroidered accessories like tiny wings, bows, or a crocheted hat to give each bee its own personality—small props really add charm.

Try substituting the bobble rows with simple puff stitches or popcorns if you prefer a different textured look; test one stripe first to see how it reads on your yarn.

I also like adding wire to the limbs for posability when making display pieces—just ensure wire ends are properly secured and padded with stuffing.

For gifting I sometimes stitch on a small embroidered name or initial on the back to personalize the toy and make it extra special.

Mix color sequences to create different stripe patterns—three narrow stripes, alternating thin and thick, or even ombre transitions look great.

Use safety eyes of different sizes for varied expressions—smaller eyes give a shy look while larger eyes create a cuter, more expressive face.

If you enjoy sewing, you can replace the no-sew beard/feet technique with sewn-on crocheted pieces for a slightly different finish and stronger attachment.

Don’t be afraid to combine elements from the mouse or puppy pages—for example, try the puppy snout on the bee for a whimsical mash-up.

Common Mistakes & How to Fix Them

✗ Skipping stitch markers when working in continuous rounds causes you to lose track of the round; place a marker at the start of every round and move it up as you go. ✗ Switching colors without catching the yarn properly can create loose loops and gaps; carry the unused color neatly at the back or change colors with a secure join to hide the tail. ✗ Not stuffing as you work will make closing rounds difficult and create lumps; stuff gradually after key shaping rounds to keep a smooth silhouette. ✗ Forgetting to count after increases or decreases results in incorrect shaping; count your stitches at the end of each round, especially after pattern changes and bobble rows. ✗ Pulling your tension too tight on bobble or BO stitches will flatten the texture; keep a consistent, slightly loose tension on bobbles so they puff correctly. ✗ Leaving tails too short when fastening off makes finishing fiddly; leave a longer tail for sewing or weaving in so you can secure parts and weave ends invisibly.

Bee No Sew Amigurumi Pattern

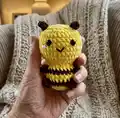
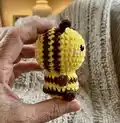
Make a sweet no-sew bee amigurumi you can finish in an afternoon. This pattern walks you through every round from the body up to the head with clear row-by-row instructions. Youll love the textured bobble details and easy color changes that create a charming, handmade companion. Perfect for gifting or brightening up a shelf.

Intermediate 2-3 Hours

Materials Needed for Bee No Sew Amigurumi Pattern

— Main Fabric

  • 01
    Super Bulky yarn / Category 6 - small amounts for each toy (main projects use approx small skeins depending on yarn brand)
  • 02
    Bee Colors: Yellow (main) - small amount
  • 03
    Bee Accent: Brown - small amount
  • 04
    Mouse Colors: Grey (main) - small amount; Pink for ear center - small piece; Black for nose/whisker details - small piece
  • 05
    Puppy Colors: Brown (main), White (snout), Skin/cream color (inner ears) - small amounts
  • 06
    Short pieces of pink and black yarn for cheeks and mouth embroidery (small scraps)

— Tools Required

  • 01
    Crochet hook size 3.5mm (E)
  • 02
    Stitch marker
  • 03
    Sewing needle
  • 04
    Scissors
  • 05
    Plastic safety eyes 8mm (2 pieces)
  • 06
    Hot gun glue
  • 07
    Fiberfill / polyester stuffing
  • 08
    Yarn needle for weaving ends and sewing small parts

Progress Tracker

0% Complete

— Body to Head (Bee) :

Row 1 :

6 SC in an MR (6)

Row 2 :

6 INC (12)

Row 3 :

(SC, INC) 6 times (18)

Row 4 :

(2 SC, INC) 6 times (24)

Info :

Change to Brown yarn

Row 5 :

8 SC, BO, 6 SC, BO, 8 SC (24)

Info :

Change to Yellow yarn

Row 6 :

8 SC, SC into the stitch's BO, 6 SC, SC into the stitch's BO, 8 SC (24)

Row 7 :

24 SC (24)

Info :

Change to Brown yarn

Row 8 :

6 SC, BO, 10 SC, BO, 6 SC (24)

Info :

Change to Yellow yarn

Row 9 :

6 SC, SC into the stitch's BO, 10 SC, SC into the stitch's BO, 6 SC (24)

Row 10 :

(SC, DEC) 8 times (16)

Row 11 :

FLO, (SC, INC) 8 times (24)

Row 12 :

(SC, INC) 12 times (36)

Row 13-18 :

36 SC (36)

Row 19 :

(2 SC, DEC) 9 times (27)

Info :

*Stuffing*

Row 20 :

(SC, DEC) 9 times (18)

Row 21 :

(SC, DEC) 6 times (12)

Row 22 :

6 DEC (6)

Info :

Weave in the yarn end and cut

BEARD (P1) :

Begin with brown. Pick up the yarn from row 19: 4CH, turn: 3SC. Cut the yarn.

Info :

Attach the eyes between rows 16 and 17. Use black yarn to embroider the mouth and pink yarn to embroider the cheeks.

— Body to Head (Mouse) :

Info :

Join the new round with a slip stitch and chain 1.

Row 1 :

6 SC in an MR (6)

Row 2 :

6 INC (12)

Row 3 :

(SC, INC) 6 times (18)

Row 4 :

(2 SC, INC) 6 times (24)

Row 5 :

8 SC, BO, 6 SC, BO, 8 SC (24)

Row 6-7 :

24 SC (24)

Row 8 :

6 SC, BO, 10 SC, BO, 6 SC (24)

Row 9 :

24 SC (24)

Row 10 :

(SC, DEC) 8 times (16)

Row 11 :

FLO, 6SC, (3SC in one st) 4 times, 6SC (24)

Row 12 :

(SC, INC) 12 times (36)

Row 13 :

16SC, (BLO: 4SC), 16SC (36)

Row 14-15 :

15SC, (BLO: SC), 4SC, (BLO: SC), 15SC (36)

Row 16 :

(2SC, DEC) 4 times, (BLO: 2SC, DEC), (2SC, DEC) 4 times (30)

Row 17-19 :

27SC (27)

Info :

*Stuffing*

Row 20 :

(SC, DEC) 9 times (18)

Row 21 :

(SC, DEC) 6 times (12)

Row 22 :

6 DEC (6)

Info :

Weave in the yarn end and cut

— Ears (Mouse) :

Info :

Make 2. Begin with Pink yarn. Join the new round with a slip stitch and chain 1.

Row 1 :

6 SC in an MR (6)

Row 2 :

(SC, INC) 3 times (9)

Row 3 :

(2SC, INC) 3 times (12)

Info :

Change to Grey yarn

Row 4 :

(SC, INC) 6 times (18)

Info :

Attach the ear point straight from the arm going up with 3 SLST at R18-20

— Nose (Mouse) :

Info :

Begin with Black yarn. Join the new round with a slip stitch and chain 1.

Row 1 :

4SC in an MR (4)

Info :

Change to Grey yarn

Row 2 :

(SC, INC) 2 times (6)

Row 3 :

(2SC, INC) 2 times (8)

Row 4 :

(SC, INC) 4 times (12)

Info :

Attach the nose to the head with 12 SLST at BLO of R13-16. Attach the eyes at R15-16, 6st apart. Sew the line like this.

— Body to Head (Puppy Dog) :

Info :

Ear make2 uses Skin yarn: Row 1: 6 SC in an MR (6). Row 2: 6 INC (12). Row 3-4: 12 SC (12). Row 5: (2 SC, DEC) 3 times (9). Row 6-7: 9 SC (9). Row 8: (SC, DEC) 3 times (6). Cut the yarn.

Info :

Begin with Brown yarn for body. Row 1: 6 SC in an MR (6). Row 2: 6 INC (12). Row 3: (SC, INC) 6 times (18). Row 4: (2 SC, INC) 6 times (24). Row 5: 8 SC, BO, 6 SC, BO, 8 SC (24).

Row 6 :

8 SC, SC into the stitch's BO, 6 SC, SC into the stitch's BO, 8 SC (24)

Row 7 :

24 SC (24)

Row 8 :

6 SC, BO, 10 SC, BO, 6 SC (24)

Row 9 :

6 SC, SC into the stitch's BO, 10 SC, SC into the stitch's BO, 6 SC (24)

Row 10 :

(SC, DEC) 8 times (16)

Row 11 :

FLO, (SC, INC) 8 times (24)

Row 12 :

(SC, INC) 12 times (36)

Row 13-15 :

36 SC (36)

Row 16 :

(2 SC, DEC) 9 times (27)

Row 17-19 :

27 SC (27)

Info :

*Stuffing*

Row 20 :

2SC, DEC, fold the ears in half and crochet them together at the head 3SC, (DEC, 2SC) 2 times, DEC, SC, DEC, fold the ears in half and crochet them together at the head 3SC, DEC, 2 SC (21)

Row 21 :

(SC, DEC) 7 times (14)

Row 22 :

7 DEC (7)

Info :

Weave in the yarn end and cut

— Nose (Puppy Dog) :

Info :

Use White yarn.

Row 1 :

Crochet 12 SLst from rows 14-16 in a circular shape as the photo

Row 2 :

Crochet 12SC crochet into the 12 slip

Row 3 :

(SC, DEC) 4 times (8)

Info :

*Stuffing*

Row 4 :

4DEC

Info :

Cut the yarn. Attach the eyes at row 16.

Assembly Instructions

  • Attach the eyes between rows 16 and 17 of the head for the Bee; use safety eyes and secure with washers.
  • Use black yarn to embroider the mouth and pink yarn to embroider the cheeks on the Bee after eyes are attached.
  • Attach the mouse nose to the head with 12 SLST at the BLO of rows 13-16; position eyes at rows 15-16, 6 stitches apart.
  • For the puppy, crochet the white nose piece and sew it to the head at row 16; attach ears by folding and stitching into place as described in Row 20.
  • Pick up yarn for the Bee beard from row 19: chain 4, turn, 3 SC, then cut the yarn and position as shown in photos.

Important Notes

  • 💡Join new rounds with a slip stitch and chain 1 when instructed to keep round starts tidy and consistent.
  • 💡Place safety eyes before stuffing fully to ensure correct placement and ease of attachment between the specified rows.
  • 💡Work BO (bobble) and FLO/BLO instructions slowly and maintain consistent tension to keep the texture and silhouette even.
  • 💡Weave in yarn ends and cut after finishing rounds as noted to prevent unraveling and to keep the finish neat.

This cheerful Bee amigurumi is a quick, satisfying project that makes a lovely gift or personal keepsake. The no-sew construction and super bulky yarn mean youll have a cuddly friend in an afternoon. Try making a whole collection in different colors to brighten up any shelf or nursery. 🐝🧶

You ask,

we answer.

FAQs

What size will the finished piece be?

The finished amigurumi measures approximately 10-12 cm tall when using super bulky Category 6 yarn and a 3.5mm (E) hook; actual size may vary by yarn brand and tension.

Can I use different yarn weights for this pattern?

Yes, you can use different yarn weights but your finished size will change; use an appropriate hook for your yarn and expect to adjust stuffing and stitch tension.

Do I need prior crochet experience for this pattern?

This pattern is rated intermediate and assumes you know single crochet, increases, decreases, working in the round, FLO/BLO techniques, and basic bobble stitches.

How long does this project typically take to complete?

Most crocheters complete this project in 2-3 hours using the recommended yarn and hook size, though time may vary depending on experience and finishing details.

Where should I place the safety eyes?

Place the safety eyes between rows 16 and 17 for the Bee and at row 16 for the Puppy nose placement reference; for the mouse attach eyes at rows 15-16, 6 stitches apart.