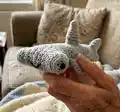
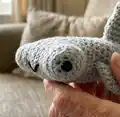
About This Hammerhead Shark Friend Amigurumi Pattern
This pattern creates a small, friendly hammerhead shark amigurumi made in DK yarn. You will crochet the head and body with shaping in rows, then make a big dorsal fin and several small fins to sew on. The design focuses on simple shaping, tight stitches, and thoughtful finishing for a cute finished toy.

Includes full material list, abbreviations in US terms, and clear step-by-step rounds for head, body and fins. Suitable for crocheters comfortable with basic increases, decreases and working in rows and rounds.
Why You'll Love This Hammerhead Shark Friend Amigurumi Pattern
I absolutely love this pattern because it takes a familiar amigurumi technique and gives it personality with a playful hammerhead shape. I enjoy the shaping that moves from a round nose into worked rows — it feels like sculpting as you crochet. The pattern is compact, which means you can finish a charming toy in an afternoon and have something to show off right away. I also love that it is easy to customise with yarn weights, eye types or embroidered expressions so each shark becomes uniquely yours.
Switch Things Up
I love how easy it is to customise this pattern—try different colours to make each shark unique, like pastel blues, greys, or even a rainbow shark for a fun twist.
You can change the size by switching yarn weight and hook size: use a 3mm hook with DK for a tinier shark or a 5mm hook with chunky yarn for a huggable version.
I often add embroidered spots or stripes to the back for extra personality; simple surface embroidery with a contrasting yarn works beautifully.
Swap safety eyes for embroidered eyes if you need a child-safe toy; a few satin stitched lines can create adorable expressions.
Try making the hammerhead head wider or narrower by adjusting the number of rows worked in the head shaping for different looks.
For posable fins, thread thin craft wire through the fin before sewing it to the body, then bend gently into position.
Make a keychain version by using thinner yarn and a smaller hook, and attach a keyring through a securely sewn loop.
Add small accessories like a tiny crocheted scarf or a felt party hat to personalise gifts or seasonal decorations.
I sometimes stuff the nose more firmly than the tail to give a slightly upturned, playful face—experiment with stuffing placement for character changes.
Combine yarn textures—try a fuzzy or boucle yarn for a soft, whimsical shark, but remember to use safety eyes that suit the yarn thickness.
Consider making a whole set of sea friends using the same proportions and swapping fin shapes to create variety in your collection.
Don't be afraid to change the number of small fins you add—less can be more for a cute, stylised hammerhead or add more for an anatomically inspired look.
Common Mistakes & How to Fix Them
✗ Not checking your stitch count every round can cause shaping to be off; count stitches at the end of each round and correct any mistakes immediately.
✗ Starting with an elastic chain and loose tension gives holes in the nose area; use a firm tension or start with a chain 2 and work into the first stitch or use a magic ring for a tighter start.
✗ Forgetting to place safety eyes before closing the head will make them impossible to attach securely later; insert safety eyes in the beginning/end spaces before closing the head.
✗ Overstuffing or understuffing changes the shark profile and makes sewing difficult; stuff gradually while shaping to achieve an even, firm but not hard finish.
✗ Not keeping decreases at the intended edge stitches can make the sides lopsided; change the stitch arrangement if necessary to ensure decreases happen once on each side.
✗ Using an inappropriate hook size for your yarn results in loose stitches and stuffing showing through; size down your hook 0.5-1.0mm from recommended to keep stitches tight for amigurumi.