🧢 Beautiful ✨ Detailed πŸ’ Adorable

Grumpy Mini Octopus Amigurumi Pattern

Grumpy Mini Octopus Amigurumi Pattern
4.0β˜… Rating
2-3 Hours Time Needed
2.3K Made This
βœ‚οΈ

Intermediate Level

Ideal for those with basic crochet experience, featuring slightly more advanced stitches and techniques to expand your skills.

⏱️

Bite-Sized Project

Finishes in 2-4 hoursβ€”perfect for an afternoon of creative relaxation.

🧸

Cute Companion

An adorable friend to cherish, handcrafted with love to bring comfort and joy for years to come.

About This Grumpy Mini Octopus Amigurumi Pattern

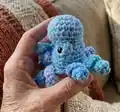
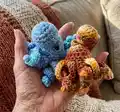
This pattern creates a small, grumpy mini octopus amigurumi with a rounded head, a cute protruding nose, and eight curly arms. It uses common crochet stitches and a few shaping techniques to produce an expressive face and compact body. The octopus is perfect as an ornament, little toy, or a tiny collectible.

Grumpy Mini Octopus Amigurumi Pattern crochet pattern - detailed view of completed project

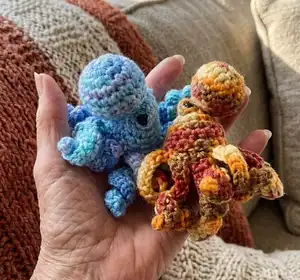
Designed for variegated or self-striping worsted yarn to create charming color pooling and texture. Includes full round-by-round instructions for the nose, body, arms, and assembly.

Why You'll Love This Grumpy Mini Octopus Amigurumi Pattern

I absolutely love this pattern because it gives a lot of character with just a few stitches and tiny details like the little nose and eyelids. I enjoy how each arm naturally curls differently depending on which direction you work it, so every octopus ends up unique. The pattern is compact and satisfying to finish in one sitting, which makes it perfect for quick handmade gifts. I also love seeing how variegated yarns create delightful color pooling that makes each octopus a one-of-a-kind miniature.

Grumpy Mini Octopus Amigurumi Pattern step 1 - construction progress Grumpy Mini Octopus Amigurumi Pattern step 2 - assembly progress Grumpy Mini Octopus Amigurumi Pattern step 3 - details and accessories Grumpy Mini Octopus Amigurumi Pattern step 4 - final assembly and finishing

Switch Things Up

I love trying different yarns to change the look; using pastel variegated yarn gives a soft, whimsical octopus while bold colors make a bright, playful friend.

I often switch hook sizes to change the final scale; using a smaller hook tightens the stitches for a denser mini, while a larger hook creates a softer, slightly bigger octopus.

I like adding felt or embroidered eyelids instead of crocheted ones for a cleaner, flatter face detail that still looks grumpy.

To make a keychain version, I attach a small split ring or keyring to the top before sewing the nose and use minimal stuffing to keep it lightweight.

I sometimes add a bit of wire inside the arms for posability so I can wrap them perfectly around branches or hangers.

If I want a very tiny set, I use sport weight yarn and a 2.5mm hook to create a family of miniature octopuses perfect for advent calendars.

I enjoy experimenting with different eye types; wooden beads give a vintage look while black safety eyes are classic and easy to use.

Try embroidering tiny mouths or blush with yarn or fabric paint for added personality and to vary expressions.

If you want more texture, I sometimes substitute a few rows with HDC or DC to change body height and create subtle ridges.

I also like making matching accessoriesβ€”crochet a little scarf, hat, or a tiny shell to nestle the octopus into for a themed gift.

Common Mistakes & How to Fix Them

βœ— Skipping the long tail when finishing the nose; leave a long tail so you can sew the nose securely and hide the starting chain. βœ— Overstuffing the body so it becomes too round and loses the flat base; stuff the body lightly so it remains somewhat flat and sits well. βœ— Placing safety eyes too close or too far apart which breaks the face balance; add eyes between rounds 2 and 3 about 4 to 5 stitches apart for the intended expression. βœ— Working arms inconsistently in direction causing uneven curl; decide whether to work clockwise or counterclockwise for each arm set so curls match your desired look. βœ— Forgetting to reattach and work in FLO/BLO when instructed which alters shaping; follow the BLO/FLO instructions exactly to get the correct inside/outside body texture.

Grumpy Mini Octopus Amigurumi Pattern

Make a tiny, grumpy octopus amigurumi perfect for ornaments, keychains, or small toys. This pattern uses simple amigurumi techniques and creative arm curling to give each octopus personality. You will enjoy making a set in variegated yarns that highlight the little rounds and curls. Clear step-by-step rounds and photos guide you through assembly and finishing.

Intermediate 2-3 Hours

Materials Needed for Grumpy Mini Octopus Amigurumi Pattern

β€” Main Fabric

  • 01
    Red Heart Super Saver (worsted weight) - approximately 2 oz (Ocean, Marrakesh, Stillwater Pooling or any color you like)
  • 02
    Variegated/self-striping worsted yarn (optional) - small skein or 2 oz for color-changing effects
  • 03
    Small scraps of yarn for eyelid detailing (optional)

β€” Tools Required

  • 01
    Crochet hook size 3.5mm (or hook you prefer with chosen yarn)
  • 02
    6mm Safety Eyes (2 pieces)
  • 03
    Embroidery needle for sewing nose and assembly
  • 04
    Yarn needle for weaving in ends
  • 05
    Scissors
  • 06
    Stitch markers (optional)
  • 07
    Polyester stuffing for nose and body
  • 08
    Pins for positioning parts while sewing (optional)

Progress Tracker

0% Complete

β€” Nose :

Rnd 1 :

6 sc in a mc

Rnd 2 :

(inc) 6 times (12)

Rnd 3 :

(1 sc, inc) 6 times (18)

Rnd 4-5 :

1 sc in each st around (18)

Rnd 6 :

(1 sc, dec) 6 times (12)

Rnd 7 :

(2 sc, dec) 3 times (9)

Info :

TO but do not close, leave long tail for sewing. Stuff the nose at this time. Set aside.

β€” Body :

Rnd 1 :

Ch 9 slst into first chain to close

Rnd 2-3 :

1 sc in each st around (9)

Rnd 4 :

(2 sc, inc) 3 times (12)

Rnd 5 :

(2 sc, inc) 4 times (16)

Rnd 6 :

BLO 1 sc in each st around (16)

Info :

Add eyes between rows 2 and 3 about 4 to 5 stitches apart (See Picture A). At this time you can add the eye lids in a 'V' shape to make it appear a bit grumpy (See Picture B). Stuff the body but not too much as it should be some what flat.

Rnd 7 :

(dec) 8 times (8)

Info :

Close then reattach to FLO from round 6

Rnd 6 :

FLO 1 sc in each st around (16)

Rnd 7-8 :

1 sc in each st around (16)

Info :

We will begin making the Octopuses arms now.

β€” Arms :

Info :

Arms can be done in any number of ways. If you work the arms Clockwise they will curl up, if you work the arms counterclockwise they will curl down (See pictures C and D). Either way is fine and gives you a unique look! I prefer working counter clockwise so they curl down, if I can figure out how to alternate to get them curling in both directions I will update the pattern!!

Info :

Here are 4 arm patterns. Once you complete Arm 4 go back and repeat all arms again to get 8 arms.

Arm 1 (P1) :

Ch 20 turn, slst into 2nd chain from hook, 5 sc, sc3tog, 2 sc, 5 hdc, 3dc (should be at base of chain), skip st, sc into next st.

Arm 2 (P2) :

Ch 15 turn, slst into 2nd chain from hook, 7 sc, 6 hdc, skip st, sc into next st.

Arm 3 (P3) :

Ch 18 turn, slst into 2nd chain from hook, 3 sc, hdc3tog, 7 hdc, 3 dc, skip st, sc into next st.

Arm 4 (P4) :

Ch 20 turn, slst into 2nd chain from hook, 4 sc, 3 hdc, hdc3tog, 5 hdc, 3 dc, skip st, sc into next st.

Info :

Once you have 8 arms slst into 1st chain of 1st arm. TO leave tail. Using a needle and the tail go around and close hole left from skipping a stitch (See picture E). Weave in ends.

β€” Assembling :

Info :

Using the tail from the nose and an embroidery needle, sew the nose on. I start at the top of the head sewing the opening closed and tucking in any extra starting tail from the first chain. Try to center it between the eyes with the eyelids positioned so it is looking towards the nose. Weave in any loose ends.

Assembly Instructions

  • Sew the nose to the head using the long tail left from the nose; start at the top of the head closing the opening and tuck in any extra starting tail from the first chain.
  • Position safety eyes between rounds 2 and 3 about 4 to 5 stitches apart and, if desired, add small eyelid stitches in a 'V' shape to create the grumpy expression before stuffing.
  • After completing all 8 arms, slst into the first chain of the first arm, leave a tail and use a needle to close the gap left by skipped stitches, then weave in ends securely.
  • Stuff the nose firmly and the body lightly so the body remains somewhat flat; shape and adjust stuffing before closing and sewing parts together.

Important Notes

  • πŸ’‘Place safety eyes between rounds 2 and 3 about 4 to 5 stitches apart to achieve the intended facial expression.
  • πŸ’‘Leave a long tail on the nose piece so you can sew it neatly to the head and hide the starting chain.
  • πŸ’‘Stuff the body lightly so the finished octopus has a somewhat flat base and natural shape.
  • πŸ’‘Decide on arm direction (clockwise or counterclockwise) before working arms to control curl direction and consistency.

This cute Grumpy Mini Octopus is tiny, full of character, and so fun to make! 🧢 Twist the arms around branches for ornaments or make a set for gifting. πŸ™ Enjoy the little quirks of color pooling and unique curls each time you make one! ✨

You ask,

we answer.

FAQs

What size will the finished piece be?

The finished amigurumi measures approximately 2 inches from top of nose to bottom of body and 4-5 inches from nose to end of arms, depending on yarn and tension.

Can I use different yarn weights for this pattern?

Yes, you can use different yarn weights, but the final size will change. Use an appropriate hook for your chosen yarn and expect a larger or smaller octopus accordingly.

Do I need prior crochet experience for this pattern?

This pattern is rated intermediate and uses stitches like hdc3tog and sc3tog; basic amigurumi experience and familiarity with increases, decreases, BLO/FLO are recommended.

How long does this project typically take to complete?

Most crocheters complete this project in about 2-3 hours, though time may vary based on experience and how many octopuses you make.

How do I get the arms to curl up or down?

Work the arms clockwise to make them curl up and counterclockwise to make them curl down; choosing the direction before starting the arm gives predictable curl behavior.