🧢 Beautiful ✨ Detailed πŸ’ Adorable

Flower bouquet C Crochet Pattern

Flower bouquet C Crochet Pattern
4.8β˜… Rating
12-15 Hours Time Needed
2.9K Made This
βœ‚οΈ

Intermediate Level

Ideal for those with basic crochet experience, featuring slightly more advanced stitches and techniques to expand your skills.

⏱️

Multi-Day Project

A rewarding 12+ hour journeyβ€”perfect for dedicated crafters who love detailed work.

🏑

Cozy Accent

A warm touch for your space that transforms ordinary corners into inviting nooks filled with handmade charm.

About This Flower bouquet C Crochet Pattern

This pattern set creates a full flower bouquet with tulips, daisies, baby daisies, two styles of roses, and several leaf types. Each flower includes clear row-by-row instructions and guidance for adding wire stems and finishing. The designs use 4-ply yarn and a small hook for delicate, realistic flowers. You can mix colors and textures to make a unique arrangement.

Flower bouquet C Crochet Pattern crochet pattern - detailed view of completed project

Includes materials list, yarn size guidance, abbreviations, and assembly tips to complete the bouquet. The instructions are beginner-friendly in tone but assume familiarity with basic stitches and shaping.

Why You'll Love This Flower bouquet C Crochet Pattern

I absolutely love this pattern because it brings garden-fresh flowers indoors with yarn and a little wire. I enjoy how each bloom is built from simple building blocksβ€”chains and basic stitchesβ€”that combine into a realistic shape. The patterns let me experiment with color gradients, mixed yarns and stem shaping to create personalized bouquets. I feel proud gifting these handmade arrangements, and I know you'll enjoy the creative process as much as I do.

Flower bouquet C Crochet Pattern step 1 - construction progress Flower bouquet C Crochet Pattern step 2 - assembly progress Flower bouquet C Crochet Pattern step 3 - details and accessories Flower bouquet C Crochet Pattern step 4 - final assembly and finishing

Switch Things Up

I love how easy it is to customize this pattern by changing yarn colors and blending two shades for a gradient petal effect.

I often alternate cotton and acrylic yarn to vary texture β€” the cotton gives crisp petals while acrylic feels softer and fuller.

I sometimes substitute metallic floral wire for the thicker stem wire to achieve more poseable stems that I can bend into display shapes.

I also like to create mini versions by using finer yarn and a smaller hook, making cute buttonhole-sized bouquets for gifts.

For a vintage look I add a little blush or fabric paint to petal edges after finishing to create depth and realism.

I often make multiple versions of the same flower in different sizes and cluster them for a fuller bouquet effect.

To make wearable accessories I scale down petals and attach them to hair clips or brooch backings for wearable blooms.

Try combining yarns (one strand cotton + one strand shiny thread) to make subtle sparkly petals for special occasions.

I recommend experimenting with stem lengths and ribbon wraps β€” a long stem makes a bouquet, short stems are great in small vases or gift boxes.

Don’t be afraid to add beads or embroidered details to centers for an extra pop of color or texture.

Common Mistakes & How to Fix Them

βœ— Not adding wire to petals or leaves that need shaping can make stems floppy; add thin wire when instructed and secure it before finishing to keep petals and leaves moldable. βœ— Skipping stitch counts or not reading parentheses causes uneven petals; count stitches after each round and follow parentheses exactly to keep shape consistent. βœ— Using a too-large hook for 4-ply yarn will make loose stitches and floppy flowers; use a 2-2.5mm hook and maintain consistent tension for crisp petals. βœ— Over-gluing the petals to the stick can distort shapes and be visible; use small amounts of hot glue and position petals carefully before glue sets. βœ— Forgetting to roll yarn around the wooden stick will make stems look unfinished; always wrap yarn around the stem after attaching leaves to secure and create a natural look.

Flower bouquet C Crochet Pattern

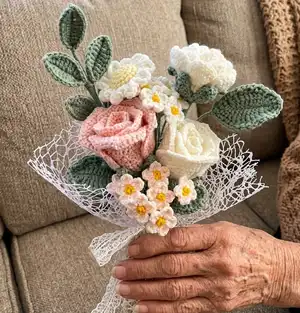
Make a charming crochet flower bouquet using simple 4-ply yarn and small hooks. This pattern collection includes step-by-step instructions for tulips, roses, daisies, baby daisies and leaves so you can recreate the exact bouquet shown. You can change colors and wire placement to make a unique arrangement every time. Perfect for handmade gifts, home decor, or practice with shaping and wire stems.

Intermediate 12-15 Hours

Materials Needed for Flower bouquet C Crochet Pattern

β€” Main Fabric

  • 01
    4-ply yarn (also called fingering/sock weight) - cotton recommended for a crisp finish
  • 02
    Cotton yarn of your preference (4 ply) - multiple colors for petals and leaves (approx 10-50g per color depending on how many flowers you make)
  • 03
    Milk yarn or acrylic yarn can also be used (adjust hook size accordingly)
  • 04
    Small amounts of contrasting yarn for flower centers (yellow for daisy centers)
  • 05
    Fibrefill or cotton for filling the daisy centers (small pinch per flower)

β€” Tools Required

  • 01
    Crochet hook size 2-2.5mm
  • 02
    Thin wire (around 0.6mm) for leaves and petals (moldable)
  • 03
    Thicker wire or wooden stick (around 2mm) for stems or wooden skewers
  • 04
    Hot glue gun (glue)
  • 05
    Scissors
  • 06
    Yarn needle for sewing and finishing
  • 07
    Pins for temporary placement while assembling
  • 08
    Small amount of fibrefill or cotton for daisy centers

Progress Tracker

0% Complete

β€” Materials & Notes :

Info :

Use 4ply yarn and a 2-2.5mm hook for similar sizing. Thin wire is recommended for leaves and petals that need shaping; thicker wire or a wooden stick is used for stems. Hot glue is used for assembly. The color of yarn is up to you and will change the bouquet look.

β€” Tulips :

Small petals (x3) :

R1: Chain 12.

Round 2 :

R2: (add wire) sk, sc, hdc, 7dc, hdc, w, hdc, 7dc, hdc, sc

Round 3 :

R3: 23 sc, sl, FO

Big petals (x3) :

R1: chain 13

Round 2 :

R2: sk, 11 sc, w, 11 sc

Round 3 :

R3: (add wire) sc, hdc, 9dc, hdc, w, hdc, 9dc, hdc, sc

Round 4 :

R4: 27sc, sl, FO

Big leaf :

R1: chain 31

Round 2 :

R2: (add wire) sk, 3 sc, 3 hdc, 18 dc, 3 hdc, 2 sc, w, 2sc, 3 hdc, 18 dc, 3hdc, 3 sc, sl, FO

Info :

Start sticking with glue around the stick the small petals, and then add the bigger ones, in a circular way. Add the leaf in the down part of the stick, and roll yarn around the stick to secure the leaf and make the stem look more natural.

β€” Daisy flower :

Center of the flower :

R1: 6 sc magic ring

Round 2 :

R2: 6 inc

Round 3 :

R3: 12 sc and FO

Info :

Make one yellow and with the same steps make a green one for the back of the flower, to connect with the stem. You will have to connect both and stitch it together; before completely closing the stitch add some fibrefill or cotton to fill the inside of the center.

Petals :

(3 ch, dc, 3 ch, sl st) Rep 12. There will be 12 petals in total.

Info :

Connect the wire or wooden stick to the flower depending on how you want to put the daisies; you can put the stem right in the middle of the center in the back of the flower or between two centers. Both ways look good. Roll yarn over the stem to make it look more realistic.

β€” Baby daisy flower :

Baby daisy :

R1: 5 sc magic ring

Round 2 :

R2: (2 ch, 3 dc, 2 ch) Rep 5 times

Info :

The center of the flower just pass the yarn making some stitches in the center. You can make a few baby daisies and connect them to a wire or wooden stick rolling green yarn to make the stem. Add blush or slight color gradient if desired.

β€” Rose flower type 1 :

Flower petals :

R1: chain 53

Round 2 :

R2: 52 sc

Round 3 :

R3: chain 5, dc, sk2, to begin with. The rest rep (dc, 2ch, dc) sk2 until the end. The part inside of the parenthesis has to be worked in the same stitch

Round 4 :

R4: chain 3, in the next hole work (2dc, 2ch, 2dc); Work on the hole of the upper part (2dc, 2ch, 2dc) Rep until the end

Round 5 :

R5: *ch 1, and in the hole of the upper part work 8dc. In the next hole work 1 sc. And repeat from* until the end and sl, FO.

Info :

To finish the rose, roll it up starting with the first chain at the center of the rose, then stick it together with glue. Roll tightly or loosely depending on desired fullness.

Flower bottom :

R1: (3 ch, 20 dc, sl st) magic ring

Round 2 :

R2: 8ch, ((sk, 2sc, 2hdc, 2dc, 1 tc) on chain) sk3, sl st Repeat 5 times and sl, FO, making a similar to star figure to put in the bottom of the rose.

Rose leaf :

R1: 12ch, sk, sc, hdc, 7dc, hdc; on the other side of the chain: w, hdc, 7dc, hdc, sc

Round 2 :

R2: (add wire), sc, 2ch. Rep until reached the end and sl, FO.

β€” Rose flower type 2 :

Small petal (x4) :

R1: 10 dc magic ring

Round 2 :

R2: 10 hdc inc

Round 3 :

R3: 6 sc, 8 hdc inc, 6 sc

Midi petal (x4) :

R1: 10 dc magic ring

Round 2 :

R2: 10 hdc inc

Round 3 :

R3: (2 sc, sc inc) rep

Round 4 :

R4: 8 sc, 9 hdc inc, 9 sc

Big petal (x5) :

R1: 10 dc magic ring

Round 2 :

R2: 10 hdc inc

Round 3 :

R3: (hdc, hdc inc) rep

Round 4 :

R4: 8 sc, 6 hdc inc, (hdc, dc in same st), 3 ch, (dc, hdc in same st), 6 hdc inc, 8 sc

Flower bottom :

R1: 6 sc magic ring

Round 2 :

R2: 6 inc

Round 3 :

R3: 6 (sc, inc)

Round 4 :

R4: 18 sc

Round 5 :

R5: [9 ch, (sk1 backward, 2 sl st, 2sc, 2 hdc, dc, tc in chain), sk 2, sl st] rep 6 times.

Rose leaf :

R1: 12ch, sk, sc, hdc, 7dc, hdc; on the other side of the chain: w, hdc, 7dc, hdc, sc

Round 2 :

R2: (add wire), sc, 2ch. Rep until reached the end and sl, FO.

β€” Leafs :

Leaf :

R1: Chain 12

Round 2 :

R2: (add metallic wire to secure the position) sk, sc, hdc, dc, 5 tc, dc, hdc, w, hdc, dc, 5 tc, dc, hdc, sc, sl, FO.

Info :

Make 5 or 7 leaves depending on desired branch size, and connect them to a wooden stick to create stems. Roll yarn over the wooden stick to make it more realistic. Pin parts before gluing for accurate placement.

β€” Assembly & Finishing :

Info :

Attach petals to the stick with hot glue in the order indicated in each flower section, starting with smaller petals then larger ones for a layered look. Add back pieces (like daisy green backing) and stuff centers before closing. Wrap yarn around stems to cover and secure wire, and arrange bouquet before final gluing and trimming.

Assembly Instructions

  • Start sticking tulip petals around the stick using hot glue: attach small petals first, then glue the bigger petals in a circular way to form the bloom.
  • Connect the daisy front (yellow center) to the green back center by stitching them together, add a small pinch of fibrefill, then insert and secure the stem through the back center.
  • Roll up rose petals starting at the chain edge, glue the rolled rose base to the flower bottom (star shape) and secure to the stem with glue and wrapped yarn.
  • Attach leaves to stems by placing the wired leaf on the wooden stick, securing with glue, then roll yarn around the stem to hide wires and create a natural-looking stem.
  • Arrange flowers into a bouquet and secure with ribbon or lace; use small amounts of glue to hold clusters in place while preserving shape.

Important Notes

  • πŸ’‘Use a 2-2.5mm crochet hook with 4-ply yarn to achieve the sizing shown and maintain consistent tension for crisp petals.
  • πŸ’‘Add thin wire inside petals and leaves when instructed to make them moldable and able to hold shape; secure wire ends inside the base before finishing.
  • πŸ’‘Work petals and assembly on a clear workspace; pin parts in place before gluing to ensure symmetrical placement and easy adjustments.
  • πŸ’‘Stuff daisy centers lightly with fibrefill before closing to give a rounded center; avoid overstuffing which will distort petals.

This pattern pack gives you all the pieces to create a beautiful, long-lasting crochet bouquet that can be gifted or used as decor. Mix colors, add blush, and play with stem lengths to craft a truly unique arrangement. Enjoy the slow, satisfying process of building each bloom by hand and displaying your finished bouquet with pride. 🌸🧢

You ask,

we answer.

FAQs

What size will the finished bouquet be?

Size varies depending on yarn and stem length, but individual flowers are roughly 4-10 cm across using 4-ply yarn and a 2-2.5mm hook; bouquet height depends on chosen stems.

Can I use different yarn weights for these flowers?

Yes, you can use different yarn weights but final size will change; use an appropriate hook for your yarn and expect a chunkier look with thicker yarn or smaller delicate flowers with finer yarn.

Do I need experience with wire and assembly?

Basic experience with inserting and wrapping wire helps but instructions guide you where to add wire; practice on one flower first to build confidence before full assembly.

How long does it typically take to make the bouquet?

This is a multi-day project; expect around 12-15 hours total to crochet multiple flowers and assemble the bouquet, depending on speed and number of flowers included.