๐Ÿงถ Beautiful โœจ Detailed ๐Ÿ’ Adorable

Groot Amigurumi Pattern

Groot Amigurumi Pattern
4.9โ˜… Rating
5-7 Hours Time Needed
3.8K Made This
โœ‚๏ธ

Intermediate Level

Ideal for those with basic crochet experience, featuring slightly more advanced stitches and techniques to expand your skills.

โฑ๏ธ

Weekend Treat

Takes 5-7 hours, making it an enjoyable project to finish over a couple of days.

๐Ÿงธ

Cute Companion

An adorable friend to cherish, handcrafted with love to bring comfort and joy for years to come.

About This Groot Amigurumi Pattern

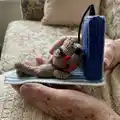
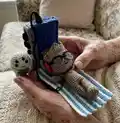
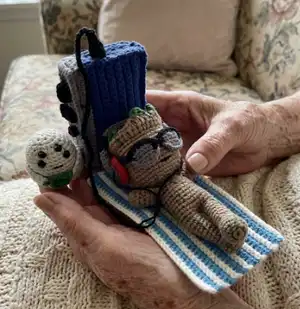
This pattern creates a small, poseable Groot amigurumi complete with a crown of little leaves, embroidered veins and tiny headphones. You will crochet legs, join them to form the body, continue to the head and finish with decorative embroidery and accessories. The instructions include every round and clear assembly photos to guide you through finishing touches.

Groot Amigurumi Pattern crochet pattern - detailed view of completed project

Includes materials list, abbreviations and step-by-step rounds for each part. Great for making a thoughtful handmade gift or collector piece.

Why You'll Love This Groot Amigurumi Pattern

I absolutely love this pattern because it captures Groots personality in a tiny, charming form that is fun to stitch. I enjoy the small-scale detailing like the embroidered veins and crown leaves, which really bring the character to life. The headphones and accessories add a playful, modern twist that makes each finished toy unique. I also appreciate how the pattern walks you through attaching parts and finishing details โ€” it feels rewarding at every step.

Groot Amigurumi Pattern step 1 - construction progress Groot Amigurumi Pattern step 2 - assembly progress Groot Amigurumi Pattern step 3 - details and accessories Groot Amigurumi Pattern step 4 - final assembly and finishing

Switch Things Up

I love customizing this pattern by changing yarn colors and stitch textures to create different variations.

I often swap the brown body yarn for a warmer or cooler shade to see how it changes the character's mood.

If you want a chunkier Groot, I use a bulkier yarn with a larger hook to create a cuddlier version.

For a keychain sized Groot, I pick a thinner yarn and a smaller hook to miniaturize the pattern and keep all rounds identical.

I add tiny accessories like scarves, tiny crocheted flowers, or mini sunglasses to personalize each finished piece.

Try embroidering different vein patterns with contrasting thread colors for playful detail variations.

I sometimes replace the plastic safety eyes with embroidered eyes for a softer, child-friendly toy finish.

To alter poseability, I add a flexible wire core to the arms or legs so I can bend limbs into fun poses.

If you prefer a simpler finish, skip the headphones and embroider a cute leaf crown only, or swap the headphones for a tiny scarf accessory.

Experiment with surface slip stitches or back-loop-only rows to add texture to the body or crown for a handcrafted, rustic look.

Common Mistakes & How to Fix Them

โœ— Skipping stitch markers during joins can cause misaligned legs and body seams; place markers at the start of joins and count stitches carefully before attaching to keep symmetry. โœ— Not stuffing while crocheting results in lumps or gaps when shaping the head and body; stuff gradually while working and check shape frequently for smooth results. โœ— Using incorrect hook size will change the gauge and final size of the amigurumi; use the recommended 2.5mm hook for the same stitch density or adjust yarn/hook consistently. โœ— Forgetting to place safety eyes before closing rounds makes installation difficult; insert the safety eyes in row 37 with five stitches between them before finishing the head. โœ— Cutting thread too short at the end of pieces makes sewing parts harder; leave long tails (4โ€“8 inches) for sewing and weaving in ends comfortably.

Groot Amigurumi Pattern

Crochet your own adorable Groot amigurumi, complete with crown leaves, embroidered details and tiny headphones. This pattern walks you through each piece step by step so you can shape legs, body, head, arms and accessories with confidence. Ideal for crafters who enjoy small, detailed amigurumi projects and playful finishing touches.

Intermediate 5-7 Hours

Materials Needed for Groot Amigurumi Pattern

โ€” Main Fabric

  • 01
    #2 fine yarn (55% cotton + 45% acrylic), 180 yds / 1.76 oz per skein; colors: brown (main body)
  • 02
    Green yarn for leaves and embroidery (small amount)
  • 03
    Red yarn for headphones (small amount)
  • 04
    Black yarn for smile and headphone details (small amount)
  • 05
    Blue, gray, light gray, white, azure (optional accent colors as desired)
  • 06
    Two 9mm black plastic safety eyes (for main eyes) and four 6mm safety eyes (extra or alternative use)

โ€” Tools Required

  • 01
    Crochet hook size 2.5mm
  • 02
    Small steel hook 1.40mm (for very fine embroidery like smile)
  • 03
    Yarn needle for sewing and embroidery
  • 04
    Scissors
  • 05
    Stitch markers
  • 06
    Polyester stuffing/filler
  • 07
    Pins for assembly and positioning

Progress Tracker

0% Complete

โ€” Legs :

Round 1 :

6sc in MR (6)

Round 2 :

6inc (12)

Round 3 :

12sc BLO (crochet in the back loop of the stitches) (12)

Round 4-5 :

12sc (2rows) (12)

Round 6 :

dec, 4sc, dec, 4sc (10)

Round 7 :

dec, 8sc (9)

Round 8-14 :

9sc (7rows) (9)

Round 15 :

8sc, slst (8)

Info :

Do not forget to fill the toy with filler while knitting. We do not cut the threads from the second leg, we continue to knit the body.

โ€” Body :

Round 16 :

2ch, attach the first leg 9sc, 2sc by ch, 9sc on the second leg, 2sc by ch (22)

Round 17-25 :

22sc (9rows) (22)

Round 26 :

(3sc, dec)*4, 2sc (18)

Round 27 :

(1sc, dec)*6 (12)

Round 28 :

12sc (12)

Info :

Do not forget to fill the toy with filler while knitting. We continue to knit the head.

โ€” Head :

Round 29 :

12inc (24)

Round 30 :

(1sc, inc)*12 (36)

Round 31-32 :

36sc (2rows) (36)

Round 33 :

(5sc, inc)*6 (42)

Round 34-41 :

42sc (8rows) (42)

Info :

Insert eyes in row 37, 5sc between the eyes.

Info :

Check that everything is exactly and you like it and only then put on the puck. Do not forget to fill the toy with filler while knitting.

Round 42 :

(5sc, dec)*6 BLO (36)

Round 43 :

(4sc, dec)*6 (30)

Round 44 :

(3sc, dec)*6 (24)

Round 45 :

(2sc, dec)*6 (18)

Round 46 :

(1sc, dec)*6 (12)

Round 47 :

6dec (0)

Info :

Cut and hide the thread.

โ€” Crown :

Info :

Return to the 42nd row, FLO (crochet in the front loop of the stitches).

Round 43 :

2ch, 42hdc, slst (42)

Round 44 :

ch, 11sc, 4hdc, 6dc, 2ch, slst into the next stitch, 2ch, 3dc, 1hdc, 16sc, slst (41)

Info :

Tie and hide excess threads.

Item Name (P1) :

Insert the green thread into the 17th loop of the 44th row of the crown. 2ch, 2dc, 1hdc. Tie and hide excess threads.

Item Name (P2) :

Insert the thread again in the 44th row in the 22nd loop from the beginning of the row. 2ch, 1hdc, 1sc. Cut and hide the threads.

Item Name (P3) :

Once again, insert the thread now into the 29th loop of the 44th row of the crown. 2ch, 1hdc, 1sc. Tie and hide excess threads.

โ€” Arms :

Round 1 :

5sc in MR (5)

Round 2 :

5sc (5)

Round 3 :

inc, 4sc (6)

Round 4 :

6sc (6)

Round 5 :

inc, 5sc (7)

Round 6 :

7sc (7)

Round 7 :

inc, 6sc (8)

Round 8-14 :

8sc (7rows) (8)

Info :

Fill the lower part of the arm to the 8th row, then fold and hold the 8th row to fill the upper part of the arm.

Round 15 :

Fold the edges together and knit 3sc. Cut off the thread, leaving 4 inch for sewing. With another thread of the same color, sew the 8th row, tie and hide the extra threads.

Info :

Sew on arms in row 26, tie and hide excess threads.

โ€” Smile :

Info :

Smile: black. Divide a large piece of yarn into two thinner threads. Then divide the thin thread into two more thin threads. We knit with the thinnest single thread. Hook 1.40mm. 1) 5ch.

Info :

Cut off the thread, leaving 4 inch for sewing. Sew on a smile in the 33rd row, tie and hide the extra threads.

โ€” Decorations :

Info :

Decorations: green. Divide a large piece of yarn into two thinner threads. Embroider the decoration as shown in the pictures. Then one of the separated threads is divided again into two thinner threads. Use a single thread to embroider thin jewelry as shown in the pictures.

Info :

Divide a large piece of yarn into two thinner threads. Mark and embroider eyebrows.

โ€” Headphones (black/red) :

Round 1 :

6sc in MR (6)

Round 2 :

At the beginning change color to red 6inc (12)

Round 3 :

(1sc, inc)*6 (18)

Round 4 :

18sc (18)

Round 5 :

(1sc, dec)*6 (12)

Round 6 :

6dec (0)

Info :

Cut and hide the threads.

โ€” Headphones part 2 (gray) :

Round 1 :

33ch, turn (33)

Round 2 :

32sc, ch, turn (32)

Round 3 :

32sc (32)

Info :

Cut off the thread, leaving 8 inch for sewing. Fold the first row to the third and sew along the entire length. Then sew the second part of the headphones to the first and to the head. Do as shown in the pictures.

Info :

Insert the thread into the rim of the headphones and embroider about 0.3 inches. Then tie and hide the extra threads.

โ€” Final Assembly :

Info :

Sew on arms in row 26, tie and hide excess threads. Pin arms in place before sewing to ensure correct position.

Info :

Pin and sew the hands to the head as shown in the pictures, then hide all extra threads.

Info :

Insert safety eyes in row 37 with 5sc between, secure backs and then continue stuffing and closing head.

Info :

Embroider eyebrows, veins and decorations with divided green thread according to the photos, tie and hide ends.

Assembly Instructions

  • Attach legs to form the body by crocheting them together at round 16: 2ch then pick up 9sc from first leg, 2sc along chain, 9sc on second leg and 2sc along chain so seams are even and secure.
  • Insert safety eyes in row 37 with 5sc between the eyes; secure the safety backs and adjust placement before stuffing the head firmly.
  • Sew arms to the body at row 26, pinning carefully to get symmetrical placement; tie and hide excess threads after stitching.
  • Pin and sew the folded hands to the head area as shown in the photos; use the long tails left when finishing the hands for neat sewing.
  • Sew headphone cups to the sides of the head and attach the folded gray strap to form the headband; embroider rim and small details as described then hide ends.

Important Notes

  • ๐Ÿ’กUse stitch markers to mark the beginning of rounds and the position for attaching legs, arms and eyes for consistent placement.
  • ๐Ÿ’กStuff the toy gradually while crocheting โ€” especially the head and body โ€” to maintain smooth shaping and avoid lumps.
  • ๐Ÿ’กInsert safety eyes before closing the head (row 37) and ensure placement matches the photos (5sc between eyes).
  • ๐Ÿ’กLeave long tails (4โ€“8 inches) when finishing pieces so you have enough length for sewing pieces together securely.

This cheerful Groot amigurumi is a joyful project that combines simple shaping with playful accessories and embroidered details. It makes a thoughtful handmade gift or a cute shelf companion to brighten up any room. Happy crocheting and enjoy every stitch of this little tree friend! ๐ŸŒฑ๐Ÿงถ

You ask,

we answer.

FAQs

What size will the finished piece be?

The finished amigurumi measures approximately 12โ€“15 cm tall depending on your tension and yarn choice when using the recommended #2 fine yarn and 2.5mm hook.

Can I use different yarn weights for this pattern?

Yes, you can use different yarn weights but this will affect the final size; adjust your hook size accordingly and expect a larger or smaller finished doll.

Do I need prior crochet experience for this pattern?

This pattern is rated intermediate because it includes joining legs to form the body, front/back loop work, embroidery and small accessory construction; basic amigurumi experience is helpful.

How long does this project typically take to complete?

Most crocheters complete this project in 5-7 hours, depending on experience level and how much time you spend on embroidered details and accessories.