🧢 Beautiful ✨ Detailed πŸ’ Adorable

Granny shoulder bag Pattern

Granny shoulder bag Pattern
4.6β˜… Rating
5-7 Hours Time Needed
1.1K Made This
βœ‚οΈ

Advanced Level

Designed for experienced crocheters, these patterns involve intricate designs and complex techniques to challenge and inspire.

⏱️

Weekend Treat

Takes 5-7 hours, making it an enjoyable project to finish over a couple of days.

✨

Stylish Touch

An elegant detail to elevate any look, combining traditional techniques with contemporary design sensibilities.

About This Granny shoulder bag Pattern

This pattern creates a roomy granny square shoulder bag constructed from 13 decorative granny squares. The design uses Rainbow cotton 8/4 and features popcorn rounds for a textured center and neat cream edging for a cohesive look. It includes full instructions for each square, joining and finishing the bag.
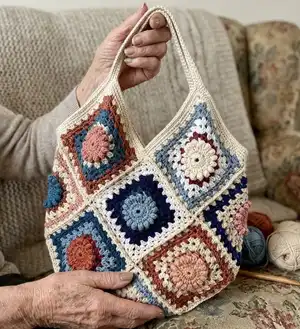
Granny shoulder bag Pattern crochet pattern - detailed view of completed project

You will learn the popcorn stitch, crab (shrimp) edging and a simple joining method. The pattern includes sizes, gauge and stitch glossary for clarity.

Why You'll Love This Granny shoulder bag Pattern

I absolutely love this pattern because it combines classic granny square techniques with textured popcorn centers for a fresh modern look. I enjoy the relaxed, diagonal composition which gives the bag a flattering drape and visual movement. The palette and cream edging are designed to make every color pop while keeping the bag wearable. Making the squares is meditative and the finishing steps bring everything together into a beautiful, functional accessory.

Granny shoulder bag Pattern step 1 - construction progress Granny shoulder bag Pattern step 2 - assembly progress Granny shoulder bag Pattern step 3 - details and accessories Granny shoulder bag Pattern step 4 - final assembly and finishing

Switch Things Up

I love experimenting with color order to give each bag a different mood; try soft pastels for a spring look or deep jewel tones for a richer feel.

I often change the yarn weight and hook to create different sizes β€” use a bulkier yarn and larger hook for a roomy market tote, or finer yarn for a delicate mini bag.

I sometimes add a cotton fabric lining with an inner pocket for added structure and to protect small items; a lightweight interfacing helps too.

You can swap the chain-60 handles for shorter leather or wooden handles for a different aesthetic and improved durability.

Try alternative joining methods like whipstitch or mattress stitch if you prefer a less visible seam than slip stitch joining.

I like to add additional rounds of single crochet around the whole bag for extra reinforcement if I plan to carry heavier items.

Mix and match popcorn centers with flat round centers to vary texture across your set of squares and create visual interest.

Personalize the bag by embroidering small motifs on a few squares or by adding tassels and pompoms to the corners for a playful finish.

If you want a fold-over flap, plan an arrangement of squares to form the flap and join only three sides so you can fold the top over and add a button or magnetic snap.

When changing colors frequently, I recommend weaving in ends as you go to keep the finishing quick; I also use small safety pins to hold color tails temporarily while joining.

Common Mistakes & How to Fix Them

βœ— Skipping the magic loop in round 1 can leave a large hole in the center; start with a proper magic loop and pull it tight before closing the first round. βœ— Forgetting to slip stitch into the third starting chain at the end of rounds will change your stitch count; always finish rounds exactly as written and count stitches after each round. βœ— Not matching reverse sides when joining squares can make the bag look uneven; place squares with reverse sides matching and join using slip stitch in the ch-space of both to keep seams neat. βœ— Overstuffing or stretching the cream edge while joining will distort the bag shape; maintain even tension and block squares if needed before joining to preserve shape.
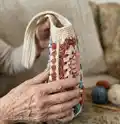
Granny shoulder bag Pattern

Create a beautiful boho-inspired shoulder bag made from 13 colorful granny squares. This pattern guides you through popcorn stitches, joining techniques and finishing touches so you can make a sturdy, stylish everyday bag. Perfect for makers who love texture and color play.

Advanced 5-7 Hours

Materials Needed for Granny shoulder bag Pattern

β€” Main Fabric

  • 01
    Rainbow cotton 8/4 (Hobbii.it) 100% cotton – 1.76 oz (136 yd) per ball; use 1 ball in each color
  • 02
    Use 2 balls of color 04 (cream) for edging and joining
  • 03
    Color 07 – Rainbow Deluxe 8/4 (used as an accent color in sample)

β€” Tools Required

  • 01
    Crochet hook US C-2 (2.75 mm)
  • 02
    Scissors
  • 03
    Yarn needle for sewing in ends and joining
  • 04
    Stitch markers (optional)
  • 05
    Pins for blocking (optional)
  • 06
    Measuring tape

Progress Tracker

0% Complete

β€” Supplies :

Info :

Yarn: Rainbow cotton 8/4 (Hobbii.it) 100% cotton– 1,76 oz (136 yd)- 1 ball in each color- 2 balls in 04. color 07- Rainbow Deluxe 8/4. Hook US C-2

β€” Sizes :

Info :

Height 22". Width 16" about.

β€” Gauge :

Info :

4" x 4" = 27 st x 34 rows

β€” Abbreviations and Glossary (US terms) :

Infos :

st stitch. ch chain. dc Double crochet. slst Slip stitch. sp space.

β€” Stitches :

Info :

5dc popcorn: work 5 dc into the same place, drop off hook, insert hook into first dc, pick up dropped loop and draw through.

Info :

Crab stitch or reverse single crochet: it works from left to right. Insert your hook into the same st you just worked into. YO and draw through the st. There are 2 loops on your hook. YO again and draw the yarn through both loops on the hook. You will have 1 loop on your hook when your first crab stitch is complete. Work 1 crab st into each sc to the right.

β€” How to do :

Info :

Follow the chart provided for visual stitch placement. Symbols: start, slst, ch, dc, 5dc popcorn.

β€” Granny Square :

Round 1 :

Start a magic loop ch3, 15 dc, slst in the third starting chain. [16 dc]

Round 2 :

Ch3, 1 dc into the ch base, 2 dc in each stitch of round 1, slst in the third starting ch. [32 dc]

Round 3 :

Ch3, *5dctog (popcorn), 1dc* rep. from* 15 times, 5dctog, slst into 3rd starting ch. [16 popcorns]

Round 4 :

Ch1, 1 sc into 3rd ch of round 3, *ch2, skip the first popcorn, 1 sc* rep from* 15 times, ch2, slst into 3rd starting ch.

Round 5 :

Ch3, 2 dc into the same Ch2-sp, ch1 *3 dc into the next ch2-sp, ch1* rep from * to * 15 times, slst into 3rd starting ch.

Round 6 :

[ch3, 2 dc, ch3, 3 dc] into the same ch1-sp, *ch1 3dc, ch1, 3 dc, ch1, 3 dc, ch1, [3 dc, ch3, 3 dc] in the same ch sp,* rep from * 3 times, ch1, 3 dc, ch1, 3 dc, ch1, 3 dc, ch1, slst into 3rd starting ch, 3 slst to arrive into ch sp.

Round 7 :

rep round 6, increasing one group of 3 dc in each side of the square.

Round 8-9 :

rep round 6

Info :

Color 04 (cream) for each granny square. Use cream for outer rounds and joining to give a unified look.

Round 10 :

rep round 6

Info :

Make 13 granny squares.

β€” Make Squares :

Info :

Work each square in the color order you choose. The sample uses a palette of blues, old rose and red brown accents with cream outer rounds.

β€” Finishing :

Info :

Following the image above, join squares together. I joined them putting squares with reverse sides matching and working a slst in the ch-sp of both, and 3 ch.

Info :

Then make 3 SC rows along the inner edges of both sides as show in the image below, and finish with a shrimp stitch row.

Info :

Repeat the same process for the opposite side.

Info :

Now work in the same way the outer sides, making ch60 for both handles. Then make 3 rounds working single crochet.

Info :

Weave in ends, block squares if desired, and secure handles; bag is complete.

Assembly Instructions

  • Following the diagram, join the 13 granny squares placing squares with reverse sides matching, work a slip stitch in the ch-space of both squares and chain 3 where shown to form seams.
  • After joining the main body squares, make 3 rows of single crochet along the inner V-shaped edges on both sides, then finish those inner edges with a crab (shrimp) stitch row for a neat reinforced finish.
  • Repeat the inner edge finishing on the opposite side so both handles openings are even and symmetrical before working the outer sides.
  • For the outer sides create handles by chaining 60 for each handle, then work 3 rounds of single crochet around the edge and handles to strengthen and tidy the bag opening.

Important Notes

  • πŸ’‘Use the cream color (color 04) for the final rounds of every granny square to make a unified edge and simplify joining.
  • πŸ’‘Place squares with reverse sides matching before joining to ensure consistent appearance on the outside of the bag.
  • πŸ’‘Maintain even tension when joining and when working the handle chains to avoid distorted edges and uneven handle lengths.

This Granny shoulder bag is a joyful blend of texture and color, perfect for everyday use or as a handmade gift. The popcorn centers and cream borders create a timeless handmade look you will love to carry. Make it your own by changing the palette or adding a lining for extra structure. πŸ§Άβœ¨πŸ‘œ

You ask,

we answer.

FAQs

What size will the finished piece be?

The finished bag measures approximately 22" high and about 16" wide when using the recommended yarn and hook size.

Can I use different yarn weights for this pattern?

Yes, you can substitute yarn weights, but the finished size will change; choose an appropriate hook for your yarn and make a gauge square to adjust accordingly.

Do I need prior crochet experience for this pattern?

This pattern is rated advanced, so experience with popcorn stitches, joining granny squares and finishing techniques like crab stitch is recommended.

How long does this project typically take to complete?

Most crocheters complete this project in 5-7 hours, though time may vary based on experience level, color changes and finishing details.