🧢 Beautiful ✨ Detailed πŸ’ Adorable

Goose Mittens Pattern

Goose Mittens Pattern
4.5β˜… Rating
5-7 Hours Time Needed
3.5K Made This
βœ‚οΈ

Beginner Friendly Level

Perfect for those just starting their crochet journey, with clear instructions and simple techniques

⏱️

Weekend Treat

Takes 5-7 hours, making it an enjoyable project to finish over a couple of days.

🧣

Snug Essential

Everyday comfort with practical charm, designed for both functionality and style through changing seasons.

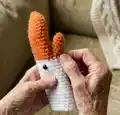
About This Goose Mittens Pattern

This pattern teaches you how to crochet cozy Goose Mittens from the top down in the round using two strands of worsted weight yarn. You will shape the mitten, create a thumb hole and build the thumb, then add simple eyes for the goose look. The design is meant to be customizable so you can make any teen or adult size with straightforward adjustments.

Goose Mittens Pattern crochet pattern - detailed view of completed project

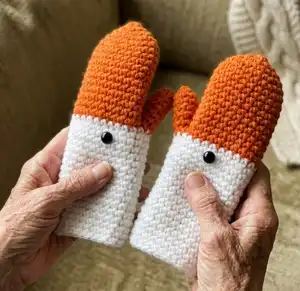
The mittens are worked in a spiral (no joining at the end of rounds) and are ideal for crafters who want a quick, satisfying project. Use the recommendations for color changes and placement to create the signature goose face.

Why You'll Love This Goose Mittens Pattern

I absolutely love this pattern because it combines quick construction with a playful, memorable finish that everyone will notice. I enjoy how easily it scales to different hand sizes by adding or reducing roundsβ€”no complex math required. The two-strand technique gives a plush, durable fabric that feels great to wear, and I always enjoy adding the little goose eyes that make the mittens come alive. Making this pair is a satisfying, cozy project that still leaves room for personalization and creativity.

Goose Mittens Pattern step 1 - construction progress Goose Mittens Pattern step 2 - assembly progress Goose Mittens Pattern step 3 - details and accessories Goose Mittens Pattern step 4 - final assembly and finishing

Switch Things Up

I love how easy it is to customize these mittens by changing color placement and eye style to create different characters or animals.

I sometimes swap the orange for a pale pastel and the white for a cream to make a softer, vintage-looking pair.

If you want a bulkier mitten, I use a bulkier yarn held as a single strand and increase the hook size for a chunky result.

For mini or child sizes, I use sport or DK weight yarn with a smaller hook and reduce the number of rounds to fit smaller hands.

I often embellish the wrist with a ribbed cuff by working front- and back-loop single crochet rows after finishing the body rounds.

Try using embroidered details instead of safety eyes for a fully washable mitten suitable for kids or gifts.

I sometimes add a trim row of slip stitches in a contrast color between the orange and white to make the transition crisp and decorative.

For a more realistic goose face, experiment with crocheted small circles for eyes and a little embroidered beak on the orange tip.

I recommend testing the thumb hole size before closing the thumb; you can chain an even number greater than 6 for a larger thumb opening if needed.

I also like to make matching sets by pairing these mittens with a simple hat worked in two strands for a cohesive gift set.

Common Mistakes & How to Fix Them

βœ— Using only one strand of yarn while the pattern specifies two strands; use two strands held together to match fabric thickness and gauge. βœ— Making the thumb chain too loose or too tight when forming the thumb hole; aim for a chain that sits comfortably across the thumb opening and test fit before fastening off. βœ— Skipping the color change technique carefully; slip stitch and begin the next round in the proper stitch to avoid a visible gap, then continue sc around as instructed. βœ— Forgetting to weave in the magic ring end after round 3; weave in the magic ring end to secure the start and prevent the opening from loosening. βœ— Not checking mitten width before continuing up the hand; try the mitten on or measure against the wearers hand and add or remove shaping rounds as needed for correct fit.

Goose Mittens Pattern

Make a pair of whimsical Goose Mittens with an easy top-down crochet approach. This beginner-friendly pattern uses two strands of worsted yarn held together for a warm, textured finish and is fully customizable to fit teens and adults. You will work the mittens in the round, create a thumb opening, and finish with cute goose eyes for personality. Perfect for handmade gifts or cozy season-ready accessories.

Beginner Friendly 5-7 Hours

Materials Needed for Goose Mittens Pattern

β€” Main Fabric

  • 01
    Worsted weight yarn (#4) Orange - 1 skein (364 yards) (Using two strands at once)
  • 02
    Worsted weight yarn (#4) White - 1 skein (364 yards) (Using two strands at once)

β€” Tools Required

  • 01
    Yarn needle
  • 02
    12mm flat back safety eyes (or black buttons) - choose size that looks best for your sized mitten (test mittens are teen/women's small)
  • 03
    J-6mm crochet hook

Progress Tracker

0% Complete

β€” Sizes :

Info :

Custom sizing (Gauge not necessary)

Info :

Gauge: 20 sts X 1 rows = 20"

Info :

Level: beginner

β€” Measurements :

Info :

Custom sizing, this pattern will show you how to make any young teen/adult size you need! (You can experiment using a smaller hook size and a lighter weight yarn to make mittens for small children)

β€” Abbreviations :

Infos :

FO - fasten off. MR - Magic Ring. ch - Chain. dec - decrease. inc - increase. rep - repeat. sc - single crochet. st - stitch. sts - stitches.

β€” Materials :

Infos :

1 skein (364 yards) of worsted weight yarn in orange (Using two strands at once). 1 skein (364 yards) of worsted weight yarn in white (Using two strands at once). Yarn Needle. 12mm flat back safety eyes (or black buttons) 'You will want to choose as size that looks best for your sized mitten, the test mittens are a size teen/women's small'. J-6mm hook.

β€” Before we begin :

Info :

These mittens will be made to fit the wearers hands. You will be creating these mittens from the top down in the round. At the end of the round, you will not be joining stitches (It is worked in a spiral, as done in amigurumi projects). Afterwards, you will create the thumb while attaching it to the glove.

β€” Making the Top of the Mitten :

Info :

With 2 Strands of Orange:

Round 1 :

Start 10 sc in a magic ring (10)

Round 2 :

Sc around (10)

Round 3 :

Sc around (10) 'Weave in magic ring end'

Round 4 :

Inc in each st around (20)

Info :

See how the glove is fitting so far, if you have medium to large size hands, you may want to do several more rounds of (sc in st, inc in next) repeat around

Round 5-14 :

Sc around (20)

Info :

After reaching the proper width for your hand, continue to make rounds of sc until the glove reaches the crook of your hand. (If you slip on the mitten, it should be just touching the space in between your thumb and index finger)

Round 15 :

Thumb hole round: Sc in the first stitch of the round, chain 6* 'not too loose or tight', skip the next two stitches in the round and sc in the next st. Sc around until you get back to that first stitch that had the chain 6. Fasten off, weave ends.

Info :

Note: You can chain more stitches in an even number to create a larger thumb hole

β€” Making the Lower Hand and Wrist of the Mitten :

Info :

With 2 Strands of White:

Round 16 :

Slip st and then sc into that same st 3 sts away from the thumb hole. (You can choose anywhere in the round if you would like, this color change will be hardly visible.) Sc around. (24)

Round 17 :

You may notice a gap at the beginning of this next round from where the color change happened. We are going to start this next round without any joining, just sc in the first stitch (skip the slip st) and sc around. (24)

Round 18 :

Sc around (24)

Info :

Note: From here on forward with the pattern, you can continue to sc around without any decreasing to have looser fitting mittens. Or, you can choose to shape them by decreasing as they go down your hand and your wrist for a snug fit. (Test mittens are made with a snug fit). So, wherever you see fit to make the mitten tighter, repeat for each round (Sc in 2sts, decrease in next st)

Round 19 :

(Sc in 2sts, decrease in next) (18)

Round 20-28 :

Sc around (18)

Info :

Fasten off. You can add some ribbing to the end of the mitten if you wish.

β€” Making the Thumb :

Info :

With 2 Strands of Orange: Flip glove inside out, and you will be crocheting from the inside of the circle (See image)

Info :

Slip st yarn into any chain around the thumb hole. Sc in the same st. Then in traditional and non-traditional spaces, work 12 sts around. (12)

Round 2-3 :

Sc around

Info :

See how the thumb hole is fitting so far, if you have medium to large size hands and long fingers, you may want to do a few more rounds of sc. Stop making sc rounds when you reach slightly past your thumb knuckle.

Round 4 :

Decrease in all sts (6)

Info :

If you added more chains than 6 when you made the thumb hole, continue to decrease in each st until you reach 6 sts in the round.

Round 5-7 :

Sc around (6)

Info :

Fasten off and weave top of thumb shut.

β€” Placing the Eyes :

Info :

Flip the glove right side out and place your goose eyes (Can be flat back eyes that are then melted at the sharp end, also buttons, or small crocheted circles) on the inner corner of the glove, with the test gloves, the eyes were placed between the 2nd and 3rd round of white.

Info :

The mittens are complete! Honk!

Assembly Instructions

  • After finishing the thumb hole round, attach the thumb by slip stitching yarn into any chain around the thumb hole, then sc in same stitch and work 12 sts around to make the thumb base before continuing rounds.
  • When placing the white color for the lower hand, slip stitch and begin sc 3 stitches away from the thumb hole to create a smooth color transition and reduce a visible gap.
  • Position the goose eyes on the inner corner of the white section, between the 2nd and 3rd round of white, and secure flat back eyes or sew on buttons firmly.
  • Fasten off and weave ends securely at the thumb and wrist areas, then close the top of the thumb by pulling yarn through remaining stitches and weaving to hide the tail.
  • If adding ribbing to the wrist, pick up stitches evenly around the cuff end and work desired ribbing rows before finishing and weaving in ends.

Important Notes

  • πŸ’‘Work the mittens in a continuous spiral; do not join rounds at the end unless you intentionally want a seam.
  • πŸ’‘Use two strands of worsted yarn held together throughout for the correct fabric density and the intended look.
  • πŸ’‘Check mitten fit frequently as you progress and add or reduce rounds before shaping to ensure the proper width and length.
  • πŸ’‘When changing color to white, slip stitch and begin sc as instructed to minimize a visible gap where the color change occurs.

These Goose Mittens are a playful, cozy accessory that will brighten chilly days and make great handmade gifts. The pattern is simple, customizable, and perfect for practicing shaping and color changes. Make a pair in orange and white, add the little eyes, and give a fun honk-worthy finish. 🧢🧀

You ask,

we answer.

FAQs

What size will the finished piece be?

The finished mittens are made to custom sizing and can be adjusted to fit young teen to adult sizes by adding or removing rounds as instructed.

Can I use different yarn weights for this pattern?

You can use different yarn weights, but this pattern is designed for two strands of worsted weight held together; changing yarn weight will alter the final size and fabric thickness, so adjust hook size and rounds accordingly.

Do I need prior crochet experience for this pattern?

This pattern is rated beginner friendly, so basic knowledge of single crochet, increases, decreases, chains, and working in the round is recommended for the best results.

How long does this project typically take to complete?

Most crocheters complete a pair of mittens in about 5-7 hours, though time may vary based on experience level and how many adjustments you make for sizing.