🧢 Beautiful ✨ Detailed πŸ’ Adorable

God With Us Cross Stitch Pattern

God With Us Cross Stitch Pattern
4.8β˜… Rating
2-3 Hours Time Needed
1.2K Made This
βœ‚οΈ

Intermediate Level

Ideal for those with basic crochet experience, featuring slightly more advanced stitches and techniques to expand your skills.

⏱️

Bite-Sized Project

Finishes in 2-4 hoursβ€”perfect for an afternoon of creative relaxation.

πŸŽ„

Holiday Cheer

Festive fun for the season, bringing handmade magic to celebrations and creating new family traditions.

About This God With Us Cross Stitch Pattern

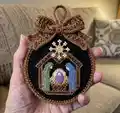
This charted design creates a 34w x 40h nativity ornament titled "God With Us". The motif is stitched on black Aida for strong contrast and finished into a 3" wooden hoop for a polished ornament. The pattern uses a small, focused palette of DMC threads and includes a central star accent with a crystal.

God With Us Cross Stitch Pattern crochet pattern - detailed view of completed project

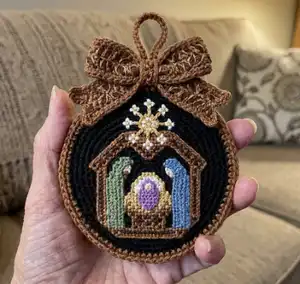
The model was stitched 2 over 1 on 16-count Black Aida by Zweigart for a compact, detailed finish. The chart is fully center-marked and includes a legend matching each symbol to a DMC floss number.

Why You'll Love This God With Us Cross Stitch Pattern

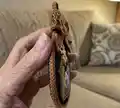
I absolutely love this pattern because it distills a timeless nativity scene into a palm-sized ornament that still feels meaningful. I enjoy the way the dark background makes the colors pop and gives the tiny stitches real presence. I love that it finishes easily into a 3" hoop, making it a lovely handmade gift or a quick seasonal project. I also appreciate how the single Swarovski AB crystal adds a small touch of sparkle that elevates the whole piece.

God With Us Cross Stitch Pattern step 1 - construction progress God With Us Cross Stitch Pattern step 2 - assembly progress God With Us Cross Stitch Pattern step 3 - details and accessories God With Us Cross Stitch Pattern step 4 - final assembly and finishing

Switch Things Up

I love experimenting with different fabric colors to change the mood of this design; try navy or deep green instead of black for a softer contrast.

You can resize the finished ornament easily by switching fabric counts β€” use 14-count or 18-count Aida and follow the 2 over 1 or 2 over 2 suggestions to get the size you want.

I often change the central crystal to a small pearl or tiny sequin for a vintage look; swap the Swarovski for a different sparkle if you prefer.

Swap color palettes to match your home decor β€” warm neutrals create a rustic ornament while bright jewel tones make it pop on the tree.

I sometimes stitch the design on evenweave and use one strand over two threads for a delicate, lacy finish that fits smaller frames.

If you want a softer edge, mount the design onto a small padded round and cover the hoop with velvet instead of fabric strips.

I like to create a set of three coordinating ornaments by changing only one color in each piece to make a matching collection for gifting.

For a keepsake, embroider the year or initials on the back of the hoop before finishing and sealing it with felt and glue.

You can also turn the design into a small framed pin or magnet by mounting it onto stiff card and adding hardware instead of using a hoop.

Try using variegated threads for the star or halo area for subtle color shifts and added visual interest without changing the chart.

Common Mistakes & How to Fix Them

βœ— Starting away from the chart center can cause off-center stitching and wasted fabric; always find the chart center and fabric center before stitching. βœ— Using too many strands on high-count fabric will obscure detail and make the ornament bulky; use the recommended '2 over 1' (two strands on 16ct) or follow the count suggestions exactly. βœ— Skipping the color legend mapping can result in wrong shades or misplaced stitches; double-check each symbol against the DMC number before loading floss. βœ— Not finishing the hoop edges neatly makes the ornament look unfinished; wrap the wooden hoop with fabric strips and secure the back carefully for a polished presentation.

God With Us Cross Stitch Pattern

Create a charming miniature nativity ornament with this detailed cross stitch chart. This pattern is perfect for making a festive 3" hoop ornament or a small hanging decoration for your tree. You'll enjoy the clear center-marked chart and the simple color palette that brings a classic, handcrafted look to the season.

Intermediate 2-3 Hours

Materials Needed for God With Us Cross Stitch Pattern

β€” Main Fabric

  • 01
    16-count Black Aida (model used) β€” stitched 2 over 1
  • 02
    Suggested sizes and finished dimensions: 14/28 count approx. 2.4" x 2.7" (use 14 count 2 over 1 or 28 count 2 over 2)
  • 03
    16/32 count approx. 2.2" x 2.5" (16 count 2 over 1 or 32 count 2 over 2)
  • 04
    18/36 count approx. 2.0" x 2.3" (18 count 2 over 1 or 36 count 2 over 2)
  • 05
    Floss colors (DMC numbers) as charted: DMC 842, DMC 208, DMC 930, DMC 931, DMC 433, DMC 3362, DMC 3363, DMC 729, DMC 3865

β€” Tools Required

  • 01
    Embroidery needle (size appropriate for 16-count Aida)
  • 02
    16-count Black Aida fabric (recommended) or other counts as suggested
  • 03
    DMC stranded cotton floss: 842, 208, 930, 931, 433, 3362, 3363, 729, 3865
  • 04
    Embroidery hoop 3" (wooden hoop recommended) and fabric strips to wrap hoop
  • 05
    Swarovski AB crystal (single) and craft glue for attaching
  • 06
    Scissors
  • 07
    Tapestry needle for finishing and weaving ends
  • 08
    Pins for mounting and assembly
  • 09
    Water-soluble pen or chalk marker for centering (optional)

Progress Tracker

0% Complete

β€” Pattern Chart :

Info :

Stitch Count: 34w x 40h

Info :

Model was stitched 2 over 1 on 16 ct Black Aida by Zweigart.

Infos :

14/28 count is approx. 2.4" x 2.7" (suggestion for 14 count, 2 over 1 or for 28 count, 2 over 2). 16/32 count is approx. 2.2" x 2.5" (suggestion for 16 count, 2 over 1 or for 32 count, 2 over 2). 18/36 count is approx. 2.0" x 2.3" (suggestion for 18 count, 2 over 1 or for 36 count, 2 over 2).

Info :

The chart is center-marked with red lines and arrows; begin stitching at the center unless you prefer another starting point.

Info :

Stitch all full cross stitches as indicated by the symbols in the grid. No backstitching or fractional stitches are indicated on the chart; follow symbols for color placement.

Item DMC 842 (=) :

Use DMC 842 for the symbol '=' as shown on the chart (brown/tan accent areas in the design).

Item DMC 208 (heart) :

Use DMC 208 for the heart symbol (purple accents in the central figure).

Item DMC 930 (diamond) :

Use DMC 930 for the filled diamond symbol (deep blue elements on the right figure).

Item DMC 931 (outlined square) :

Use DMC 931 for the outlined square symbol (light blue/sky accents on the right figure).

Item DMC 433 (B) :

Use DMC 433 for the 'B' symbol which represents the dark brown frame and structural elements.

Item DMC 3362 (triangle) :

Use DMC 3362 for the triangle symbol (dark green elements in the left figure).

Item DMC 3363 (star) :

Use DMC 3363 for the star symbol (lighter green shades in the left figure).

Item DMC 729 (crosshatch) :

Use DMC 729 for the crosshatch symbol representing the gold/copper star and some central accents. A Swarovski AB crystal was glued over top of the DMC 729 square at the center of the star on the model.

Item DMC 3865 (circle) :

Use DMC 3865 for the circle-with-dot symbol (very light highlight accents in the star and border).

Info :

The chart spans multiple pages; align the grid squares and use the bold 10x10 grid lines to track your position. The red center lines mark the horizontal and vertical center of the design.

Info :

Finish recommendation: This ornament was finished in a 3" wooden hoop wrapped with fabric strips; secure stitching, trim fabric, and mount as desired.

Info :

Attach the Swarovski AB crystal at the center of the star after stitching and securing threads; use a small dot of craft glue.

Assembly Instructions

  • Center your stitched piece by aligning the chart center with the fabric center, then trim the fabric leaving enough allowance to fit into a 3" hoop.
  • Wrap the 3" wooden hoop with fabric strips and secure them with glue or small stitches before mounting the stitched piece for a neat edge.
  • Place the stitched piece in the hoop, pull fabric taut and even, then secure the back with glue or a small circle of felt glued in place to hide raw edges.
  • Glue a single Swarovski AB crystal over the DMC 729 square at the center of the star after all threads are secured and ends are woven in.
  • Tie a ribbon or bow at the top of the hoop for hanging and use a short cord loop glued or stitched to the hoop for an ornament hanger.

Important Notes

  • πŸ’‘Always find and mark the chart center and the fabric center before stitching to ensure the design is positioned correctly in the hoop.
  • πŸ’‘Weave in ends as you go to prevent a bulky back and to keep the back of the ornament tidy for mounting.
  • πŸ’‘When gluing the Swarovski crystal, use only a tiny amount of clear-drying craft glue and allow it to dry fully before handling the ornament.

This little "God With Us" ornament captures a timeless nativity in a tiny hoop, perfect for your tree or as a heartfelt gift. The bold colors on black Aida make a striking, elegant miniature that stands out on any branch. Finish it in a 3" wooden hoop and add a sparkling crystal to the star for a special, polished touch. πŸŽ„πŸ§΅

You ask,

we answer.

FAQs

What size will the finished piece be?

The stitched design is 34 stitches wide by 40 stitches high; on 16-count Aida stitched 2 over 1 it will finish approximately 2.2" x 2.5" and fits perfectly into a 3" hoop.

Can I use a different fabric count?

Yesβ€”use the suggested conversions: 14/28 count approx. 2.4" x 2.7" (14 count 2 over 1 or 28 count 2 over 2), 16/32 count approx. 2.2" x 2.5", 18/36 count approx. 2.0" x 2.3" (18 count 2 over 1 or 36 count 2 over 2).

Is there any specialty finishing or embellishment?

The model has a Swarovski AB crystal glued over the DMC 729 square at the center of the star and is finished in a 3" wooden hoop wrapped with fabric strips for a professional look.

Do I need advanced embroidery skills to complete this pattern?

This design is intermediate-level due to multiple color changes and working on dark fabric, but if you are comfortable with full cross stitches and reading charts you will be successful.