🧢 Beautiful ✨ Detailed πŸ’ Adorable

God With Us Cross Stitch Pattern

God With Us Cross Stitch Pattern
4.6β˜… Rating
2-4 Hours Time Needed
2.7K Made This
βœ‚οΈ

Beginner Friendly Level

Perfect for those just starting their crochet journey, with clear instructions and simple techniques

⏱️

Bite-Sized Project

Finishes in 2-4 hoursβ€”perfect for an afternoon of creative relaxation.

🏑

Cozy Accent

A warm touch for your space that transforms ordinary corners into inviting nooks filled with handmade charm.

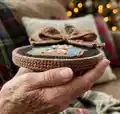
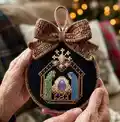
About This God With Us Cross Stitch Pattern

This pattern creates a 34w x 40h counted cross stitch nativity ornament designed to fit in a 3" hoop. The design is stitched on black Aida in the sample and uses a small palette of DMC floss to create a detailed, traditional look. It includes both a full-color chart and a black-and-white symbol chart plus the DMC legend for accurate color placement.

God With Us Cross Stitch Pattern crochet pattern - detailed view of completed project

The ornament is finished in a small wooden hoop wrapped with fabric strips and accented with a Swarovski AB crystal. Clear size guides for multiple fabric counts are provided so you can adapt the final size to your preferred fabric.

Why You'll Love This God With Us Cross Stitch Pattern

I absolutely love this pattern because it captures a timeless nativity scene in a compact, ornament-friendly format that is both meaningful and decorative. I enjoy how the limited stitch count still allows for plenty of color detail, making each finished piece feel rich and complete. I love finishing these in small hoops wrapped in fabric β€” it elevates the stitch into a ready-to-hang keepsake. Stitching this design is a relaxing, rewarding project that makes a lovely handmade gift for the holiday season.

God With Us Cross Stitch Pattern step 1 - construction progress God With Us Cross Stitch Pattern step 2 - assembly progress God With Us Cross Stitch Pattern step 3 - details and accessories God With Us Cross Stitch Pattern step 4 - final assembly and finishing

Switch Things Up

I often change the color palette to match my tree or home decor; swapping the browns for warmer or cooler tones gives the piece a fresh look.

I like to stitch this design on different fabric counts β€” using 14/28 for a slightly larger ornament or 18/36 for a daintier mini keeps it interesting.

I sometimes substitute a metallic or variegated strand for the star area to add subtle sparkle without using a crystal.

You can increase the hoop size and add a padded fabric border to turn the design into a tiny wall hanging instead of a hoop ornament.

I add small seed beads to the star or halo area for extra dimension; be sure to pre-plan bead placement so they sit neatly within the chart squares.

Try using colored Aida (deep navy or burgundy) instead of black for a different mood β€” adjust floss contrasts accordingly to keep the motif readable.

I like to back the finished hoop with felt and add a stitched label or year so the ornament becomes a dated keepsake on the tree.

For a rustic look, finish the hoop edge with twine or thin leather instead of fabric strips; it changes the overall style dramatically.

If you prefer no glued crystal, embroider an extra metallic star with gold thread and a few french knots for sparkle instead.

I sometimes make a set by stitching the same design in different colorways and grouping them together as a themed tree decoration or gift set.

Common Mistakes & How to Fix Them

βœ— Not checking your fabric count before starting can change the finished size; verify your Aida count and use the provided size conversions to choose the correct stitch-over count. βœ— Using too many strands of floss makes stitches bulky and the design can lose definition; use the recommended two strands for 14-18 counts or follow the suggested strands for your chosen fabric. βœ— Failing to secure the Swarovski crystal properly can result in it falling off; use a strong clear craft adhesive and allow adequate drying time before handling the ornament. βœ— Skipping the centerline alignment can cause the design to be off-center in the hoop; mark the fabric center and align it with the red centerlines on the chart to ensure correct placement.

God With Us Cross Stitch Pattern

Create a charming nativity ornament with this compact counted cross stitch pattern designed for a 3" hoop. You will stitch a sweet, stylized stable and baby with a small star detail using DMC floss. The pattern includes a full color chart, black-and-white chart, and a DMC color key so you can follow along easily. Perfect for making handmade holiday ornaments or small gifts that show thoughtful craftsmanship.

Beginner Friendly 2-4 Hours

Materials Needed for God With Us Cross Stitch Pattern

β€” Main Fabric

  • 01
    Black Aida fabric, 16 count (Model was stitched 2 over 1 on 16 ct Black Aida by Zweigart)
  • 02
    Alternative fabric counts suggested: 14/28 count (2 over 1 on 14 or 2 over 2 on 28), 16/32 count (2 over 1 on 16 or 2 over 2 on 32), 18/36 count (2 over 1 on 18 or 2 over 2 on 36)
  • 03
    DMC stranded cotton embroidery floss: DMC 842, DMC 208, DMC 930, DMC 931, DMC 433, DMC 3362, DMC 3363, DMC 729, DMC 3865 (use two strands unless adjusting for fabric count)
  • 04
    3" wooden hoop (for finishing the ornament) wrapped with fabric strips
  • 05
    Swarovski AB Crystal (one small crystal used over the DMC 729 squares at center of the star)

β€” Tools Required

  • 01
    Embroidery needle (tapestry or blunt needle suitable for counted cross stitch)
  • 02
    3" wooden embroidery hoop (for finishing)
  • 03
    Scissors for cutting threads and trimming fabric
  • 04
    Clear craft adhesive (for gluing Swarovski crystal)
  • 05
    Pins to hold fabric when finishing in the hoop
  • 06
    Light source/magnifier as needed for small count fabric
  • 07
    Thread organizer or bobbins to keep DMC floss separated
  • 08
    Ruler or tape measure for centering and trimming fabric

Progress Tracker

0% Complete

β€” Pattern :

Info :

Stitch Count: 34w x 40h

Info :

Model was stitched 2 over 1 on 16 ct Black Aida by Zweigart.

Infos :

14/28 count is approx. 2.4" x 2.7" (suggestion for 14 count, 2 over 1 or for 28 count, 2 over 2). 16/32 count is approx. 2.2" x 2.5" (suggestion for 16 count, 2 over 1 or for 32 count, 2 over 2). 18/36 count is approx. 2.0" x 2.3" (suggestion for 18 count, 2 over 1 or for 36 count, 2 over 2).

Info :

A Swarovski AB Crystal was glued over top of the DMC 729 squares at the center of the star.

Info :

This ornament was finished in a 3" wooden hoop wrapped with fabric strips.

Info :

I hope you enjoy stitching this design.

Chart :

The full color chart and the black-and-white symbol chart are provided across the pattern pages; align fabric center with the red centerlines on the chart when starting.

Legend :

The following symbols correspond to DMC floss colors as shown on the chart legend.

DMC 842 :

Symbol: =

DMC 208 :

Symbol: heart

DMC 930 :

Symbol: solid diamond

DMC 931 :

Symbol: outlined square

DMC 433 :

Symbol: B (filled square with B)

DMC 3362 :

Symbol: filled triangle

DMC 3363 :

Symbol: star

DMC 729 :

Symbol: cross-hatched square

DMC 3865 :

Symbol: circle

Assembly Instructions

  • Align the stitched design with the centerlines on the chart and center it in a 3" wooden hoop, tightening the screw to secure the fabric snugly.
  • Trim the fabric around the hoop leaving a small allowance, then wrap the outer hoop edge with fabric strips as shown in the sample to hide raw edges.
  • Glue a small Swarovski AB crystal over the DMC 729 squares at the center of the star using clear craft adhesive and allow to dry completely before handling.
  • Tie or attach a small hanging loop to the top of the hoop and add a decorative bow if desired, securing it with stitches or fabric glue.
  • Weave in all thread ends neatly on the back and, if desired, finish the reverse with felt or fabric to create a clean back for gifting or display.

Important Notes

  • πŸ’‘Use the red centerlines on the chart to find the exact centre of the design so the motif sits correctly in the 3" hoop.
  • πŸ’‘Match the DMC numbers from the legend exactly to ensure the colors and shading in the design match the charted sample.
  • πŸ’‘When adapting to a different fabric count, follow the provided size suggestions (2 over 1 or 2 over 2) to maintain the correct finished dimensions.
  • πŸ’‘Allow glued embellishments like the Swarovski crystal to dry fully and handle gently to prevent them from detaching during display.

This little nativity ornament makes a heartfelt handmade accent for your tree or gifts this season. It stitches up quickly and finishes beautifully in a 3" hoop wrapped in fabric β€” a perfect small project for holiday crafting. Add a tiny crystal at the star for a sparkling finishing touch and enjoy sharing the finished piece with loved ones. πŸŽ„βœ¨

You ask,

we answer.

FAQs

What size will the finished piece be?

The stitch count is 34w x 40h; on 16 ct stitched 2 over 1 the model measures approximately 2.2" x 2.5". Size will vary with fabric count and stitch-over choice.

Can I use different fabric counts for this pattern?

Yes, suggested options are 14/28, 16/32, and 18/36 with approximated finished sizes listed in the pattern; choose 2 over 1 or 2 over 2 as recommended for each count.

Do I need any special supplies to finish the ornament?

You will need a 3" wooden hoop for finishing and a small Swarovski AB crystal if you want the exact accent used on the sample, plus common finishing supplies like glue and fabric strips.

What skill level is required for this pattern?

This pattern is beginner friendly and suitable for stitchers who are comfortable with counted cross stitch and following a symbol chart.