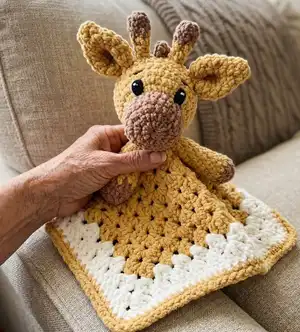
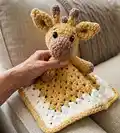
Make a snuggly, super-soft giraffe lovey that doubles as a tiny toy and a comforting blanket. This pattern walks you through a granny square blanket, plus crocheted head, ears, knobs, arms and facial details. Perfect for gifting or keeping for baby cuddles, the plush yarn and clear step-by-step instructions make this a joyful project to create.
Progress Tracker
0% Complete
— Granny Square Blanket :
Row 1 :
(Your beginning chain needs to be about 16" long, it will be used later to sew the head onto the blanket.) Do a magic circle then chain 3 (this counts as a dc), then 2 dc, then [ch 2, 3 dc], repeat 2 more times, then ch 2 and sl st in top of the chain 3 you started with (20). You should have a square-ish shape like pictured. P.S. Don't pull the magic circle too tight, you want a small hole to remain in the center.
Row 2 :
Chain 3, turn your work, you're now working on the backside, in that corner space do [2 dc, ch 2, 3 dc], in the next corner space do [3 dc, ch 2, 3 dc] repeat this in the next 2 corner spaces. Sl st to the top of the chain 3. (32)
Row 3 :
Chain 3, turn your work, in that same space you're going to do 2 dc, then in the corner space do [3 dc, ch 2, 3 dc] in the next space along the side of the square do 3 dc, then in the corner space do [3 dc, ch 2, 3 dc], repeat this all the way around then sl st to the top of chain 3.
Row 4-9 :
Repeat row 3; the bigger the blanket gets, the more spaces will appear along the sides, continue to do 3 dc in those side spaces. When you get to the end of row 9, change colors to the Bernat Blanket Birch when you do the slip stitch into chain 3. This is the best way to not show the color change.
Row 10-11 :
Repeat same steps in row 4-9 in the new color.
Row 12 :
Chain 1, turn your work, now single crochet in every stitch around, when you reach the corners put 3 sc in each. Before you sl st at the end, change colors back to mustard.
Row 13 :
Chain 1, turn your work, now single crochet in every stitch around again. When you get to the corners, do 3 sc into the middle stitch. Sl st to beginning chain.
Row 14 :
Chain 1, don't turn your work. To add a nice finished touch, slip stitch all the way around the blanket, make sure you don't have any tension, this should be a pretty loose slip stitch (if too tight, it will make ends curl up).
Info :
Slip stitch along the edge to finish the blanket and weave in ends. Use the 16" beginning chain tail to position and sew the head onto the blanket later.
— Knobs on Head x2 :
Round 1 :
Start with a magic circle of 6 sc stitches (6)
Round 2-3 :
sc in every st around (6)
Info :
*SWITCH TO MUSTARD YARN*
Round 4 :
[dec, sc, dec, sc] (4)
Round 5-6 :
sc in every st around (4)
Info :
Cut 8" tail and set aside.
— Ears x2 :
Round 1 :
Start with a magic circle of 6 sc stitches (6)
Round 2 :
sc in every st around (6)
Round 3 :
inc in every st around (12)
Round 4 :
sc in every st around (12)
Round 5 :
[inc, sc in next st] repeat around (18)
Round 6 :
sc in every st around (18)
Round 7 :
[dec, sc in next 2] (13) *you'll end with a dec*
Round 8 :
dec all around (7)
Info :
Cut a 12" tail and set aside.
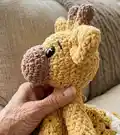
— Snout & Head :
Round 1 :
Start with a magic circle of 8 sc stitches (8)
Round 2 :
inc in every st around (16)
Round 3 :
[inc, sc in next st] repeat around (24)
Round 4-5 :
sc in every st around (24)
Round 6 :
[dec, sc in next 2] repeat around (18)
Info :
*SWITCH TO MUSTARD YARN*
Info :
*STUFF WITH POLYFIL AS YOU GO*
Round 7 :
sc in 4 sts, inc in 10 sts, sc in 4 sts (28)
Round 8 :
sc in 4 sts, then [inc, sc in next 2 sts] repeat this 6 more times, then sc in 3 sts (35)
Round 9-14 :
sc in every st around (35)
Info :
*If you choose to use safety eyes, snap between round 7 & 8 with 5 stitches in between them*
Round 15 :
[dec, sc in next 2 sts] (26)
Round 16 :
[dec, sc in next st] (17)
Round 17-18 :
dec around until hole closes
Info :
Cut a 12" tail and weave it in the head.
— Arms x2 :
Round 1 :
Start with a magic circle of 6 sc stitches (6)
Round 2 :
inc in every st around (12)
Round 3 :
sc in every st around (12)
Round 4 :
[dec, sc in next 4 sts] repeat around (10)
Info :
*SWITCH TO MUSTARD HERE*
Round 5-6 :
sc in every st around (10)
Info :
*Stuff half the arm with polyfil*
Round 7 :
[dec, sc in next 2 sts] repeat around (7) *you'll end on a dec*
Round 8-14 :
sc in every st around (7)
Info :
Cut an 8" tail and sew onto both sides of the body on round 5 of the body (sew where the head and blanket meet).
— Eyes (Black Yarn) :
Info :
NEXT: Let's add eyes. Grab 2 feet of black worsted weight yarn and your needle. Insert needle in the back of the head and come out between round 8 and 9, align with the inside edge of ear. Pull yarn so there's only 4 inches left in the back of the head.
Info :
Now insert the needle between round 6 and 7 and come back out the same stitch where you started. Only work in these two stitches. Continue wrapping the yarn slowly until eye gets thicker, then start guiding the yarn along the right and left side so that it hugs the sides. This is what eventually makes the eye round.
Info :
When you have a nice full round eye, insert needle into the back of the head into the same stitch where the yarn entered, then tie the two ends together and push them into the head. Repeat on the other side, with 5 stitches in between the eyes.
— White Eye Highlights :
Info :
Now grab 12" of white worsted weight yarn and needle. Insert in back of head again. Carefully push it through the upper right of right eye, go to the left about 1mm then poke needle carefully back into eye and come out of the bottom through the same stitch you were using for the black part of eye.
Info :
Then guide yarn along the right side of the eye and insert the needle at the top center stitch above eye, then come back out the back of the head to meet the yarn in the same stitch where you entered. Tie the two ends together and push into the head. Repeat for left eye, hugging white yarn on left side of left eye.
— Happy Eye Brows :
Info :
Now grab another 12" of black worsted weight yarn and needle. Push needle through back of the head again. Come out between round 9 and 10 aligned with the right side of right eye, go over 2 stitches to the left and insert needle back inside head, come back out aligned with the right side of the left eye and go over 2 stitches to the left and poke back into head. Tie ends together and push into head. Dont tie too tight or the eyebrows will disappear.
— Short Hair Along Head :
Info :
Now grab the 6.5 mm hook and caramel/brown yarn. Insert the hook at the top of the head between the two knobs. Grab the brown yarn and pull it through, then chain 5, then place the hook in the head again in the next stitch down, pull yarn through with hook, slip stitch, then chain 5 again. Repeat this until you get to the back bottom part of head. Cut 6" tail and weave in both ends.
— Assembly and Sewing :
Info :
NOW SEW HEAD ONTO BLANKET: Grab the yarn needle and the 16" beginning tail from the blanket. The best way to make sure the giraffe head is centered is to fold the blanket in half so the tail is sticking out of the center then insert the yarn needle between round 10 and 11 of the bottom of the head. This is your starting point.
Info :
Use yarn needle to sew in and out around that row 1 of blanket until giraffe head is secured. Tuck remaining tail into the head.
Info :
NOW SEW ON ARMS: Grab the yarn needle and sew the arms onto the bottom of the head where the head and blanket meet. Sew knobs and ears to top of head between rounds 11 and 12 (position knobs and ears about 1/2" apart as pictured).
— Final Finishing :
Info :
Weave in all ends, tuck tails into the head, cut any remaining excess yarn. Adjust stuffing if needed and ensure all pieces are securely sewn so they withstand gentle play and washing by spot-cleaning instructions for chenille yarn.
— Horse Lovey Blanket Pattern - Granny Square :
Row 1 :
(Using brown super bulky yarn and 8 mm hook) Your beginning chain needs to be about 16" long, it will be used later to sew the head onto the blanket. Do a magic circle then chain 3 (this counts as a dc), then 2 dc, then [ch 2, 3 dc], repeat 2 more times, then ch 2 and sl st in top of the chain 3 you started with (20). You should have a square-ish shape like pictured.
Row 2 :
Chain 3, turn your work, you're now working on the backside, in that corner space do [2 dc, ch 2, 3 dc], in the next corner space do [3 dc, ch 2, 3 dc] repeat this in the next 2 corner spaces. Sl st to the top of the chain 3. (32)
Row 3 :
Chain 3, turn your work, in that same space you're going to do 2 dc, then in the corner space do [3 dc, ch 2, 3 dc] in the next space along the side of the square do 3 dc, then in the corner space do [3 dc, ch 2, 3 dc], repeat this all the way around then sl st to the top of chain 3.
Row 4-9 :
Repeat row 3, continue to do 3 dc in those side spaces. When you get to the end of row 9, change colors to the super bulky weight WHITE yarn when you do the slip stitch into chain 3. This is the best way to not show the color change.
Row 10-13 :
Repeat same steps in row 4-9 but in the new color. At the end of row 13, change colors back to brown with that slip stitch at the end.
Row 14 :
Chain 1, turn your work, now half double crochet in every stitch around, when you reach the corners put 3 hdc in each.
Row 15 :
Chain 1, turn your work, now single crochet in every stitch around again. Again, putting 3 sc into the middle stitch in corners. Sl st to beginning chain. Cut an 8" tail and weave it in.
Info :
Slip stitch along the final edge to tidy and weave in ends. Use the beginning 16" tail to sew the head later.
— Horse Ears x2 :
Round 1 :
Start with a magic circle of 6 sc stitches (6)
Round 2 :
sc in every st around (6)
Round 3 :
inc in every st around (12)
Round 4-8 :
sc in every st around (12)
Info :
Cut a 12" tail and set aside. Use the yarn needle to squinch the bottom part together to make the ear concave.
— Horse Snout & Head :
Round 1 :
Start with a magic circle of 6 sc stitches (6)
Round 2 :
inc in every st around (12)
Round 3 :
[inc, sc in next st] repeat around (18)
Round 4 :
[inc, sc in next 2 sts] repeat around (24)
Round 5 :
[inc, sc in next 3 sts] repeat around (30)
Round 6 :
sc in next 12 sts, BOBBLE STITCH, sc in next 4 sts, BOBBLE STITCH, sc in next 12 sts (30)
Round 7 :
sc in every st around (30)
Round 8 :
[dec, sc in next 4 sts] repeat around (25)
Info :
*SWITCH TO BROWN YARN*
Round 9-10 :
sc in every st around (25)
Info :
*STUFF WITH POLYFIL AS YOU GO*
Round 11 :
[dec, sc in next 3 sts] repeat around (20)
Round 12-19 :
sc in every st around (20)
Round 20 :
[dec, sc in next st] repeat around (12)
Round 21 :
dec around until hole closes
Info :
NEXT: Sew ears onto top of head between round 19 and 20, with 3 sts in between them.
Info :
NEXT: Let's add the mane. Grab black worsted weight yarn and a 5 mm hook. Insert the hook at the top of the head between the ears, close to the right ear. Grab the black yarn and pull it through, then chain 15, then place the hook in the head again in the next stitch over, pull yarn through with hook, slip stitch, then chain 15 again. Repeat this until you get across the row like "bangs." Once you finish the "bangs," the remaining locks of mane I did a mix of chain 20 and chain 22. Add these locks until you can't see the back of head.
Info :
NEXT: Let's add eyes. Grab 4 feet of black worsted weight yarn and your needle. Insert needle in the side of the head and come out between round 13 and 14, align with the inside edge of ear. Pull yarn so there's only 4 inches left in the back of the head.
Info :
Now insert the needle back into the head two rounds down from where you entered, then come back up through the first stitch you entered. Only work in these two stitches. Continue wrapping the yarn slowly until eye gets thicker, then start guiding the yarn along the right and left side so that it hugs the sides. This is what eventually makes the eye round.
Info :
When you finish the right eye, insert the needle into the lower stitch and come out 4 stitches to the left of the right eye. This width could vary (maybe 5 sts); just make sure the eyes are centered. Repeat the same thing for the left eye. When you finish, insert the yarn needle back into the head and come out the original stitch that you entered. Tie the two ends together then push into head to disappear.
Info :
Now let's add the white to the eyes. Grab 4 feet of white worsted weight yarn and your needle. Insert in the side of the head again. Carefully poke yarn up through the upper center area of eye, then insert needle back into head at the top of the eye; you created a small white straight vertical line. Then bring yarn out of the same bottom stitch used for the black part of eyes, hug it around the side and insert needle back into head through the top stitch used for black part of eye. Do this about 4-5 times to get a nice thick white area around right side of right eye. Repeat for left eye. When finish, poke yarn through the head to meet beginning tail and knot loosely, push into head to disappear.
Info :
Final assembly: sew head onto blanket using the 16" beginning tail, centering by folding blanket and inserting needle between designated rounds of head. Sew mane, ears and any additional pieces securely and weave ends in.
This adorable Giraffe Lovey brings a soft, handmade friend to life for baby cuddles and sweet naps. The plush chenille yarn and chunky granny square make it irresistibly huggable. Make one for a baby shower, a first birthday, or as a comforting keepsake — it will quickly become a treasured companion. 🧶🧸