🧢 Beautiful ✨ Detailed πŸ’ Adorable

Ginanita Bag Amigurumi Pattern

Ginanita Bag Amigurumi Pattern
4.9β˜… Rating
5-7 Hours Time Needed
3.1K Made This
βœ‚οΈ

Intermediate Level

Ideal for those with basic crochet experience, featuring slightly more advanced stitches and techniques to expand your skills.

⏱️

Weekend Treat

Takes 5-7 hours, making it an enjoyable project to finish over a couple of days.

✨

Stylish Touch

An elegant detail to elevate any look, combining traditional techniques with contemporary design sensibilities.

About This Ginanita Bag Amigurumi Pattern
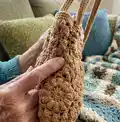
This pattern creates the Ginanita Bag β€” a crochet bag constructed from 11 granny hexagons assembled into a shaped handbag or tote. It uses popcorn stitches and clusters to create textured petals and defined corners. The pattern includes both diagram and written rounds, hexagon measurements, assembly diagrams and handle instructions.

Ginanita Bag Amigurumi Pattern crochet pattern - detailed view of completed project

Choose fine yarn and a 2.5mm hook for a compact handbag, or DK yarn and a 3.0mm hook for a larger tote. Step-by-step photos and clear round counts are included to guide your progress.

Why You'll Love This Ginanita Bag Amigurumi Pattern

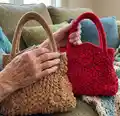
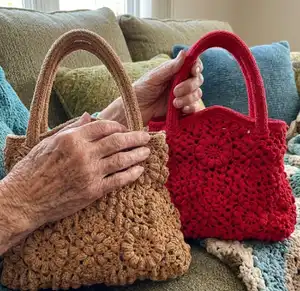
I absolutely love this pattern because it turns simple granny hexagons into a very wearable, textured bag with lots of personality. I enjoy the rhythmic flow of working popcorn clusters and corners β€” they create a beautiful 3D surface. The flexibility in yarn weight means you can make a petite handbag or a roomy tote with the same instructions. Finishing the bag and attaching the handles always feels so rewarding; the final result looks far more intricate than the effort required.

Ginanita Bag Amigurumi Pattern step 1 - construction progress Ginanita Bag Amigurumi Pattern step 2 - assembly progress Ginanita Bag Amigurumi Pattern step 3 - details and accessories Ginanita Bag Amigurumi Pattern step 4 - final assembly and finishing

Switch Things Up

I love how easy it is to customize this pattern with different yarns; try cotton for summer bags or recycled t-shirt yarn for a chunky market tote.

I often change the color per hexagon to create a patchwork look; alternate two or three colors for a rhythmic color repeat.

If you want a smaller accessory, use a lighter weight yarn and a smaller hook to create mini hexagons for a mini bag or coin pouch.

For a more structured bag, add a fabric lining and interfacing; I sew a cotton lining and insert light interfacing for extra firmness.

Try different handle options: crocheted handles for a fully handmade look, or attach leather handles for a polished finish; I sometimes add metal rings for detachable straps.

I like to embellish with a small crocheted flower or a tassel on the front hexagon for personality; use leftover yarn to make coordinating details.

To make a crossbody, crochet longer handles or make adjustable straps using hardware; you can also attach clips to handles for versatility.

Experiment with stitch variations in the final rounds: replace the outer crab stitch with a scallop edging for a feminine look.

I recommend blocking each hexagon lightly to even out stitches before joining; a quick spray and pin helps everything line up neatly.

When assembling, I always pin and dry-fit the layout first, then whip stitch with the same yarn to ensure neat, nearly invisible seams that hold under use.

Common Mistakes & How to Fix Them

βœ— Ignoring stitch counts at the end of each round leads to misshapen hexagons; always verify the number of stitches shown for each round before continuing. βœ— Skipping the slip stitch joins between motif sections can make assembly uneven; secure each join with the whip stitch in the order shown for a flat seam. βœ— Using inconsistent tension while making multiple hexagons will give you uneven sizes; keep your tension consistent and compare new hexagons to an earlier one. βœ— Not measuring the hexagon (corner-to-corner and side-to-side) causes layout problems when assembling; measure after round 7 and adjust hook or yarn if needed.

Ginanita Bag Amigurumi Pattern

Make a beautiful Ginanita Bag by combining 11 granny hexagons into a stylish tote or handbag. This pattern walks you through the hexagon granny motif, detailed round-by-round instructions, assembly and handle finishing so you can create a durable, textured bag. Choose fine yarn for a handbag or DK for a roomy tote β€” the pattern is flexible and rewarding.

Intermediate 5-7 Hours

Materials Needed for Ginanita Bag Amigurumi Pattern

β€” Main Fabric

  • 01
    Fine weight yarn (for handbag) - Hazelnut color example - 560 yards (or 510 meters) approximately; hook 4/0 (2.5mm)
  • 02
    Double Knit (DK) weight yarn (for tote bag) - Stylecraft Special DK example - 560 yards (or 510 meters) approximately; hook 5/0 (3.0mm)
  • 03
    Additional small amount of same yarn for assembly and handles or contrasting color for embellishments

β€” Tools Required

  • 01
    Crochet hook size 4/0 (2.5mm) for handbag
  • 02
    Crochet hook size 5/0 (3.0mm) for tote bag
  • 03
    Scissors
  • 04
    Tapestry needles for weaving ends and whip stitch assembly
  • 05
    Measuring tape
  • 06
    Pins for blocking and positioning hexagons while assembling
  • 07
    Optional: wooden, leather or metal handles if not crocheting handles
  • 08
    Optional: stitch markers

Progress Tracker

0% Complete

β€” Preliminary :

Info :

Greetings from us Tutorial Rajut.Id. Thank you for purchasing this GINANITA BAG pattern. We take the name Ginanita from Sanskrit which means counting, because Ginanita Bag is basically made from combining 11 hexagons. So in making this bag, accuracy and patience is needed in calculating the hexagon pattern. Our hope is that this pattern can be understood and practiced easily. This is the video tutorial link for the Ginanita Bag : bit.ly/Ginanitabag

β€” Tools and Materials :

Info :

To make a handbag size : Use fine weight yarn in Hazelnut 560 yards or 510 meters in length, Hook 4/0 (2.5mm). To make the size of the ToteBag bag : use Double Knit (DK) weight yarn in stylecraft special DK 560 yards or 510 meters in length, Hook 5/0 (3.0mm). Scissors. Tapestry needles.

β€” Basic Stitch that Used :

Infos :

In making this Ginanita Bag, several basic stitches are used, including : 1) Magic Ring (MR) 2) Single Crochet (SC) 3) Chain (CH) 4) Double Crochet (DC) 5) Slip Stitch (SL-ST) 6) Popcorn Stitch : How to make popcorn stitch is a. work 5 double crochet (DC) stitches in the same stitch, b. Drop the loop from your hook, c. Insert your hook from front to back under the top 2 loops of the first double crochet of the group, d. Grab the dropped loop with your hook and pull it through the stitch 7) Crab Stitch : Reverse Single Crochet Stitch : Literally SC done in reverse. Instead of working as you normally would (right to left) you are working left to right. So, you are working into the stitch to the right of your hook (not the left).

β€” Maintenance :

Info :

In caring for knitted/crocheted work there are several things that must be considered : 1) Wash by hand using soft detergent and warm water at 40Β°c. 2) If there is a stubborn stain, you can brush it with a soft brush with the help of soap. 3) Don't use bleach product. 4) Drying should not be exposed to direct sunlight, just let it dry.

β€” Pattern (Granny Hexagon) :

Round 1 :

MR + 12 SC (12 sts)

Round 2 :

5 CH + (1 DC + 2 CH) x 11 (36 sts)

Round 3 :

Slip Stitch to 2CH space + {(1 Popcorn + 1 DC in 2CH space) + 2 CH } x 12 (48 sts)

Round 4 :

Slip Stitch to 2CH space + (1 SC in 2CH space + 5 CH) x 12 (72 sts)

Round 5 :

Slip Stitch to 5CH space + {(1 Popcorn + 1 DC in 5CH space) + 2 CH + (Corner : 3 DC + 2 CH + 3 DC in next 5CH space) + 2 CH } x 6 (84 sts)

Round 6 :

Slip Stitch to 2CH space + {(1 Popcorn + 1 DC in 2CH space) + 2 CH + (3 DC + 2 CH + 3 DC in corner space) + 2 CH + (1 Popcorn + 1 DC in 2CH space + 1 CH)} x 6 (102 sts)

Round 7 :

Slip Stitch to 2CH space + {(1 Popcorn + 1 DC in 2CH space) + 2 CH + (3 DC + 2 CH + 3 DC in corner space) + 2 CH + (1 Popcorn + 1 DC in 1CH space) + 1 CH) x2} x 6 (120 sts)

Info :

Diagram Pattern and symbol legend are provided. Written pattern rounds 1-7 correspond to the diagram. Round counts provided for each round above. Round 7 is complete when you have 6 groups of corner sequences producing a hexagon shape.

β€” Hexagon Measurement for Handbag :

Info :

Size corner to corner is 14cm. Size side to side is 12cm. Measurement example shown uses fine weight yarn with hook 2.5mm for handbag sample.

β€” How to Form the Bag :

Round 1 :

Make 11 hexagons according to the pattern.

Round 2 :

Arrange them like this picture below : (1-2-5-2-1) to form the bag shape.

Round 3 :

Combine 11 hexagons with needle and the same color yarn using whip stitch technique. Combine the sides starting from the bottom, in number order (1-1, 2-2, 3-3). Top of front and back side is tapered side, top of right and left side is straight.

Info :

Finished result images shown: the wrong side and the right side after all hexagons are combined.

β€” How To Make an Edge :

Info :

1) Make 2 rows of SC at the top of bag as you want. 2) Make a row of Crab Stitch for ending.

β€” How To Make Handle :

Item Name (Handle Pattern) :

Diagram Pattern : Chain (CH), Half Double Crochet (HDC) rows and 2 HDC increase at rounded ends to form an oval-crocheted handle. Continue to the desired length (example 60-80 CH). Make 2 pieces of crochet handle according to pattern (like making an oval base).

Item Name (How To Attach Handle) :

1) Make 2 pieces of crochet handle according to pattern (like making an oval base). You can make 60-80 CH or as your desired length. 2) Sew the ends of the handles to the bag. Do the same to the second piece on the other side of the bag.

Info :

*PS : You also can use any handle which made of wood, leather, iron or any other materials. You can also create a spiral model handle as shown in the photos. Video tutorial links provided for spiral handles and the whole Ginanita Bag.

Assembly Instructions

  • Make 11 hexagons and arrange them in the layout (1-2-5-2-1) before joining so you can check placement and symmetry.
  • Combine hexagon sides using whip stitch with same-color yarn starting from the bottom and joining in order (1-1, 2-2, 3-3) as shown in the diagram to create a neat seam.
  • Sew handles to the top of the bag after finishing two rows of SC and a row of crab stitch: position handles evenly across the tapered top edges and secure by sewing the handle ends tightly.
  • After joining all hexagons, fold and whip-stitch the lower edges to form the bag base and sides; check alignment often and pin pieces before sewing to keep the shape even.
  • Add finishing rows: work 2 rows of SC along the top edge and finish with a crab stitch (reverse SC) for a tidy, reinforced rim before attaching handles.

Important Notes

  • πŸ’‘Use stitch markers or safety pins to hold hexagons in place while you whip stitch them together to avoid shifting.
  • πŸ’‘Measure a finished hexagon after round 7 to confirm it matches the sample dimensions; swap yarn or hook if size is off.
  • πŸ’‘Weave in ends as you go and use the same-color yarn for joining to keep seams invisible and secure.

This Ginanita Bag pattern turns 11 simple granny hexagons into a stunning, textured handbag you will love to make and use. Whether you choose fine yarn for a delicate handbag or DK for a roomy tote, the result is a beautiful, handcrafted accessory. Happy crocheting and enjoy styling your new handmade bag! πŸ§ΆπŸ‘œ

You ask,

we answer.

FAQs

What size will the finished piece be?

The finished handbag hexagon measures approximately 14cm corner-to-corner and 12cm side-to-side after round 7 when using the recommended fine yarn and hook; assembled bag dimensions vary by yarn weight and number of hexagons.

Can I use different yarn weights for this pattern?

Yes; use fine weight yarn with a 2.5mm hook for a smaller handbag (example sizes provided) or DK with a 3.0mm hook for a larger tote, but stitch counts per hexagon remain the same.

Do I need prior crochet experience for this pattern?

This pattern is rated intermediate and assumes you know MR, SC, DC, CH, slip stitch, popcorn stitch and how to join motifs; photo steps and diagrams are included to help.

How long does this project typically take to complete?

Most crocheters complete the 11 hexagons and assembly in about 5-7 hours, though time varies with experience, yarn choice and whether you crochet handles by hand.