🧢 Beautiful ✨ Detailed πŸ’ Adorable

Giant Sloth Amigurumi Pattern

Giant Sloth Amigurumi Pattern
4.7β˜… Rating
5-7 Hours Time Needed
2.1K Made This
βœ‚οΈ

Intermediate Level

Ideal for those with basic crochet experience, featuring slightly more advanced stitches and techniques to expand your skills.

⏱️

Weekend Treat

Takes 5-7 hours, making it an enjoyable project to finish over a couple of days.

🧸

Cute Companion

An adorable friend to cherish, handcrafted with love to bring comfort and joy for years to come.

About This Giant Sloth Amigurumi Pattern

This pattern creates a giant three-toed sloth plush using jumbo chenille/blanket yarn and a 10 mm hook. You will work in a continuous spiral to form an oval head/body, add felt facial pieces, safety eyes, and simple sewn claws. The finished sloth is plush, squishy, and great as a cuddle pillow or decorative buddy.
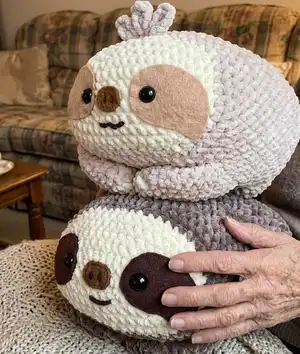
Giant Sloth Amigurumi Pattern crochet pattern - detailed view of completed project

Designed for jumbo yarn, the pattern explains shaping, decreasing, and facial placement with helpful tips. Includes templates for felt facial pieces and clear assembly instructions for a polished finish.

Why You'll Love This Giant Sloth Amigurumi Pattern

I absolutely love this pattern because it turns chunky chenille yarn into the softest, squishiest sloth you can hug. I enjoyed designing the oval shaping so the sloth sits nicely and has a cute, rounded appearance. The facial templates make placing felt pieces and eyes easy, which always brings a big smile when the sloth comes to life. I love that it uses simple stitches but creates a wonderfully tactile result that’s perfect for gifts and home decor.

Giant Sloth Amigurumi Pattern step 1 - construction progress Giant Sloth Amigurumi Pattern step 2 - assembly progress Giant Sloth Amigurumi Pattern step 3 - details and accessories Giant Sloth Amigurumi Pattern step 4 - final assembly and finishing

Switch Things Up

I love customizing this pattern to create different personalities for each sloth by changing the main body color and face color combinations.

I sometimes use pastel tones for a softer look or use bold contrasts for a cartoon-style sloth; swapping taupe for plum or mint creates a totally different vibe.

If you want a larger or smaller sloth, change your yarn weight and hook size; bulky yarn with a larger hook makes a chunkier version and lighter yarn with a smaller hook makes a mini version.

I add embroidered eyebrows, freckles, or tiny felt accessories like bows or hats to give each sloth more character and charm.

Try different eye sizes or safety eye placements to adjust the sloth's expression β€” moving eyes slightly closer or wider changes the face instantly.

For a poseable version, I sometimes add thin wire inside the arms to bend them into hugging or holding positions; be sure to secure wire ends inside a sewn channel.

To make a set, vary sizes and colors to create a family of sloths that can stack together for display.

If you want washable toys, use sewn-on felt details and embroidered noses instead of hot glue to make them more durable through gentle hand washing.

I also enjoy making matching accessories like tiny crocheted scarves or a mini leaf prop to tuck under the sloth's arm for a seasonal touch.

Experiment with textured stitches on the underside or back panel to add visual interest, and always test with a small swatch before committing to a full change in stitch pattern.

Common Mistakes & How to Fix Them

βœ— Skipping stitch markers when working with chenille yarn leads to losing track of the round; use a marker at the start of each round to stay oriented. βœ— Stuffing too much at once causes lumps and uneven shaping; stuff gradually and fluff fiberfill before inserting for even distribution. βœ— Not aligning the start of decrease rounds with the body color change will make the oval twist; compare rnd 24 start with rnd 6 and add or remove a few sc to align them. βœ— Cutting chenille yarn carelessly produces loose fibers and fraying; use sharp scissors and cut carefully, and expect some loose fibers which can be trimmed or brushed away.
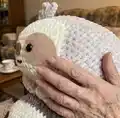
Giant Sloth Amigurumi Pattern

Make a cuddly Giant Sloth plush with this detailed crochet pattern. You will learn to work with jumbo chenille yarn to create a soft, oval sloth body with adorable facial features and claws. The pattern includes full round-by-round instructions, materials, and assembly guidance so you can recreate Sylvia or Sylvester with confidence. Perfect for a handmade gift or a cozy decorative pillow.

Intermediate 5-7 Hours

Materials Needed for Giant Sloth Amigurumi Pattern

β€” Main Fabric

  • 01
    Jumbo size 7 chenille yarn - cream for the face (approx. 23 g)
  • 02
    Jumbo size 7 chenille yarn - taupe or marshmallow for the body (approx. 386 g; about a little over 1 skein for main body color with Sweet Snuggles/Chenille Home)
  • 03
    Long strand of white blanket yarn for the claws

β€” Tools Required

  • 01
    10 mm crochet hook
  • 02
    Jumbo yarn needle
  • 03
    Scissors
  • 04
    Stitch markers
  • 05
    Hot glue (optional for felt pieces)
  • 06
    Fiber fill stuffing (approx. 680 g)
  • 07
    20 mm safety eyes (2 pieces)
  • 08
    Brown/tan/black felt for facial details
  • 09
    Long strand of dark brown medium worsted yarn for nostrils and small facial embroidery

Progress Tracker

0% Complete

β€” Head/Body :

Rnd 1 :

Ch 13. Sc into the second st from the hook. Sc into the next 10 sts. Make 3 sc into the next st. Continue onto the underside of the chain. Sc into the next 10 sts. Inc into the next st and slst into the first st of the rnd. [26]

Info :

*The new rnd starts after the slst.

Rnd 2 :

(10 sc, inc into the next 3 sts) x2. [32]

Rnd 3 :

(10 sc, [sc into the next st, inc] x3) x2 [38]

Rnd 4 :

(10 sc, [2 sc, inc] x3]) x2 [44]

Rnd 5 :

(10 sc, [3 sc, inc] x3]) x2 [50]

Info :

Change to your main color yarn.

Rnd 6 :

blo - (10 sc, [4 sc, inc] x3]) x2 [56]

Rnd 7-23 :

(17 rnds total): sc all around [56]

Info :

Insert a stitch marker and remove your hook. We will now create the facial features before closing up the body.

β€” Facial Features :

Eyes :

Cut out two pieces of brown or tan felt for the dark part of the eyes using the template on pg 5. Then, cut a small slit in both to insert the safety eyes into. Glue (sewing is optional) the felt part onto the face and secure the eyes in place.

Nose :

Cut an oval out of brown felt ~2 in. x 1 in. and create the nostrils out of a darker felt. Glue (or sew) the nose in the middle of the starting ch, keeping it aligned with the eyes for a cuter look.

Mouth :

Use your yarn needle and create a mouth right below the nose. Secure the yarn tails in a knot on the wrong side of the body. [img 2]

Hair tuft (for Sylvia) :

(ch 6, slst into the first st) x3. Fasten off and sew onto the head where the body color starts. Secure the yarn tails in a knot on the inside of the body. [img 2]

β€” Head/Body (cont.) :

Info :

Here, we will begin decreasing. Lay the body flat against a table to see where the start of the rnd should align with where rnd 6 started. Undo or add a few sts to achieve this.

Rnd 24 :

(10 sc, [4 sc, dec) x3]) x2 [50]

Rnd 25 :

(10 sc, [3 sc, dec) x3]) x2 [44]

Rnd 26 :

(10 sc, [2 sc, dec) x3]) x2 [38]

Rnd 27 :

(10 sc, [sc into the next st, dec] x3) x2 [32]

Rnd 28 :

(10 sc, dec into the next 3 sts) x2. [26]

Info :

Fasten off and leave a long tail for sewing. Stuff well.

Info :

Pinching the two longer edges together, whip stitch the hole closed. Bury the excess yarn tail.

β€” Assembly :

Limbs :

Cut a long strand of white blanket yarn. Using your yarn needle, weave through each limb to create three long claws. Secure the yarn tails in a knot. Lightly stuff.

Info :

Flatten each arm and then use pins to mark where to sew so that the tips meet in the middle.

Info :

Sew the arms 2 rnds below the cream part of the face. Sew the legs 4 rnds below the arms.

Info :

Weave one of the arm's remaining tail through to the hand and sew the two hands together. [img 3]

β€” Arms/Legs :

Info :

(make four in body color)

Rnd 1 :

Ch 5. Sc into the second ch from the hook. Sc into the next 2 sts. Make 3 sc into the next st. Continue onto the underside of the chain. Sc into the next 2 sts. Inc into the next st and slst into the first st of the rnd. [10]

Rnd 2 :

sc all around [10]

Rnd 3 :

(2 sc, inc into the next 3 sts) x2 [16]

Rnd 4-5 :

sc all around [16]

Rnd 6 :

(6 sc, dec) x2 [14]

Rnd 7-9 :

(3 rnds total): sc all around [14]

Info :

Fasten off and leave a long tail for sewing.

Assembly Instructions

  • Cut a long strand of white blanket yarn and weave through each limb to create three long claws; secure tails in a knot and lightly stuff the limbs.
  • Flatten each arm and use pins to align tips so they meet in the middle, then sew the arms together at the tips.
  • Sew the arms 2 rnds below the cream facial area and sew the legs 4 rnds below the arms to balance positioning.
  • Weave one arm's remaining tail through to the hand and sew the two hands together securely; whip stitch and bury excess yarn tails.

Important Notes

  • πŸ’‘Use stitch markers to keep track of your rounds, especially with fuzzy chenille yarn that makes stitches hard to see.
  • πŸ’‘Stuff gradually and fluff your fiberfill before inserting to avoid lumps and achieve an even, firm shape.
  • πŸ’‘Pin parts in place before sewing to ensure symmetrical placement, and bury tails after whip stitching to finish neatly.

This Giant Sloth pattern makes the softest, hug-ready sloth you can imagine. It uses jumbo chenille yarn for a plush, velvety finish and simple construction that yields a big personality. Whether as a gift or a cozy home accent, your Giant Sloth will bring smiles and snuggles. 🧢🧸

You ask,

we answer.

FAQs

What size will the finished piece be?

The finished sloth measures approximately 14 in. x 13 in. (35.56 cm x 33.02 cm) when using the recommended jumbo yarn and 10 mm hook.

Can I use different yarn weights for this pattern?

You can try different yarn weights, but the dimensions and texture will change significantly; these jumbo patterns do not transfer well to thinner yarns and may not produce the intended size or feel.

Do I need prior crochet experience for this pattern?

This pattern is rated intermediate due to working in an oval spiral and shaping; basic knowledge of single crochet, increases, and decreases is recommended.

How long does this project typically take to complete?

Most crocheters complete this project in approximately 5-7 hours, depending on experience and how much time is spent on facial details and assembly.