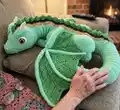
Make a magnificent, oversized crochet dragon that doubles as a play mat or cuddle buddy. This pattern guides you step-by-step through large-scale shaping, wings, legs, tail, and decorative details using worsted-weight yarn. Youll love the sculpted head, articulated legs, and wide wingspan — perfect for imaginative play or a statement handmade gift. Clear notes and assembly tips help you construct this show-stopping dragon with confidence.
Progress Tracker
0% Complete
— Body :
Info :
BODY: 2 CH, DOUBLE YARN, LIGHT GREEN
Round 1 :
6sc into second chain from hook
Round 2 :
2sc in each = 12st
Round 3 :
(1sc, 2sc in next) x 6 = 18st
Round 4 :
(2sc, 2sc in next) x 6 = 24st
Round 5 :
(3sc, 2sc in next) x 6 = 30st
Round 6 :
(4sc, 2sc in next) x 6 = 36st
Round 7 :
(5sc, 2sc in next) x 6 = 42st
Round 8 :
(6sc, 2sc in next) x 6 = 48st
Round 9 :
(7sc, 2sc in next) x 6 = 54st
Round 10 :
(8sc, 2sc in next) x 6 = 60st
Round 11 :
(9sc, 2sc in next) x 6 = 66st
Round 12 :
(10sc, 2sc in next) x 6 = 72st
Round 13 :
(11sc, 2sc in next) x 6 = 78st
Round 14 :
(12sc, 2sc in next) x 6 = 84st
Round 15 :
(13sc, 2sc in next) x 6 = 90st
Round 16 :
(14sc, 2sc in next) x 6 = 96st
Round 17 :
(15sc, 2sc in next) x 6 = 102st
Round 18 :
(16sc, 2sc in next) x 6 = 108st
Round 19 :
(17sc, 2sc in next) x 6 = 114st
Round 20 :
(18sc, 2sc in next) x 6 = 120st
Round 21-26 :
sc in each = 120st (6 rounds)
Round 27 :
Row: 50sc, 1ss, ch, turn
Round 28 :
Row: A) skip next, 2sc, 45hdc, 2sc, 1ss, ch, turn. B) skip next, 2sc, 45hdc, 2sc, (now you are going back in the original round) 69sc
Round 29-36 :
Rd: sc in each = 118st (8 rounds)
Round 37 :
Row: 48sc, 1ss, ch, turn
Round 38 :
Row: A) skip next, 2sc, 43hdc, 2sc, 1ss, ch, turn. B) skip next, 2sc, 43hdc, 71sc
Round 39 :
(56sc, sc2tog) x 2 = 114st
Round 40-46 :
Rd: sc in each = 114st (7 rounds)
Round 47 :
Row: 45sc, 1 ss, ch, turn
Round 48 :
Row: A) skip next, 2sc, 40hdc, 2sc, 1ss, ch, turn. B) skip next, 2sc, 40hdc, 70sc
Round 49 :
Rd: (54sc, sc2tog) x 2 = 110st
Round 50-56 :
Rd: sc in each = 110st (7 rounds)
Round 57 :
Rd: (9sc, sc2tog) x 10 = 100st
Round 58-82 :
Rd: sc in each = 100st (25 rounds)
Round 83 :
Rd: (8sc, sc2tog) x 10 = 90st
Round 84-93 :
Rd: sc in each = 90st (10 rounds)
Round 94 :
Rd: (7sc, sc2tog) x 10 = 80st
Round 95-99 :
Rd: sc in each = 80st (5 rounds)
Round 100 :
Rd: (6sc, sc2tog) x 10 = 70st
Round 101-105 :
Rd: sc in each = 70st (5 rounds)
Round 106 :
Rd: (5sc, sc2tog) x 10 = 60st
Round 107 :
Rd: (4sc, sc2tog) x 10 = 50st
Round 108 :
Rd: (3sc, sc2tog) x 10 = 40st
Round 109 :
Rd: (2sc, sc2tog) x 10 = 30st
Round 110 :
Rd: (4sc, sc2tog) x 5 = 25st Stuff body.
Round 111 :
Rd: (3sc, sc2tog) x 5 = 20st
Round 112 :
Rd: (2sc, sc2tog) x 5 = 15st
Round 113 :
Rd: (1sc, sc2tog) x 5 = 10st
Round 114 :
Rd: sc2tog x 5 = 5st, fo
— Back Legs :
Info :
BACK LEGS: DOUBLE THREAD, MAKE 2, LIGHT GREEN. Start with the toes: MR, make 3 each foot.
Round 2 :
2sc in each = 12st
Round 3-4 :
Rd: sc in each = 12st (2 rounds)
Round 5 :
Row: 1ss, ch, turn, 1ss, 3sc, 1ss = 5st, ch, turn
Round 6 :
Row: 1ss, 3sc, 1ss = 5st, place new stitch marker
Round 7 :
Rd: sc in each = 12st
Round 8 :
Rd: (2sc in next, 2sc) x 4 = 16st
Round 9 :
Rd: sc in each = 16st
Round 10 :
Row: 1ss, ch, turn, 1ss, 6sc, 1ss, ch, turn
Round 11 :
Row: 1ss, 6sc, 1ss, place new stitch marker
Round 12 :
Rd: sc in each = 16st
Round 13 :
Rd: (2sc in next, 3sc) x 4 = 20st
Round 14-15 :
Rd: sc in each = 20st (2 rounds), fo first two made but not the third. Leave long tails.
Info :
Add the toes to the feet matching the curves. Leave the tails available for later use.
Round 16 :
10sc continuing in the third toe, 10sc in second toe, 20sc around the first toe, sc in the opposite 10 sts of second toe, sc in the opposite 10 sts of third toe = 60st, place new marker
Round 17-19 :
Rd: sc in each = 60st (3 rounds)
Round 20 :
Rd: 9sc, sc2tog, 8sc, sc2tog, 17sc, sc3tog, 7sc, sc3tog, 9sc = 54st
Round 21-22 :
Rd: sc in each = 54st (2 rounds)
Round 23 :
Rd: 8sc, sc2tog, 7sc, sc2tog, 15sc, sc3tog, 7sc, sc3tog, 7sc = 48st
Round 24-25 :
Rd: sc in each = 48st (2 rounds)
Round 26 :
Rd: 7sc, sc2tog, 7sc, sc2tog, 12sc, sc3tog, 7sc, sc3tog, 5sc = 42st
Round 27-46 :
Rd: sc in each = 42st (20 rounds)
Round 47 :
Row: 28sc, 1ss, ch, turn
Round 48 :
Row: a) Skip 1ss, 2sc, 21hdc, 2sc, 1ss, ch, turn. b) Skip 1ss, 2sc, 21hdc, 2sc, 1ss around (a) row ch, ch, turn. c) Skip 1ss, 2sc, 21hdc, 2sc, 1ss around (b) row ch, ch, turn. d) Skip 1ss, 2sc, 21hdc, 2sc, 1sc around (a) row ch, 30sc, 1sc around (b) row ch, place new marker. e) Skip 1ss, 2sc, 21hdc, 2sc, 1ss around (b) row ch, ch, turn.
Round 48 cont :
f) Skip 1ss, 2sc, 21hdc, 2sc, 1ss around (a) row ch, ch, turn. g) Skip 1ss, 2sc, 21hdc, 2sc, 1ss around (b) row ch, ch, turn. h) Skip 1ss, 2sc, 21hdc, 2sc, 1ss around (a) row ch, ch, turn. i) Skip 1ss, 2sc, 21hdc, 2sc, 1ss around (b) row ch, ch, turn. j) Skip 1ss, 2sc, 21hdc, 2sc, 1ss in same st as (a) ss, ch, turn. k) Skip 1ss, 2sc, 21hdc, 2sc, 1ss in same st as (b) ss, ch, turn. l) Skip 1ss, 2sc, 21hdc, 2sc, 1ss around (k) row ch, ch, turn. m) Skip 1ss, 2sc, 21hdc, 2sc, 1ss around (l) row ch, ch, turn. n) Skip 1ss, 2sc, 21hdc, 2sc, 1ss around (k) row ch, ch, turn. o) Skip 1ss, 2sc, 21hdc, 2sc, 1ss around (l) row ch, ch, turn. p) Skip 1ss, 2sc, 21hdc, 2sc, 1sc around (k) row ch, 15sc, sc around (l) row ch, place a new marker
Round 49 :
Rd: sc in each = 42st
Round 50 :
Rd: 26sc, (2sc in next x 16) = 58st (stuff foot)
Round 51-52 :
Rd: sc in each = 58st (2 rounds)
Round 53 :
Rd: 9sc, (2sc in next x 6), 43sc = 64st
Round 54 :
Rd: 12sc, (2sc in next x 6), 46sc = 70st
Round 55-56 :
Rd: sc in each = 70st (2 rounds)
Round 57 :
Row: (left) 28sc, ch, turn (right) 52sc, 2sc in next x4, 6sc, ch, turn
Round 58 :
Row: (left) 42sc, 2sc in next x4, 6sc, ch, turn (right) for the right foot skip to the next row
Round 59 :
Row: 56sc = 56st, ch, turn
Round 60-61 :
Row: sc in each = 56st, ch, turn (2 rows)
Round 62 :
Row: 44sc, 2sc in next x4, 8sc = 60st, ch, turn
Round 63-65 :
Row: sc in each = 60st, ch, turn (3 rows)
Round 66 :
Row: sc2tog, 44sc, 2sc in next x4, 8sc, sc2tog = 62st, ch, turn
Round 67-69 :
Row: sc in each = 62st, ch, turn (3 rows)
Round 70 :
Row: sc2tog, 46sc, 2sc in next x4, 10sc = 65st, ch, turn
Round 71-72 :
Row: sc in each = 65st, ch, turn (2 rows) 2ch after second row
Round 73 :
Row: 40hdc, 1sc, 1ss, ch, turn
Round 74 :
Row: 1ss, 1sc, 40hdc, 2ch, turn
— Front Legs :
Info :
FRONT LEGS: DOUBLE THREAD, MAKE 2, LIGHT GREEN. Start with the toes: MR, make 3 each foot. Note: directions may apply to left or right; the pattern marks specific instructions for each leg where necessary.
Round 2 :
2sc in each = 12st
Round 3-4 :
Rd: sc in each = 12st (2 rounds)
Round 5 :
Row: 1ss, ch, turn, 1ss, 3sc, 1ss =5st, ch, turn
Round 6 :
Row: 1ss, 3sc, 1ss =5st, place new stitch marker
Round 7 :
Rd: sc in each =12st
Round 8 :
Rd: (2sc in next,2sc) x4 =16st
Round 9 :
Rd: sc in each =16st
Round 10 :
Row: 1ss, ch, turn
Round 11 :
Row: a) Skip 1ss, 1sc, 4hdc, 1sc, 1ss, ch, turn. b) Skip 1ss, 1sc, 4hdc, 1sc, ss around (a) row ch, 8sc, sc around (b) row ch, place new stitch marker
Round 12 :
Rd: sc in each = 16st
Round 13 :
Rd: (2sc in next, 3sc) x4 = 20st
Round 14 :
Rd: sc in each = 20st (fo first two made but not the third)
Info :
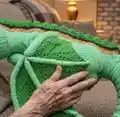
Add the toes to the feet making sure the curve goes towards the top. Look at the pictures for reference.
Round 15 :
Rd: 10sc in the third toe, 10sc in second toe, 20sc around the first toe, sc in the opposite 10 sts of second toe, sc in the opposite 10 sts of third toe = 60st, Do a partial round of 30sc and place new marker
Round 16 :
Rd: 4sc, 2hdc in next x2, 8sc, 2hdc in next x2, 8sc, 2hdc in next x2, 34sc = 66st
Round 17 :
Rd: 4sc, hdc2tog x2, 8sc, hdc2tog x2, 8sc, hdc2tog x2, 34sc = 60st
Round 18 :
Rd: (8sc, sc2tog) x 6 = 54st
Round 19 :
Rd: (7sc, sc2tog) x 6 = 48st
Round 20 :
Rd: (6sc, sc2tog) x 6 = 42st
Round 21 :
Rd: sc in each = 42st
Round 22 :
Rd: (5sc, sc2tog) x 6 = 36st
Round 23 :
Rd: sc in each = 36st
Round 24 :
Rd: (4sc, sc2tog) x 6 = 30st
Round 25 :
Rd: sc in each = 30st
Round 26 :
Rd: (3sc, sc2tog) x 6 = 24st
Round 27-28 :
Rd: sc in each = 24st (2 rounds)
Round 29 :
Rd: (3sc, 2sc in next) x 6 = 30st
Round 30 :
Rd: sc in each = 30st
Round 31 :
Rd: (4sc, 2sc in next) x 6 = 36st
Round 32 :
Rd: sc in each = 36st
Round 33 :
Rd: (left) 2sc, 2sc in next, 33sc = 37st (right) 23sc, 2sc in next, 12sc = 37st
Round 34 :
Rd: (left) 2sc, 2sc in next x 2, 33sc = 39st (right) 23sc, 2sc in next x 2, 12sc = 39st
Round 35 :
Rd: (left) 2sc, 2sc in next x 4, 33sc = 43st (right) 23sc, 2sc in next x 4, 12sc = 43st
Round 36 :
Rd: (left) 20sc, 2sc in next, 22sc = 44st (right) 12sc, 2sc in next, 30sc = 44st
Round 37 :
Rd: (left) 20sc, 2sc in next x 2, 22sc = 46st (right) 12sc, 2sc in next x 2, 30sc = 46st
Round 38-44 :
Rd: sc in each = 46st (7 rows)
Round 45 :
Rd: (left) 2sc, sc2tog x 2, 40sc = 44st (right) 28sc, sc2tog x 2, 14sc = 44st
Round 46 :
Rd: (left) 2sc, sc2tog, 40sc = 43st (right) 28st, sc2tog, 14sc = 43st
Round 47 :
Rd: 15sc, sc2tog x 2, 24sc = 41st
Round 48 :
Rd: (left) (5sc, sc2tog) x 5, 6sc = 36st (right) 6sc, (sc2tog, 5sc) x 5 = 36st
Additional Rounds :
Continue shaping following the patterned decreases and rows indicated in the full pattern to complete the front leg shaping through the rounds provided in the pattern (rows continue with sc2tog, sc3tog sequences and row repeats as specified until limbs are completed).
— Tail :
Info :
TAIL: 85 CH – MAKE A RING WITH SS, DOUBLE THREAD, LLT, LIGHT GREEN
Round 1 :
sc in each = 85st
Round 2 :
83sc, sc2tog = 84st
Round 3 :
82sc, sc2tog = 83st
Round 4 :
81sc, sc2tog = 82st
Round 5 :
80sc, sc2tog = 81st
Round 6 :
79sc, sc2tog = 80st
Round 7 :
Row: 4sc, 1ss, ch, turn
Round 8 :
Row: a) skip 1ss, 2sc, 44hdc, 2sc, 1ss, ch, turn. b) skip 1ss, 2sc, 44hdc, 2sc, 1ss around ch of row a, ch, turn. c) skip 1ss, 2sc, 44hdc, 2sc, 1ss around ch of row b, ch, turn. d) skip 1ss, 2sc, 44hdc, 2sc, 1sc around ch of row a, 30sc, 1sc around ch of row b, place new marker
Round 9 :
Rd: 64sc, sc2tog, 14sc = 79st
Round 10 :
Row: 50sc, 1ss, ch, turn
Round 11 :
Row: a) skip 1ss, 2sc, 46hdc, 2sc, 1ss, ch, turn. b) skip 1ss, 2sc, 46hdc, 2sc, 1ss around ch of row a, ch, turn. c) skip 1ss, 2sc, 46hdc, 2sc, 1ss around ch of row b, ch, turn. d) skip 1ss, 2sc, 46hdc, 2sc, 1sc around ch of row a, 27sc, 1sc around ch of row b, place new marker
Round 12 :
Rd: 64sc, sc2tog, 13sc = 78st
Round 13 :
Row: 52sc, 1ss, ch, turn
Round 14 :
Row: a) skip 1ss, 2sc, 50hdc, 2sc, 1ss, ch, turn. b) skip 1ss, 2sc, 50hdc, 2sc, 1ss around ch of row a, ch, turn. c) skip 1ss, 2sc, 50hdc, 2sc, 1ss around ch of row b, ch, turn. d) skip 1ss, 2sc, 50hdc, 2sc, 1sc around ch of row a, 22sc, 1sc around ch of row b, place new marker
Round 15 :
Rd: 66sc, sc2tog, 10sc = 77st
Round 16 :
Row: 56sc, 1ss, ch, turn
Round 17 :
Row: a) skip 1ss, 2sc, 54hdc, 2sc, 1ss, ch, turn. b) skip 1ss, 2sc, 54hdc, 2sc, 1ss around ch of row a, ch, turn. c) skip 1ss, 2sc, 54hdc, 2sc, 1ss around ch of row b, ch, turn. d) skip 1ss, 2sc, 54hdc, 2sc, 1sc around ch of row a, 17sc, 1sc around ch of row b, place new marker
Round 18 :
Rd: 67sc, sc2tog, 8sc = 76st
Round 19 :
Row: 60sc, 1ss, ch, turn
Round 20 :
Row: a) skip 1ss, 2sc, 58hdc, 2sc, 1ss, ch, turn. b) skip 1ss, 2sc, 58hdc, 2sc, 1ss around ch of row a, ch, turn. c) skip 1ss, 2sc, 58hdc, 2sc, 1ss around ch of row b, ch, turn. d) skip 1ss, 2sc, 58hdc, 2sc, 1sc around ch of row a, 12sc, 1sc around ch of row b, place new marker
Round 21 :
Rd: 69sc, sc2tog, 5sc = 75st
Round 22 :
Row: 64sc, 1ss, ch, turn
Round 23 :
Row: a) skip 1ss, 2sc, 62hdc, 2sc, 1ss, ch, turn. b) skip 1ss, 2sc, 62hdc, 2sc, 1ss around ch of row a, ch, turn. c) skip 1ss, 2sc, 62hdc, 2sc, 1ss around ch of row b, ch, turn. d) skip 1ss, 2sc, 62hdc, 2sc, 1sc around ch of row a, 7sc, 1sc around ch of row b, place new marker
Round 24 :
Rd: 70sc, sc2tog, 3sc = 74st
Round 25 :
Rd: 69sc, sc2tog, 3sc = 73st
Round 26 :
Row: 65sc, 1ss, ch, turn
Round 27 :
Row: a) skip 1ss, 2sc, 60hdc, 2sc, 1ss, ch, turn. b) skip 1ss, 2sc, 60hdc, 2sc, 1sc around ch of row a, 7sc, 1sc around ch of row b, place new marker
Round 28 :
Rd: 68sc, sc2tog, 3sc = 72st
Round 29 :
Rd: 67sc, sc2tog, 3sc = 71st
Round 30 :
Row: 63sc, 1ss, ch, turn
Round 31 :
Row: a) skip 1ss, 2sc, 58hdc, 2sc, 1ss, ch, turn. b) skip 1ss, 2sc, 58hdc, 2sc, 1sc around ch of row a, 7sc, 1sc around ch of row b, place new marker
Round 32 :
Rd: 66sc, sc2tog, 3sc = 70st
Round 33 :
Rd: 66sc, sc2tog, 2sc = 69st
Note :
Continue following the tail shaping rows and decreases as specified in the pattern through subsequent rounds; the tail is worked flat and shaped with repeated hdc rows and sc2tog decreases, placing markers where instructed and finishing with the indicated stitch counts.
— Assembly :
Info :
Assembly instructions can be found throughout the pattern; pin pieces before sewing.
This giant dragon pattern makes a dramatic, playful statement that kids and adults will adore. It combines structured shaping, double-thread strength, and delightful details for a finished dragon thats built for imaginative play. Whether you crochet it as a gift or a centerpiece, this dragon will bring handmade magic to any room. 🧶🐉