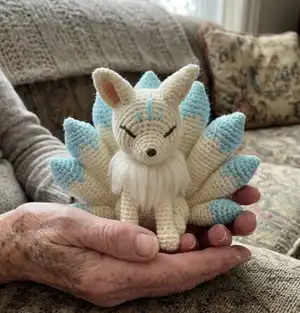
Create a sweet, nine-tailed kitsune with this complete crochet pattern. You will make a cuddly little fox with embroidered facial features and soft brushed fur around the neck. The pattern includes step-by-step rounds, clear assembly instructions, and helpful photos so you can follow along easily.
Progress Tracker
0% Complete
— Head :
Round 1 :
6 sc in magic ring. (6 sts)
Round 2 :
Sc 3, inc 3. (9 sts)
Round 3 :
Inc 3, sc 6. (12 sts)
Round 4 :
Sc 6, *sc 1, inc,* 3 times. (15 sts)
Round 5 :
*Sc 1, inc,* 3 times, sc 9. (18 sts)
Round 7 :
*Sc 1, inc,* 6 times, sc 6. (24 sts)
Round 8 :
*Sc 1, inc,* 9 times, sc 6. (33 sts)
Round 9 :
Sc 4, inc, *sc 10, inc,* 2 times, sc 6. (36 sts)
Round 10 :
*Sc 11, inc,* 3 times. (39 sts)
Round 11 :
Sc 5, inc, *sc 12, inc,* 2 times, sc 7. (42 sts)
Round 12 :
*Sc 13, inc,* 2 times, sc 14. (44 sts)
Round 13 :
Sc 4, dec, sc 30, dec, sc 6. (42 sts)
Round 20 :
*Sc 5, dec,* 6 times. (36 sts)
Round 21 :
*Sc 4, dec,* 6 times. (30 sts)
Round 22 :
*Sc 3, dec,* 6 times. (24 sts)
Round 23 :
*Sc 2, dec,* 6 times. (18 sts)
Round 24 :
*Sc 1, dec,* 6 times. (12 sts)
Round 25 :
Dec around. (6 sts)
Info :
Fasten off and leave a tail for sewing.
— Ears (make 2) :
Round 1 :
6 sc in magic ring. (6 sts)
Round 2 :
*Sc 1, inc,* 3 times. (9 sts)
Round 3 :
*Sc 2, inc,* 3 times. (12 sts)
Round 4 :
*Sc 3, inc,* 3 times. (15 sts)
Round 5 :
*Sc 4, inc,* 3 times. (18 sts)
Round 6 :
*Sc 5, inc,* 3 times. (21 sts)
Info :
Press the ear flat and do not stuff. Fasten off and leave a tail for sewing.
— Front Legs (make 2) :
Round 1 :
6 sc in magic ring. (6 sts)
Round 2 :
*Sc 3 in one st, inc, sc 1,* 2 times. (12 sts)
Round 6 :
Dec 3, sc 6. (9 sts)
Info :
Fasten off and leave a tail for sewing.
— Body :
Round 1 :
6 sc in magic ring. (6 sts)
Round 2 :
2 sc in each st around. (12 sts)
Round 3 :
*Sc 1, inc,* 6 times. (18 sts)
Round 4 :
*Sc 2, inc,* 6 times. (24 sts)
Round 5 :
*Sc 3, inc,* 6 times. (30 sts)
Round 9 :
Sc 15, *sc 4, inc,* 3 times. (33 sts)
Round 11 :
Sc 15, *sc 5, inc,* 3 times. (36 sts)
Info :
Stuff the front legs with fiberfill. In the next round, we will join the front legs with the body.
Round 13 :
*Sc 4, dec,* 3 times, sc 4, starting at the next unstitched st of one front leg (photo 4), sc 7 on the leg, skip 2 sts on the body and sc 4. Continue by joining the other leg, starting at the next unstitched st of the other front leg, sc 7 on the leg, skip 2 sts on the body and sc 7 on the remaining sts of the round on the body. (43 sts) (photo 5)
Round 14 :
Sc 26, dec, sc 15. (42 sts)
Round 15 :
Sc 5, dec, sc 12, dec, sc 4, dec, sc 5, dec, sc 8. (38 sts)
Round 17 :
Sc 17, dec, sc 10, dec, sc 7. (36 sts)
Round 21 :
Sc 4, dec, *sc 10, dec,* 2 times, sc 6. (33 sts)
Round 23 :
*Sc 9, dec,* 3 times. (30 sts)
Round 24 :
*Sc 3, dec,* 6 times. (24 sts)
Round 25 :
Sc 1, hdc, dc 3, tc 2, dc 3, hdc, sc 1. (12 sts) (left as an incomplete round)
Info :
Stuff body. Fasten off and leave a tail for sewing.
— Hind Leg - Feet (make 2) :
Round 1 :
6 sc in magic ring. (6 sts)
Round 2 :
*Sc 1, inc,* 3 times. (9 sts)
Info :
Stuff feet. Fasten off and leave a tail for sewing.
— Hind Leg - Thigh (make 2) :
Round 1 :
6 sc in magic ring. (6 sts)
Round 2 :
2 sc in each st around. (12 sts)
Round 3 :
*Sc 1, inc,* 6 times. (18 sts)
Info :
Stuff thigh lightly and continue stuffing as you go.
Round 10 :
*Sc 1, dec,* 6 times. (12 sts)
Round 11 :
Dec around. (6 sts)
Info :
Fasten off and leave a tail for sewing.
— Tails :
Item Name (Tail 1) :
Using sky blue yarn,
Round 1 :
4 sc in magic ring. (4 sts)
Round 2 :
Sc 1, inc 3. (7 sts)
Round 3 :
Sc 1, *sc 1, inc,* 3 times. (10 sts)
Round 4 :
Sc 1, *sc 1, inc,* 4 times, sc 1. (14 sts)
Round 5 :
*Sc 2, inc,* 4 times, sc 2. (18 sts)
Round 6 :
Sc 3, *sc 3, inc,* 3 times, sc 3. (21 sts)
Info :
From R7 onwards, we will start working with both sky blue [blue] and white [white] yarn.
Round 7 :
Sc 7, inc, sc 2, change to white yarn [white], sc 1, change to sky blue yarn [blue], sc 1, inc, sc 1, [white] sc 1, [blue] sc 2, inc, [white] sc 1, [blue] sc 2. (24 sts)
Round 8 :
Sc 1, [white] sc 1, [blue] sc 3, [white] sc 1, [blue] sc 2, sc 1 in the next st, [white] sc in the same st (this is an inc with one sky blue and one white st), [blue] sc 2, [white] sc 2, [blue] sc 1, inc, [white] sc 3, [blue] sc 2, sc 1 in the next st, [white] sc in the same st (this is an inc with one sky blue and one white st), sc 2, [blue] sc 1. (27 sts)
Round 9 :
[White] sc 3, [blue] sc 2, [white] sc 2, [blue] sc 1, [white] sc 3, [blue] sc 1, [white] sc 3, [blue] sc 1, [white] sc 5, [blue] sc1, [white] sc 5. (27 sts)
Round 10 :
*Sc 1, dec,* 3 times, *sc 5, inc,* 3 times. (27 sts)
Round 12 :
*Sc 1, dec,* 2 times, *sc 5, inc,* 3 times, sc 1, dec. (27 sts)
Round 14 :
*Sc 7, dec,* 3 times. (24 sts)
Round 15 :
Sc 4, dec, *sc 5, inc,* 2 times, sc 4, dec. (24 sts)
Round 17 :
Sc 2, dec, *sc 6, dec,* 2 times, sc 4. (21 sts)
Info :
Stuff the tail, and continue stuffing as you go.
Round 19 :
*Sc 5, dec,* 3 times. (18 sts)
Round 21 :
*Sc 7, dec,* 2 times. (16 sts)
Round 24 :
Sc 2, dec, sc 6, dec, sc 4. (14 sts)
Round 27 :
*Sc 5, dec,* 2 times. (12 sts)
Round 31 :
Sc 1, dec, sc 4, dec, sc 3. (10 sts)
Round 33 :
*Sc 3, dec,* 2 times. (8 sts)
Round 35 :
*Sc 2, dec,* 2 times. (6 sts)
Round 37 :
*Sc 1, dec,* 2 times. (4 sts)
Info :
Fasten off and leave a tail for sewing.
Item Name (Tails 2 & 3 - make 2) :
Using sky blue yarn,
Round 1 :
4 sc in magic ring. (4 sts)
Round 2 :
Sc 1, inc 3. (7 sts)
Round 3 :
Sc 1, *sc 1, inc,* 3 times. (10 sts)
Round 4 :
Sc 1, *sc 1, inc,* 4 times, sc 1. (14 sts)
Round 5 :
*Sc 2, inc,* 4 times, sc 2. (18 sts)
Round 6 :
Sc 3, *sc 3, inc,* 3 times, sc 3. (21 sts)
Info :
From R7 onwards, we will start working with both sky blue [blue] and white [white] yarn.
Round 7 :
Sc 7, inc, sc 2, change to white yarn [white], sc 1, change to sky blue yarn [blue], sc 1, inc, sc 1, [white] sc 1, [blue] sc 3, [white] sc 1, [blue] sc 3, [white] sc 1, [blue] sc 1. (24 sts)
Round 8 :
Sc 1, [white] sc 1, [blue] sc 4, [white] sc 1, [blue] sc 1, [white] sc 3, [blue] sc 2, [white] sc 3, [blue] sc 2, [white] sc 3, [blue] sc 1. (24 sts)
Round 9 :
[White] sc 3, [blue] sc 1, dec, [white] sc 2, [blue] sc 1, [white] sc 2, [blue] sc 1, [white] sc 3, [blue] sc 1, [white] sc 3, [blue] sc 1, [white] sc 3, [blue] sc 1, [white] sc 1. (24 sts)
Round 11 :
*Sc 1, dec,* 2 times, *sc 4, inc,* 3 times, sc 1, dec. (24 sts)
Round 13 :
Sc 2, dec, *sc 6, dec,* 2 times, sc 4. (21 sts)
Round 15 :
Sc 2, dec, *sc 5, inc,* 2 times, sc 3, dec. (21 sts)
Round 17 :
*Sc 5, dec,* 3 times. (18 sts)
Round 19 :
*Sc 7, dec,* 2 times. (16 sts)
Round 22 :
Sc 2, dec, sc 6, dec, sc 4. (14 sts)
Round 25 :
*Sc 5, dec,* 2 times. (12 sts)
Round 29 :
Sc 1, dec, sc 4, dec, sc 3. (10 sts)
Round 31 :
*Sc 3, dec,* 2 times. (8 sts)
Round 33 :
*Sc 2, dec,* 2 times. (6 sts)
Round 35 :
*Sc 1, dec,* 2 times. (4 sts)
Info :
Fasten off and leave a tail for sewing.
Item Name (Tails 4 & 5 - make 2) :
Using sky blue yarn,
Round 1 :
4 sc in magic ring. (4 sts)
Round 2 :
Sc 1, inc 3. (7 sts)
Round 3 :
Sc 1, *sc 1, inc,* 3 times. (10 sts)
Round 4 :
Sc 1, *sc 1, inc,* 4 times, sc 1. (14 sts)
Round 5 :
*Sc 2, inc,* 4 times, sc 2. (18 sts)
Round 6 :
Sc 3, *sc 3, inc,* 3 times, sc 3. (21 sts)
Info :
From R7 onwards, we will start working with both sky blue [blue] and white [white] yarn.
Round 7 :
Sc 7, inc, sc 2, change to white yarn [white], sc 1, change to sky blue yarn [blue], sc 1, inc, sc 1, [white] sc 1, [blue] sc 3, [white] sc 1, [blue] sc 3, [white] sc 1, [blue] sc 1. (24 sts)
Round 8 :
Sc 1, [white] sc 1, [blue] sc 4, [white] sc 1, [blue] sc 1, [white] sc 3, [blue] sc 2, [white] sc 3, [blue] sc 2, [white] sc 3, [blue] sc 1. (24 sts)
Round 9 :
[White] sc 3, [blue] sc 1, dec, [white] sc 2, [blue] sc 1, [white] sc 2, [blue] sc 1, [white] sc 3, [blue] sc 1, [white] sc 3, [blue] sc 1, [white] sc 3, [blue] sc 1, [white] sc 1. (24 sts)
Round 11 :
Sc 2, dec, *sc 6, dec,* 2 times, sc 4. (21 sts)
Round 13 :
*Sc 5, dec,* 3 times. (18 sts)
Round 15 :
*Sc 5, dec,* 2 times. (12 sts)
Round 16 :
*Sc 7, dec,* 2 times. (16 sts)
Round 18 :
Sc 2, dec, sc 6, dec, sc 4. (14 sts)
Info :
Fasten off and leave a tail for sewing.
Item Name (Tails 6 & 7 - make 2) :
Using sky blue yarn,
Round 1 :
4 sc in magic ring. (4 sts)
Round 2 :
Sc 1, inc 3. (7 sts)
Round 3 :
Sc 1, *sc 1, inc,* 3 times. (10 sts)
Round 4 :
Sc 1, *sc 1, inc,* 4 times, sc 1. (14 sts)
Round 5 :
*Sc 2, inc,* 4 times, sc 2. (18 sts)
Round 6 :
Sc 3, *sc 3, inc,* 3 times, sc 3. (21 sts)
Info :
From R6 onwards, we will start working with both sky blue [blue] and white [white] yarn.
Round 6 :
Sc 6, inc, sc 2, [white] sc 1, [blue] inc, sc 2, [white] sc 1, [blue] inc, sc 1, [white] sc 1, [blue] sc 1. (21 sts)
Round 7 :
[Blue] sc 1, [white] sc 3, [blue] sc 1, [white] sc 3, [blue] sc 1, [white] sc 3, [blue] sc 1, [white] sc 1. (21 sts)
Round 11 :
*Sc 5, dec,* 2 times. (12 sts)
Round 12 :
Sc 1, dec, sc 4, dec, sc 3. (10 sts)
Round 14 :
*Sc 3, dec,* 2 times. (8 sts)
Round 16 :
*Sc 2, dec,* 2 times. (6 sts)
Round 18 :
*Sc 1, dec,* 2 times. (4 sts)
Info :
Fasten off and leave a tail for sewing.
Item Name (Tails 8 & 9 - make 2) :
Using sky blue yarn,
Round 1 :
4 sc in magic ring. (4 sts)
Round 2 :
Sc 1, inc 3. (7 sts)
Round 3 :
Sc 1, *sc 1, inc,* 3 times. (10 sts)
Round 4 :
Sc 1, *sc 1, inc,* 4 times, sc 1. (14 sts)
Round 5 :
Sc 1, dec, *sc 3, inc,* 2 times, sc 1, dec. (14 sts)
Round 6 :
*Sc 3, inc,* 2 times, sc 3. (14 sts)
Info :
Fasten off and leave a tail for sewing.
This little kitsune is a lovely project to brighten your day and decorate your home with handmade charm. The nine tails and fluffy neck add delightful detail and personality to the finished amigurumi. Enjoy making Fuyuko and sharing this adorable companion with someone special. 🧶✨