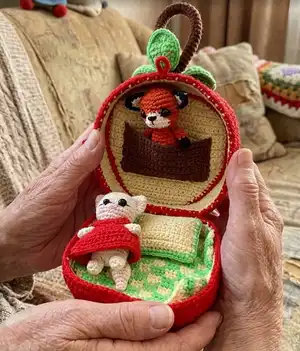
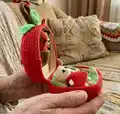
Make a charming fox duo and an apple-shaped bag with this complete crochet pattern. You will create tiny red and white foxes with removable accessories, a cozy apple bag, pillow and blanket details. The pattern includes step-by-step rounds, materials list and assembly photos so you can recreate the scene exactly as shown.
Progress Tracker
0% Complete
— Red Fox - Arms (make 2) :
Round 1 :
With Black yarn. 6sc in MR. Place row marker here.
Round 3 :
Change color to orange. 6sc
Round 4-6 :
6sc (3 rounds)
Info :
Stuff the arms with fiberfill. Fasten off, cut the yarn, weave in the yarn ends.
— Red Fox - Legs (make 2) :
Round 1 :
With Black yarn. 6sc in MR. Place row marker here.
Round 3 :
3sc, 3dec, 3sc (9)
Round 4 :
Change color to orange. (1sc, dec) *3 (6)
Round 5-9 :
6sc (5 rounds)
Info :
Stuff the legs with fiberfill. Fasten off, cut the yarn, weave in the yarn ends.
— Red Fox - Ears (make 2) :
Info :
Crochet 2 pieces in White and 2 pieces in Orange color. Work in rows.
Row 1 :
ch5. Start from the second chain on the hook: 4sc, turn (4)
Row 2 :
ch1, dec, 2sc, turn (3)
Row 3 :
ch1, dec, 1sc, turn (2)
Row 4 :
ch1, dec (1). Cut the yarn.
Info :
Place Orange and White pieces wrong sides together, with Black yarn crochet through both pieces: 5sc along one side, inc in the corner, 5sc along other side. Leave a long tail for sewing.
— Red Fox - Tail :
Round 1 :
With White yarn. 6sc in MR. Place row marker here.
Round 3 :
(1sc, inc) *3 (9)
Round 4 :
(2sc, inc) *3 (12)
Round 5 :
Attention! Crochet in Jacquard colour changing technique from Rnd 5. Change colour to orange yarn (these stitches are highlighted in red) (1sc, 1sc) *6 (12)
Round 6 :
Continue with Orange yarn. 12sc. Stuff the tail with fiberfill.
Round 8 :
(2sc, dec) *3 (9)
Round 9 :
(1sc, dec) *3 (6)
Round 10 :
6sc. Leave long tail for sewing.
— Red Fox - Body :
Round 1 :
With Orange yarn. 6sc in MR. Place row marker here.
Round 3 :
(1sc, inc) *6 (18)
Round 4 :
(2sc, inc) *6 (24)
Round 5-8 :
24sc (4 rounds)
Round 9 :
(2sc, dec) *6 (18)
Round 11 :
(1sc, dec) *6 (12)
Round 12 :
12sc (12). Stuff the body with fiberfill.
— Red Fox - Head :
Round 14 :
(3sc, inc) *6 (30)
Round 15 :
Attention! Crochet in Jacquard colour changing technique from Rnd 15 to 18. Change colour to White yarn (these stitches are highlighted in red). 5sc, 10sc, 15sc (30)
Round 16 :
5sc, 10sc, 15sc (30)
Round 17 :
6sc, 8sc, 16sc (30)
Round 18 :
8sc, 4sc, 18sc (30)
Round 19-21 :
Continue with Orange yarn. 30sc (3 rounds)
Info :
Insert the eyes between rounds 18-19 at a distance of 8-10sc.
Round 22 :
(3sc, dec) *6 (24)
Info :
Stuff the head with fiberfill.
Round 23 :
(2sc, dec) *6 (18)
Round 24 :
(1sc, dec) *6 (12)
Round 25 :
6dec (6). Fasten off, cut the yarn, weave in the ends.
Info :
Tighten cheeks following the pictures below and attach ears to head as shown in photos.
— White Fox - Arms (make 2) :
Round 1 :
With White yarn. 6sc in MR. Place row marker here.
Round 2-6 :
6sc (5 rounds)
Info :
Stuff the arms with fiberfill. Fasten off, cut the yarn, weave in the yarn ends.
— White Fox - Legs (make 2) :
Round 1 :
With White yarn. 6sc in MR. Place row marker here.
Round 3 :
3sc, 3dec, 3sc (9)
Round 4 :
(1sc, dec) *3 (6)
Round 5-9 :
6sc (5 rounds)
Info :
Stuff the legs with fiberfill. Fasten off, cut the yarn, weave in the yarn ends.
— White Fox - Ears (make 2) :
Info :
Crochet 2 pieces in White and 2 pieces in Pink color. Work in rows.
Row 1 :
Ch5. Start from the second chain on the hook: 4sc, turn (4)
Row 2 :
Ch1, dec, 2sc, turn (3)
Row 3 :
Ch1, dec, 1sc, turn (2)
Row 4 :
Ch1, dec (1). Cut the yarn on the pink pieces.
Info :
Place white and pink pieces wrong sides together, with White yarn crochet through both pieces: 5sc along one side, inc in the corner, 5sc along other side. Leave a long tail for sewing.
— White Fox - Tail :
Round 1 :
With Pink yarn. 6sc in MR. Place row marker here.
Round 3 :
(1sc, inc) *3 (9)
Round 4 :
(2sc, inc) *3 (12)
Round 5 :
Attention! Crochet in Jacquard colour changing technique from Rnd 5. Change colour to White yarn (these stitches are highlighted in red) (1sc, 1sc) *6 (12)
Round 6 :
Continue with White yarn. 12sc. Stuff the tail with fiberfill.
Round 8 :
(2sc, dec) *3 (9)
Round 9 :
(1sc, dec) *3 (6)
Round 10 :
6sc. Leave a long tail for sewing.
— White Fox - Body :
Round 1 :
With White yarn. 6sc in MR. Place row marker here.
Round 3 :
(1sc, inc) *6 (18)
Round 4 :
(2sc, inc) *6 (24)
Round 5-8 :
24sc (4 rounds)
Round 9 :
(2sc, dec) *6 (18)
Round 11 :
(1sc, dec) *6 (12)
Round 12 :
12sc (12). Stuff the body with fiberfill.
— White Fox - Head :
Round 14 :
(3sc, inc) *6 (30)
Round 15 :
Attention! Crochet in Jacquard colour changing technique from Rnd 15 to 18. Change colour to Pink yarn (these stitches are highlighted in red). 5sc, 10sc, 15sc (30)
Round 16 :
5sc, 10sc, 15sc (30)
Round 17 :
6sc, 8sc, 16sc (30)
Round 18 :
8sc, 4sc, 18sc (30)
Round 19-21 :
Continue with White yarn. 30sc (3 rounds)
Info :
Insert the eyes between rounds 18-19 at a distance of 8-10sc. Stuff the head with fiberfill.
Round 22 :
(3sc, dec) *6 (24)
Round 23 :
(2sc, dec) *6 (18)
Round 24 :
(1sc, dec) *6 (12)
Round 25 :
6dec (6). Fasten off, cut the yarn, weave in the ends.
— Dress :
Row 1 :
With Red yarn. Work in rows. Chain 19. From the second chain on the hook: 18sc, turn (18)
Row 2 :
ch1, 3sc, ch4, (skip 4 sc, start from the next stitch), 4sc, ch4, (skip 4 sc, start from the next stitch), 3sc, turn (18)
Row 3 :
ch2, 18dc-inc, turn (36)
Row 4 :
ch2, 36dc, turn (36)
Row 5 :
ch2, (dc-inc, sc) *18. Cut the yarn. Make a fastener on the dress (sew a button on one side, make a button loop on the other). Put the dress on the fox.
— Pillow :
Row 1 :
Crochet 2 pieces in Yellow color. Chain 15. Start in the second chain from the hook: 14sc, turn (14)
Row 2-11 :
Ch1, 14sc, turn (10 rows). Cut the yarn.
Info :
Place both yellow pieces together using Green yarn crochet through both pieces: 14sc, inc in the corner, 11sc, inc in the corner, 14sc, inc in the corner, 11sc, inc in the corner. Stuff the pillow with fiberfill. Fasten off, cut the yarn, weave in the yarn ends.
— Blanket :
Row 1 :
With Yellow yarn. Work in rows. Ch 31. Start in the second chain from the hook: 30sc, turn (30)
Info :
Attention! Crochet in jacquard technique from Row 2 to 11. Add Green yarn for checker pattern.
Pattern Rows 2-11 :
Green yarn (these stitches are highlighted in red). 2. ch2, (3dc, 3dc) *5, turn (30). 3. ch2, (3dc, 3dc) *5, turn (30). 4. ch2, (3dc, 3dc) *5, turn (30). 5. ch2, (3dc, 3dc) *5, turn (30). 6. ch2, (3dc, 3dc) *5, turn (30). 7. ch2, (3dc, 3dc) *5, turn (30). 8. ch2, (3dc, 3dc) *5, turn (30). 9. ch2, (3dc, 3dc) *5, turn (30). 10. ch2, (3dc, 3dc) *5, turn (30). 11. ch2, (3dc, 3dc) *5, turn (30).
Round 12 :
Continue with Yellow yarn. ch1, 30sc. Fasten off, cut the yarns, weave in the ends.
— Bag-Apple - Side Parts (make 2) :
Row 1 :
Crochet 2 pieces in Red and 2 pieces in Yellow color. Work in rows. Chain 7. From the second chain on the hook: 6sc, turn (6)
Row 2-96 :
Ch1, 6sc, turn (95 rows). Fold in half and make 5sl st through both sides.
Info :
Cut the yellow yarn, weave in ends. Do not cut the Red yarn.
— Bag-Apple - Connect Side Pieces :
Info :
Connect the pieces. Place one Yellow side piece inside the other Red side piece. Connect the two pieces together by using Red yarn and single crochet, (96sc) (see photo below). Repeat process on other side using Red yarn and reverse single crochet (96 reverse sc). Cut the yarn.
— Apple-Base (make 2) :
Row 1 :
Crochet 2 pieces in Red and 2 pieces in Yellow color. Work in rows. Chain 13. From the second chain on the hook: 12sc, turn (12)
Row 2 :
ch1, inc, 10sc, inc, turn (14)
Row 3 :
ch1, inc, 12sc, inc, turn (16)
Row 4 :
ch1, inc, 14sc, inc, turn (18)
Row 5 :
ch1, 18sc, turn (18)
Row 6 :
ch1, inc, 16sc, inc, turn (20)
Row 7-8 :
ch1, 20sc, turn (2 rows)
Row 9 :
ch1, inc, 18sc, inc, turn (22)
Row 10-11 :
ch1, 22sc, turn (2 rows)
Row 12 :
ch1, inc, 20sc, inc, turn (24)
Row 13 :
ch1, 24sc, turn (24)
Row 14 :
ch1, inc, 22sc, inc, turn (26)
Row 15 :
ch1, 26sc, turn (26)
Row 16 :
ch1, inc, 24sc, inc, turn (28)
Row 17-28 :
ch1, 28sc, turn (12 rows)
Row 29 :
ch1, dec, 24, dec, turn (26)
Row 30 :
ch1, dec, 22, dec, turn (24)
Row 31 :
ch1, dec, 20, dec, turn (22)
Row 32 :
ch1, dec, 18, dec, turn (20)
Row 33 :
ch1, dec, 16, dec, turn (18). Cut the yellow yarn, weave in ends. Do not cut the Red yarn.
Info :
Connect the pieces. Place two 'Apple-Base' together, using single crochet with red yarn around crochet: 96sc. Fasten off, cut the yarn, weave in the ends. Repeat process with the last two hearts.
— Bag-Apple - Connect Apple Base to Side :
Info :
Attach the apple base to the side part with Red yarn and reverse single crochet (96 reverse sc). Fasten off, cut the yarn, weave in the ends.
— Pocket :
Row 1 :
With Brown yarn. Work in rows. Chain 23. Start from the second chain on the hook: 22sc, turn (22)
Row 2-14 :
ch1, 22sc, turn (13 rows). Leave long tail for sewing.
Info :
Sew the pocket to one half apple-base using the long tail for sewing.
This delightful set includes two tiny foxes with a cozy apple bag, pillow and blanket — perfect for gifting or display. The pattern blends small-scale amigurumi work with fun jacquard colour changes and a clever apple construction. Follow the step-by-step rounds and photos to create a charming scene with handmade details. 🧶🍎✨