🧢 Beautiful ✨ Detailed πŸ’ Adorable

Fox Hat Pattern

Fox Hat Pattern
4.5β˜… Rating
2-4 Hours Time Needed
1.7K Made This
βœ‚οΈ

Beginner Friendly Level

Perfect for those just starting their crochet journey, with clear instructions and simple techniques

⏱️

Bite-Sized Project

Finishes in 2-4 hoursβ€”perfect for an afternoon of creative relaxation.

🧣

Snug Essential

Everyday comfort with practical charm, designed for both functionality and style through changing seasons.

About This Fox Hat Pattern

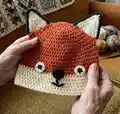
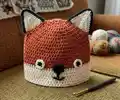
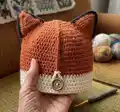
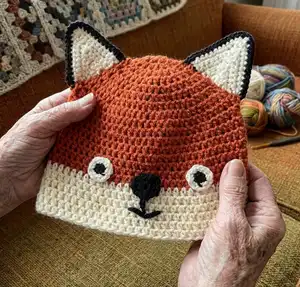
This Fox Hat pattern makes a cuddly knit-look beanie with cute fox ears and embroidered facial features. It uses half double crochet rounds for quick shaping and includes separate pieces for inner and outer ears, eyes, and nose. You will finish by sewing pieces to the hat and embroidering the mouth for a polished, playful look.

Fox Hat Pattern crochet pattern - detailed view of completed project

Written for the smallest size with alternate counts for larger sizes, the pattern uses Caron Simply Soft yarn and two hook sizes. Clear round-by-round instructions help you track increases and shaping for a neat, professional finish.

Why You'll Love This Fox Hat Pattern

I absolutely love this pattern because it turns simple stitches into a delightful, wearable character that kids adore. The design is easy to follow yet yields a polished, professional-looking hat with fun details like the layered ears and embroidered mouth. I enjoy how quickly the rounds work up using half-double crochet β€” you can see progress fast and stay motivated. Sewing the pieces on at the end is therapeutic and lets you personalize placement for unique expressions.

Fox Hat Pattern step 1 - construction progress Fox Hat Pattern step 2 - assembly progress Fox Hat Pattern step 3 - details and accessories Fox Hat Pattern step 4 - final assembly and finishing

Switch Things Up

I love customizing this hat by changing the main and contrast colors to create different animal looks; try gray and white for a wolf or brown and cream for a bear.

I sometimes adjust the size by switching yarn weight and hook; a bulkier yarn and larger hook will give a cozy chunky hat while fingering weight with a smaller hook makes a mini version for a doll.

I often add a pompom or braided ties at the ear edges for extra playfulness and functionality, especially for toddler hats that need securing.

I recommend embroidering different mouth shapes and eye positions to change the personality from curious to sleepy or mischievous.

I like to outline the ear edges in a darker color like black or deep brown to make the ear shape pop, as shown in the sample.

For colder climates, I add a thin fleece lining to the inside of the hat for warmth and comfort without changing the exterior look.

I sometimes substitute a fuzzy or textured yarn for the main color to give a more plush, toy-like finish that kids love to cuddle.

If I want a reversible look, I make the contrast band a little wider and hide seams carefully so the hat can be worn inside out for a different color effect.

I also experiment with tiny embroidered eyebrows or freckles to create distinct expressions and personalities for each hat I make.

I find that swapping the black nose for a tiny crocheted or felted button (sewn on securely) gives a cute 3D effect that stands out on photos and gifts.

Common Mistakes & How to Fix Them

βœ— Skipping the initial chain-4 ring setup can make your foundation too loose; be sure to ch 4 and join with a slip stitch to form a secure ring before beginning rnd 1. βœ— Failing to count increases each round can lead to incorrect stitch totals and uneven shaping; count stitches at the end of every round to confirm you have the stated stitch count. βœ— Changing tension or hook size mid-project will alter the finished size and gauge; stick with the recommended hook sizes and check gauge before starting to match the intended measurements. βœ— Not fastening off or breaking contrasting yarns when instructed makes neat color joins difficult; follow the pattern to join and break MC/A/B at the indicated points for clean transitions. βœ— Sewing ears or facial pieces without pinning can result in uneven placement; pin each piece in place and check alignment before stitching to secure symmetrical placement.

Fox Hat Pattern

Create a cozy, adorable fox hat with this easy crochet pattern that includes charming ears and facial details. You will enjoy working simple half-double crochet rounds to shape the beanie and make small assembled pieces for the ears, eyes and nose. This pattern is perfect for gifting or a fun weekend project that adds playful style to a child's wardrobe.

Beginner Friendly 2-4 Hours

Materials Needed for Fox Hat Pattern

β€” Main Fabric

  • 01
    Caron Simply Soft (6 oz/170.1 g; 315 yds/288 m)
  • 02
    Main Color (MC) Pumpkin (9765) - 1 ball (all sizes listed require 1 ball)
  • 03
    Contrast A Off White (9702) - 1 ball
  • 04
    Contrast B Black (9727) - 1 ball

β€” Tools Required

  • 01
    Crochet hook U.S. G/6 (4 mm) (smaller hook)
  • 02
    Crochet hook U.S. H/8 (5 mm) (larger hook)
  • 03
    Yarn needle for sewing pieces to hat and embroidery
  • 04
    Scissors

Progress Tracker

0% Complete

β€” Hat :

Infos :

Sizes to fit head circumference: 6/12 mos 17" [43 cm], 18/24 mos 18" [45.5 cm], 4 yrs 19" [48 cm], 6/8 yrs 19.5" [49.5 cm]. Gauge: 13 hdc and 11 rows = 4" [10 cm] with larger hook.

Info :

The instructions are written for smallest size. If changes are necessary for larger sizes the instructions will be written thus ( ). Numbers for each size are shown in the same color throughout the pattern. When only one number is given in black, it applies to all sizes.

Info :

Note: Ch 2 at beg of rnds does not count as hdc.

Info :

With larger hook and MC, ch 4. Join with sl st to first ch to form a ring.

Round 1 :

Ch 2. 8 hdc in ring. Join with sl st to first hdc. (8 hdc)

Round 2 :

Ch 2. 2 hdc in first hdc. *2 hdc in next hdc. Rep from * around. Join with sl st to first hdc. (16 hdc)

Round 3 :

Ch 2. 2 hdc in first hdc. *1 hdc in next hdc. 2 hdc in next hdc. Rep from * to last hdc. 1 hdc in each of last hdc. Join with sl st to first hdc. (24 hdc)

Round 4 :

Ch 2. 2 hdc in first hdc. *1 hdc in each of next 2 hdc. 2 hdc in next hdc. Rep from * to last 2 hdc. 1 hdc in each of last 2 hdc. Join with sl st to first hdc. (32 hdc)

Round 5 :

Ch 2. 2 hdc in first hdc. *1 hdc in each of next 3 hdc. 2 hdc in next hdc. Rep from * to last 3 hdc. 1 hdc in each of last 3 hdc. Join with sl st to first hdc. (40 hdc)

Round 6 :

Ch 2. 2 hdc in first hdc. *1 hdc in each of next 4 hdc. 2 hdc in next hdc. Rep from * to last 4 hdc. 1 hdc in each of last 4 hdc. Join with sl st to first hdc. (48 hdc)

Round 7 (Size 6/12 mos only) :

Ch 2. 2 hdc in first hdc. *1 hdc in each of next 11 hdc. 2 hdc in next hdc. Rep from * to last 11 hdc. 1 hdc in each of last 11 hdc. Join with sl st to first hdc. (52 hdc)

Round 7 (Sizes 18/24 mos, 4 yrs and 6/8 yrs only) :

Ch 2. 2 hdc in first hdc. *1 hdc in each of next 5 hdc. 2 hdc in next hdc. Rep from * to last 5 hdc. 1 hdc in each of last 5 hdc. Join with sl st to first hdc. (56 hdc)

Round 8 (Sizes 4 yrs and 6/8 yrs only) :

Ch 2. 2 hdc in first hdc. 1 hdc in each of next 27 (13) hdc. 2 hdc in next hdc 1 (3) time(s). 1 hdc in each hdc to end of rnd. Join with sl st to first hdc. (58 (60) hdc)

Round :

All sizes: Next rnd: Ch 2. 1 hdc in each hdc around. Join with sl st to first hdc. Rep last rnd until Hat from beg measures 5 (5Β½-5Β½-6)" [12.5 (14-14-15) cm], joining A at end of last rnd. Break MC.

Info :

With A, rep last rnd until Hat from beg measures 7 (7Β½-8-8Β½)" [18 (19-20.5-21.5) cm]. Fasten off.

β€” Ears :

Inner Ear :

With smaller hook and A, ch 2. 1st row: (RS). 5 sc in 2nd ch from hook. Turn.

Row 2 :

Ch 1. 1 sc in each of first 2 sc. 3 sc in next sc. 1 sc in each of next 2 sc. Turn. (7 sc)

Row 3 :

Ch 1. 1 sc in each of first 3 sc. (1 sc. 1 hdc. 1 dc. 1 hdc. 1 sc) in next sc. 1 sc in each of next 3 sc. Turn.

Row 4 :

Ch 1. 1 sc in each of next 5 sts. (1 sc. 1 hdc. 1 dc. 1 hdc. 1 sc) in next sc. 1 sc in each of next 5 sc. Turn.

Row 5 :

Ch 1. 1 sc in each of next 7 sts. (1 sc. 1 hdc. 1 dc. 1 hdc. 1 sc) in next sc. 1 sc in each of next 7 sc. Turn.

Row 6 :

Ch 1. 1 sc in each of next 9 sts. (1 sc. 1 hdc. 1 dc. 1 hdc. 1 sc) in next sc. 1 sc in each of next 9 sc. Fasten off.

Outer Ear :

With smaller hook and MC, make as given for Inner Ear.

Join Ears :

With WS of Inner Ear and Outer Ear facing each other, and RS of Inner Ear facing, using smaller hook join B with sl st to first sc.

Join Ears - 1st row :

1st row: Ch 1. Working through both thicknesses, 2 sc in first sc. 1 sc in each of next 10 sts. 3 sc in next sc. 1 sc in each of next 10 sts. 2 sc in last sc.

β€” Nose :

Nose :

With smaller hook and B, ch 2. 1st rnd: (3 sc. 1 hdc. 1 dc. 1 tr. 1 dc. 3 hdc. 1 dc. 1 tr. 1 dc. 1 hdc) all in 2nd ch from hook. Join with sl st to first sc. Fasten off.

β€” Eyes :

Eyes (make 2) :

With smaller hook and B, ch 2. 1st rnd: 6 sc in 2nd ch from hook. Join A with sl st to first sc. Break B.

Round 2 :

With A, ch 1. 2 sc in each sc around. Join with sl st to first sc. Fasten off.

β€” Finishing :

Finishing :

Sew Eyes, Ears and Nose to Hat as shown in picture. With 2 strands of B, embroider mouth with straight stitch as shown in picture.

Assembly Instructions

  • Sew Eyes, Ears and Nose to Hat as shown in picture, centering facial pieces on the lower contrast band for balanced placement.
  • Join Inner Ear and Outer Ear by placing WS together and slip stitching through both layers, then finish with the 1st row working through both thicknesses to form the ear edge.
  • Position joined Ears on top of hat and sew securely through the outer ear seam to the hat, ensuring symmetrical spacing and angle before final stitches are made.
  • Embroider mouth using two strands of Contrast B with straight stitches; use the photo as a guide for length and placement of the mouth.
  • Fasten off and weave in all ends neatly on the wrong side to prevent unraveling and to maintain a clean finish.

Important Notes

  • πŸ’‘Use stitch counts at the end of each round to ensure increases were done correctly and the hat maintains a round shape.
  • πŸ’‘Join contrasting colors exactly at the end of the stated round to keep color transitions neat and avoid visible jogs.
  • πŸ’‘Fasten off and break yarn as instructed between MC and A/B to avoid carrying yarn around and creating bulk.

This playful Fox Hat brings cozy style and whimsical charm to chilly days with a soft, comfy fit and cute fox details. Handmade with Caron Simply Soft for a silky, durable finish you'll love to wear and gift. Perfect for kids and a fun, quick make for crafty afternoons. 🧢🦊

You ask,

we answer.

FAQs

What size will the finished piece be?

The sizes fit head circumferences of approximately 17" (43 cm) for 6/12 mos, 18" (45.5 cm) for 18/24 mos, 19" (48 cm) for 4 yrs, and 19.5" (49.5 cm) for 6/8 yrs as indicated in the pattern.

Can I use different yarn weights for this pattern?

Yes, you can substitute yarn weights, but this will affect the final size and gauge; adjust your hook size accordingly and check gauge before continuing.

Do I need prior crochet experience for this pattern?

This pattern is beginner friendly, but familiarity with half double crochet, working in rounds, and basic sewing/assembly will help you achieve the best results.

How long does this project typically take to complete?

Most crocheters complete this hat in 2-4 hours, though time may vary based on experience, size made, and finishing details like sewing ears and embroidering the face.